Advertisement
Advertisement
Table of Contents

Related Manuals for Bissell ADVANCED PRO HEAT PET 2009 Series


Summary of Contents for Bissell ADVANCED PRO HEAT PET 2009 Series
- Page 1 2009 SERIES...
-
Page 2: Important Safety Instructions
Spares may be obtained from persons in order to avoid a hazard. your BISSELL supplier. If for any reason the plug is cut » Do not run appliance over cable. off, it must be disposed of, as it is an electric shock »... - Page 3 Thanks for buying a BISSELL deep cleaner Safety Instructions... 2 We’re glad you purchased a BISSELL deep cleaner. Everything we know Product View....4...
-
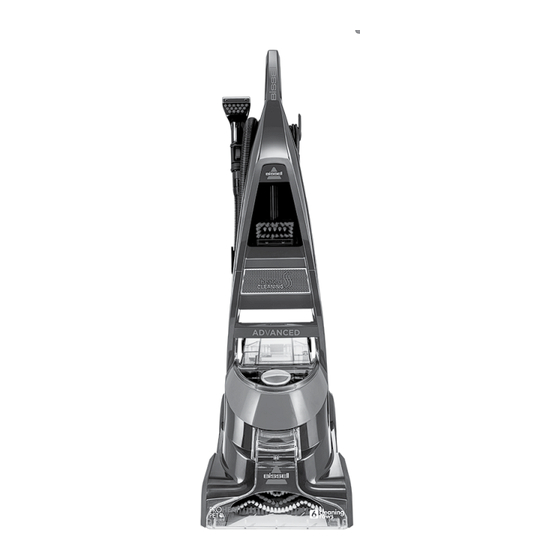
Page 4: Product View
3 Upper Handle 10 Belt Access Door 16 2-in-1 Water Tank 4 Power Cord (underside of machine) 17 Power Pedal (red pedal) 5 Carry Handle 11 Cord Clip 18 Recline Pedal 6 Ready Tools™ Dial 12 Quick Release™ Cord Wrap www.BISSELL.com... - Page 5 5. Wrap cord around lower and upper hose/cord racks and secure plug to cord with clip on plug. 6. Attach cleaning tools as necessary to storage locations on front of cleaner, bottom hose/cord warp and end of hose grip. Deep cleaner assembly is now complete. www.BISSELL.com...
- Page 6 Operations Cleaning Fluid WARNING Keep plenty of genuine BISSELL 2X formula on hand so you can clean and protect whenever To reduce the risk of fire and electric shock due to internal it fits your schedule. Always use genuine component damage, use only BISSELL cleaning fluids BISSELL deep cleaning formulas.
- Page 7 The Heatwave To reduce the risk of fire, use only BISSELL deep cleaning Technology automatically turns on when you formula for full size machines in your deep cleaner. Use turn the machine on.
- Page 8 To reduce the risk of fire and electric shock due to internal component damage, use only BISSELL cleaning fluids Filling the 2-in-1 water tank intended for use with the deep cleaner. Non-BISSELL 1. Remove tank from base of machine by lifting cleaning solutions may harm the machine and may void tank carry handle.
- Page 9 4. Plan activities to give upholstery time to dry. Manufacturer’s tag 5. Vacuum thoroughly to pick up loose debris and pet hair. Use a vacuum with a brush attachment and a crevice tool to clean in fabric folds and tufts. www.BISSELL.com...
- Page 10 Turn dial about 10 times clockwise and 10 more times counter clockwise. This should free up any debris. 17. Wipe diverter assembly with a soft cloth and replace back on machine. Replace nozzle. 18. Return ReadyTools dial to FLOOR CLEANING setting. www.BISSELL.com...
- Page 11 FLAT CREVICE NOSE 6. Continue to clean the area until no more dirt can be removed. 7. After use, tool can be easily cleaned by removing the front faceplate. Rinse out tool before storing. www.BISSELL.com...
-
Page 12: Maintenance And Care
11 and 12. 8. Wipe machine’s exterior with a soft cloth. 9. After carpet is dry, you may wish to vacuum again to remove any leftover hair and fuzz the deep cleaner may have brought to the carpet surface. www.BISSELL.com... - Page 13 Replace screws. 11. Replace screw on guard wire. NOTE: Do not over tighten screws. If you have any questions or are having trouble removing, replacing or reinstalling your brush belt or brush, please call BISSELL Consumer Care. www.BISSELL.com...
- Page 14 Replace screws. 11. Replace screw on guard wire. NOTE: Do not over tighten screws. If you have any questions or are having trouble removing, replacing or reinstalling your brush belt, please call BISSELL Consumer Care. www.BISSELL.com...
-
Page 15: Troubleshooting
Clean out lint screen, refer to page 9. Please do Other maintenance or service not included in the manual should not return be performed by an authorized service representative. this product Thank you for selecting a BISSELL product. to the store. www.BISSELL.com... -
Page 16: Consumer Care
NOT EXCEED THE PURCHASE PRICE OF THE PRODUCT. questions regarding what it may cover, please contact BISSELL BISSELL DOES NOT EXCLUDE OR LIMIT IN ANY WAY ITS LIABILITY FOR Consumer Care or contact your local distributor. (A) DEATH OR PERSONAL INJURY CAUSED BY OUR NEGLIGENCE OR THE This Guarantee is given to the original purchaser of the product from NEGLIGENCE OF OUR EMPLOYEES, AGENTS OR SUBCONTRACTORS;...
Need help?
Do you have a question about the ADVANCED PRO HEAT PET 2009 Series and is the answer not in the manual?
Questions and answers