
Related Manuals for RANAR RedStar Series

Summary of Contents for RANAR RedStar Series
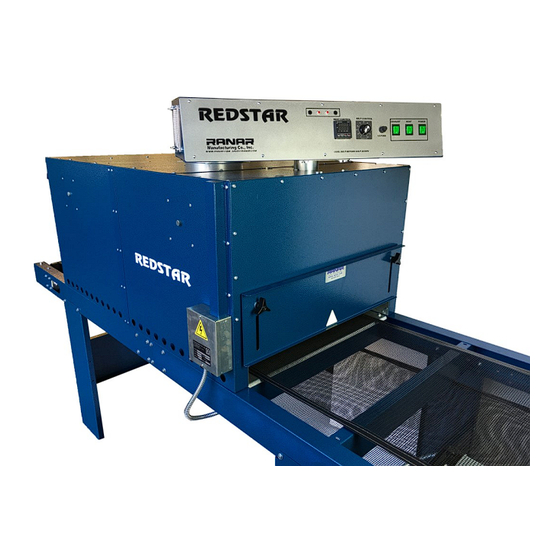
- Page 1 Infrared & Jet Air Conveyor Dryer Manual Manufactured by: Ranar RedStar & Turbo Jet-Star Series...
-
Page 2: Warranty
1 year for electrical parts. WARRANTY IS NON TRANSFERABLE. This is parts only, warranty labor not included. Parts must be returned to Ranar for inspection at customer’s expense. Ranar covers shipping within the continental USA. UPS Ground service only, expe- dited service available at customer’s expense. -
Page 3: Safety Information
Safety Information INSTALLING, OPERATING AND SERVICING RANAR HEATING DRYING EQUIPMENT Please read all information before operation • Keep children and pets away from the Dryer when in use. • • • • Keep flammables such as paint and solvents away from dryer. - Page 4 2. Ranar Conveyor drying system is intended for the curing of non-flammable inks on screen printed materials. Do not use for any other purpose unless authorized by Ranar MFG. Use of this equipment for any other purpose can be dangerous and may cause damage to this equipment, voiding the war- ranty.
- Page 5 ASSEMBLY Your conveyor dryer is partially or fully assembled at the factory. Occasionally, only minor assembly must be completed in order for your dryer to operate properly. Hardware provided LEG BOLTS – Assembles legs and attaches to conveyor 20 - ¼-20 Kep Nuts 20 –...
- Page 6 Step 1 Identify all the parts of your unit. Four (4) legs, two (2) braces, two (2) conveyor frames, two (2) deck joiners, one (1) galvanized deck, one (1) belt, one (1) oven hood, etc. Special parts for custom dryers not listed, please look for and identify these before continuing.
- Page 7 Step 3a Install casters. (Optional) If requested, add casters to the unit now. Assemble the caster frame first and then mount caster frames onto the legs of the unit. Set casters to locked position before turning unit over. Step 4 Install Galvanized Deck. Turn the conveyor over and set it upright on its legs. Set the galvanized deck in place and bolt down using hardware provided.
- Page 8 Step 5 Install oven hood. Place the oven hood on top of the conveyor deck and bolt into place. Jetstar and Redstar models have through holes to insert bolts and washers from the top and nuts from the bottom. Hardware needed: 4 ¼-20 x 1.0 bolts 4 kep nuts 4 flat washers...
-
Page 10: Start-Up Procedure
START-UP PROCEDURE 1. Turn on Power Switch 2. Turn on Belt Speed Control. By turning the dial clock wise the belt will start moving. (See chart for belt speed setting in ft. per minute) 3. Set heat panel height using the levers located on side of the oven section. The height should be set to 4 inches off the belt as a starting point. -
Page 11: Description Of Controls
DESCRIPTION OF CONTROLS 1. MAIN POWER SWITCH – 240V Turns on power to dryer controls and activates process temperature display 2. BELT CONROL – 120V Regulates belt speed from 0-25 fpm. Markings on belt control are for reference only and do not repre- sent actual speed. - Page 12 3. Once the SV is set, you should notice the PV temperature increasing or decreasing depending on what the previous setting was. 4. The temperature is in either °F or °C, whichever the light is next to. To change, please contact Ranar Manufacturing Co., Inc. for instructions.
- Page 14 CONVEYOR BELT INSTALLATION AND START-UP PROCEDURE ***PLEASE NOTE*** BELT TRACKING IS THE RESPONSIBILITY OF THE OPERATOR. ANY DAMAGE CAUSED BY OVER TIGHTENING, INCORRECT BELT TRACKING OR MISUSE IS NOT COVERED UNDER WARRANTY. 1. Inspect the belt prior to installation for damage which can occur in transit or handling. 2.
- Page 15 Stand at the adjustable roller facing the unit. • If your belt moves towards your right, then adjust the right side out, or left side in. • If your belt moves towards your left, then adjust the left side out, or right side in.
- Page 17 Recommended Set up to Cure Plastisol Inks • Maximum productions settings: Set heater panel temperature to 1100 degrees Fahrenheit. Set belt speed to 20 on the dial. Set panel height to 4 inches from the belt. Run curing test on shirt. •...
-
Page 18: Heater Setting
Drying Water-Based & Discharge Inks Drying water-based pigment inks is different from plastisol as you need hot air and heat. There is no set temperature to reach it’s the time the shirt is in the drying tunnel. The turbo star combination of radiant heat and Jet-air fans to dry base pigment ink. Which is hot air re- circulated onto the conveyor belt and an exhaust fan to remove moisture from the dryer. -
Page 19: Dryer Maintenance
DRYER MAINTENANCE CONVEYOR BELT Check frequently for rips, wear and tear – especially at the edges – and look carefully for problems with the tracking. Be sure to track belt to center of rollers. Failure to track correctly will damage the edges when it runs to the edge of the rollers.
Need help?
Do you have a question about the RedStar Series and is the answer not in the manual?
Questions and answers
whats the amperes of Infrared & jet Air Convejor Dryer D 2424
whats the amperes of this mach infrared & jet air conveyor dryer