Philips NORELCO 5000 Series Manual
Tripleheader shaver
Hide thumbs
Also See for NORELCO 5000 Series:
- User manual ,
- Manual (54 pages) ,
- Frequently asked questions manual (8 pages)
Table of Contents
Advertisement
Available languages
Available languages
Advertisement
Chapters
Table of Contents

Related Manuals for Philips NORELCO 5000 Series


Summary of Contents for Philips NORELCO 5000 Series
- Page 1 S5675 Tripleheader shaver...
- Page 4 empty page before TOC...
- Page 5 English 6 Español 25...
-
Page 6: Table Of Contents
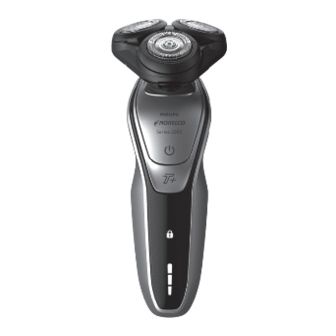
English Contents General description (Fig. 1)_______________________________________ Introduction_______________________________________________________ The display________________________________________________________ Charging___________________________________________________________ Using the shaver__________________________________________________ Using click-on attachments______________________________________ Travel lock_________________________________________________________ Cleaning and maintenance_______________________________________ Replacement______________________________________________________ Storage____________________________________________________________ Accessories_______________________________________________________ Assistance_________________________________________________________ Disposal___________________________________________________________ Full Two-Year Warranty__________________________________________ 45-DAY MONEY-BACK GUARANTEE____________________________ General description (Fig. 1) SmartClick precision trimmer attachment 2 Shaving unit with hair chamber 3 Shaving head holder release button 4 On/off button... -
Page 7: Introduction
English Introduction Congratulations on your purchase and welcome to Philips Norelco! To fully benefit from the support that Philips Norelco offers, register your product at www.norelco.com/register. The display Battery charge indicator Quick charge: When the battery is empty and you... - Page 8 English Battery low When the battery is almost empty, the bottom light of the battery charge indicator flashes orange. Remaining battery charge The remaining battery capacity is indicated by the lights of the battery charge indicator that light up continuously. ’Unplug for use’...
-
Page 9: Charging
English Travel lock You can lock the shaver when you are going to travel. The travel lock prevents the shaver from being switched on by accident (see 'Activating the travel lock'). Replacing shaving heads For maximum shaving performance, replace the shaving heads every year. -
Page 10: Using The Shaver
English - The power plug transforms 100-240V AC to less than 24V DC. Charge the shaver before you use it for the first time and when the display indicates that the battery is almost empty. Charging takes approx. 1 hour. A fully charged shaver has a shaving time of up to 60 minutes. - Page 11 - Use your new shaver exclusively for 3 weeks to fully enjoy the closeness of a Philips Norelco shave. - At first you may not get as close a shave as you expect, or your face may even become slightly irritated.
- Page 12 English Switching the shaver on and off 1 To switch the shaver on or off, press the on/off button once. The display lights up for a few seconds to show the remaining battery status. Shaving - For the best results on skin comfort, pre-trim your beard if you have not shaved for 3 days or longer.
- Page 13 English 2 Apply shaving foam or shaving gel to your skin. 3 Rinse the shaving unit under the tap to ensure that the shaving unit glides smoothly over your skin. 4 Switch on the shaver. 5 Move the shaving heads over your skin in circular movements to catch all hairs growing in different directions.
-
Page 14: Using Click-On Attachments
English 3 Stretch your skin with your free hand so blades can lift and cut whiskers. Gently press shaver to skin so the floating heads can follow the contours of your face. Note: Do not press too hard. Too much pressure can pinch the skin into the combs. -
Page 15: Travel Lock
English 3 Hold the trimmer perpendicular to the skin and move it downwards while exerting gentle pressure. 4 Switch off and clean the trimmer after use. Travel lock You can lock the shaver when you are going to travel to prevent it from turning on accidentally. Activating the travel lock 1 Press the on/off button for 3 seconds to enter the travel lock mode. -
Page 16: Cleaning And Maintenance
English Cleaning and maintenance Regular cleaning guarantees better shaving results. Never clean, remove or replace the shaving unit while the shaver is switched on. Do not apply pressure to shaving head combs. Do not touch shaving heads with hard objects as this may dent or damage the precision- made slotted combs. - Page 17 English 3 Switch off the appliance. Press the release button to open the shaving unit. 4 Rinse the hair chamber under the tap. 5 Rinse the shaving head holder under a warm tap. 6 Carefully shake off excess water and let the shaving head holder air-dry completely.
-
Page 18: Replacement
For maximum shaving performance, replace the shaving heads once a year. Replace damaged shaving heads immediately. Always replace the shaving heads with original Philips Norelco shaving heads only (see 'Accessories'). Replacement reminder The replacement reminder indicates that the shaving heads need to be replaced.The shaving unit symbol lights up when you switch the shaver off. - Page 19 English 4 Turn the retaining rings counterclockwise and remove them. Place them aside in a safe place. 5 Remove the shaving heads from the shaving head holder. Discard the used shaving heads immediately to avoid mixing them with the new shaving heads. 6 Place the new shaving heads in the shaving head holder.
- Page 20 English - Each retaining ring has two recesses and two projections that fit exactly in the projections and recesses of the shaving head holder. - Turn the ring clockwise until your hear click and the ring is fixed. Note: Hold the shaving head holder in your hand when you reinsert the shaving heads and reattach the retaining rings.
-
Page 21: Storage
The following accessories are available: - SH50 Philips Norelco shaving heads - RQ111 Philips Norelco SmartClick beard styler Assistance For assistance, visit our website: www.philips.com/support or call toll free 1-800-243-3050. -
Page 22: Full Two-Year Warranty
Full Two-Year Warranty Philips North America LLC warrants this new product (except cutters and combs) against defects in materials or workmanship for a period of two years from the date of purchase, and agrees to repair or replace any defective product without charge. -
Page 23: 45-Day Money-Back Guarantee
*Read enclosed instructions carefully. 45-DAY MONEY-BACK GUARANTEE To enjoy the closest and most comfortable shave from your new Philips Norelco Men’s Shaver, the shaver should be used exclusively for 3 weeks. This allows your hair and skin enough time to adapt to the Philips Norelco Shaving System. - Page 24 English To obtain money-back guarantee return authorization form, call 1-800-243-3050 for assistance. Delivery of refund check will occur 6–8 weeks after receipt of returned product.
-
Page 25: Instrucciones Importantes De
Español INSTRUCCIONES IMPORTANTES DE SEGURIDAD Cuando utilice un producto eléctrico, siempre debe seguir las precauciones básicas, incluidas las siguientes: Lea todas las instrucciones antes de usar este producto. PELIGRO Para reducir el riesgo de descarga eléctrica: - No intente recoger un producto con cable que haya caído al agua. - Page 26 - Use este producto para su uso previsto en el hogar, según se describe en este manual. No use accesorios que no estén recomendados por la Corporación Philips North America LLC. - Nunca emplee este producto si el cable eléctrico o el enchufe de carga están dañados, si no funciona correctamente, si se cayó, si está...
-
Page 27: Conserve Estas Instrucciones
Español - Siempre conecte la clavija al producto primero y, luego, al tomacorriente. Asegúrese de que el enchufe esté insertado firmemente en la afeitadora hasta la marca indicada en el enchufe. Para desconectar, apague la afeitadora y luego desconecte el cable de alimentación de la toma de corriente. -
Page 28: Descripción General (Fig. 1)
9 Sistema de bloqueo de viaje 10 Recordatorio de reemplazo 11 Recordatorio de limpieza 12 Enchufe pequeño 13 Cable de alimentación 14 Funda Introducción ¡Felicitaciones por su compra y bienvenido a Philips Norelco! Para beneficiarse completamente del soporte que ofrece Philips Norelco, registre el producto en www.norelco.com/register. -
Page 29: La Pantalla
Español La pantalla Carga Carga rápida Cuando la batería está agotada y conecta la afeitadora a un enchufe eléctrico, las luces del indicador de carga de la batería se iluminan en blanco una después de la otra repetidamente. Cuando la batería tiene suficiente energía para un afeitado, la luz inferior de carga de la batería comienza a destellar en blanco lentamente. - Page 30 Español Batería baja Cuando la batería está casi agotada, la luz inferior del indicador de carga de la batería destella en color naranja. Carga de batería disponible La carga disponible de la batería está indicada por las luces del indicador de carga de la batería que se iluminan continuamente.
-
Page 31: Carga
Español Bloqueo para viajes Puede bloquear la afeitadora cuando viaje. El bloqueo de viaje previene que la afeitadora se encienda por accidente (see 'Activación del sistema de bloqueo'). Reemplazo de los cabezales de afeitado Para un rendimiento de afeitado óptimo, le aconsejamos que reemplace los cabezales de afeitado cada año. -
Page 32: Uso De La Afeitadora
Español - El conector de alimentación transforma la CA de 100-240 V a menos de 24 V de CC. Cargue la afeitadora antes de usarla por primera vez y cuando la pantalla indique que la batería está casi agotada. La carga toma, aproximadamente, 1 hora. Una afeitadora completamente cargada otorga un tiempo de afeitado de hasta 60 minutos. - Page 33 Philips Norelco. - Si después de 21 días todavía no está satisfecho con los resultados, Philips Norelco le reembolsará el precio total de la compra, siempre que la solicitud de reembolso se reciba...
- Page 34 Español Encendido y apagado de la afeitadora 1 Para encender o apagar la afeitadora, presione el botón de encendido/apagado una vez. La pantalla se ilumina durante algunos segundos para mostrar el estado de la batería disponible. Afeitado Para obtener los mejores resultados de confort sobre la piel, recorte su barba si no se ha afeitado durante 3 días o más.
- Page 35 Español 1 Humedezca la piel. 2 Aplique espuma o gel de afeitar sobre la piel. 3 Enjuague la unidad de afeitado con el agua de la llave para garantizar que se deslice suavemente sobre su piel. 4 Encienda la afeitadora. 5 Mueva los cabezales de afeitado sobre la piel con movimientos circulares para llegar a todos los vellos en las diferentes direcciones de...
-
Page 36: Uso De Los Accesorios De Ajuste De Clic
Español Ajuste Turbo+ 1 Encienda la afeitadora. 2 Presione el botón Turbo+ una vez si desea afeitar áreas densas más rápido. Nota: El botón Turbo+ destella de manera irregular para indicar que el ajuste Turbo+ está activado. 3 Estire bien la piel con su mano libre de manera que las navajas puedan elevar y cortar lo barba. -
Page 37: Bloqueo Para Viajes
Español Uso del accesorio de precisión de la cortadora Puede usar la cortadora de precisión para retocar la barba, el bigote y las patillas. 1 Ajuste la cortadora a la afeitadora ("clic"). 2 Encienda la afeitadora. 3 Sostenga la cortadora perpendicular a la piel y muévala hacia abajo ejerciendo una presión suave. - Page 38 Español Desactivación del bloqueo de viaje 1 Pulse el botón de encendido/apagado durante 3 segundos. Cuando desactiva el bloqueo de viaje las indicaciones en la pantalla se iluminan brevemente. Cuando se desactiva el bloqueo de viaje, el símbolo de bloqueo de viaje destella y se apaga.
- Page 39 Español Limpieza de la afeitadora bajo la llave de agua. Limpie la afeitadora después de cada uso para un óptimo rendimiento (see 'Limpieza y mantenimiento'). Tenga cuidado con el agua caliente. Revise siempre si el agua no está muy caliente, para evitar quemarse las manos.
- Page 40 Español 5 Enjuague el sostenedor del cabezal de afeitado con agua caliente de la llave. 6 Elimine cuidadosamente el exceso de agua y deje que el soporte del cabezal de afeitado se seque al aire completamente. 7 Cierre el sostenedor del cabezal ("clic") Limpieza del accesorio de precisión de la cortadora Nunca seque los dientes de la cortadora con una toalla o paño, ya que esto puede dañar el...
- Page 41 Español Siempre reemplace los cabezales de afeitado con cabezales originales de Philips Norelco solamente (see 'Accesorios'). Recordatorio de reemplazo El recordatorio de reemplazo indica que los cabezales de afeitado tienen que ser reemplazados. El símbolo de la unidad de afeitado se ilumina cuando la afeitadora está...
- Page 42 Español 6 Coloque los cabezales de afeitado nuevos en el soporte del cabezal de afeitado. Nota: Asegúrese de que los salientes de los cabezales de afeitado encajen exactamente en las ranuras del sostenedor del cabezal de afeitado. 7 Coloque los anillos de retención de nuevo en el cabezal de afeitado y gírelos hacia la derecha ("clic").
- Page 43 Español Nota: Tome el sostenedor del cabezal de afeitado en su mano cuando vuelva a insertar los cabezales de afeitado y vuelva ajustar los anillos de retención. No coloque el soporte del cabezal de afeitado sobre una superficie, ya que esto pueden dañar los cabezales de afeitado.
- Page 44 Están disponibles los siguientes accesorios: - Cabezales de afeitado Philips Norelco SH50 - Recortadora de barba SmartClick de Philips Norelco RQ111 Asistencia Para asistencia, visite nuestro sitio web: www.philips.com/support o llame al número...
- Page 45 NINGUNA RESPONSABILIDAD ES ASUMIDA POR CUALQUIER DAÑO, INCIDENTAL O RESULTANTE. Para obtener el servicio de garantía, simplemente vaya a www.philips.com/support para obtener asistencia. Para su protección, se sugiere que el envío de las devoluciones del producto se realice por correo certificado, con seguro prepago.
- Page 46 El paquete del producto debe contar con matasellos que no supere los 45 días a partir de la fecha de compra. Philips se reserva el derecho a verificar el precio de compra del producto y limita los reembolsos al precio de venta minorista sugerido.
- Page 47 Español La entrega del cheque de reembolso ocurrirá de 6 a 8 semanas después de la recepción del producto devuelto.
- Page 51 Empty page before back cover...
- Page 52 P.O. Box 10313, Stamford, CT 06904 This symbol on the product’s nameplate means it is listed by Underwriters’ Laboratories, Inc. Norelco and Tripleheader are registered trademarks of Philips North America LLC. PHILIPS and Philips shield are registered trademarks of Koninklijke Philips N.V.
Need help?
Do you have a question about the NORELCO 5000 Series and is the answer not in the manual?
Questions and answers
Norelco 5000 shaver. the inserts that go into the retaining rings: Should I face the little prongs up towards me or down onto the blade. I **** trying to assemble this for my husband. Thank you
Each retaining ring has two recesses that fit exactly into the projections of the shaving head holder. Turn the ring clockwise until you hear a click, indicating that the ring is fixed.
This answer is automatically generated
Norelco 5000 shaver. the inserts that go into the retaining rings: Should I face the little prongs up towards me or down onto the blade. I **** trying to assemble this for my husband. Thank you
Each retaining ring has two recesses that fit exactly into the projections of the shaving head holder. Turn the ring clockwise until you hear a click to indicate that the ring is fixed.
This answer is automatically generated