
Related Manuals for Living & Co TWL413


Summary of Contents for Living & Co TWL413
- Page 1 livingQco. Top Mount Fridge 413L INSTRUCTION MANUAL MODEL: AFTER SALES SUPPORT 0800 422 274...
-
Page 3: Table Of Contents
Contents Page 1. Safety Instructions 2. Product Overview 3. Getting Started 4. Operating Instructions 5. FAQs & Troubleshooting Guide 6. Other Useful Information 7. Warranty living8co. AFTER SALES SUPPORT 0800 422 274... -
Page 4: Safety Instructions
1. Safety Instructions IMPORTANT SAFETY INSTRUCTIONS READ CAREFULLY AND KEEP FOR FUTURE REFERENCE Read this manual thoroughly before first use, even if you are familiar with this type of product. The safety precautions detailed will reduce the risk of fire, electric shock and injury when correctly adhered to. - Page 5 To reduce the risk of fire, electric shock or injury, always follow basic safety precautions and accident prevention measures when using this appliance, including the following: 1.1 Electrical Safety • Voltage: Plug the appliance into a 220-240V, 50Hz, properly earthed power outlet, which must be in good working order.
- Page 6 1.3 Cleaning and Maintenance • Disconnect: Switch off and unplug the appliance from the mains socket before cleaning, maintenance or servicing. Failure to do so can result in electric shock, injury or death. Do not connect or disconnect the plug when your hands are wet. •...
- Page 7 1.5 Water dispenser safety • Water: Only fill the water dispenser with potable (drinking) or purified water. Do not use the dispenser for hot water, soft drinks, fruit juice, etc. • Refilling: Ensure that the water tank is installed on the door before refilling. Do not remove the water tank from the door for refilling.
-
Page 8: Product Overview
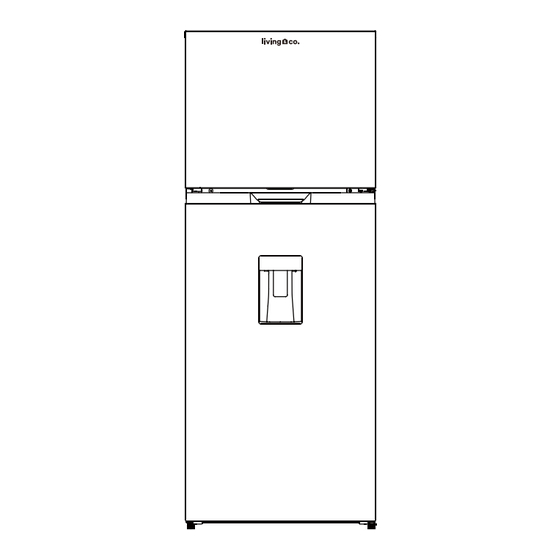
2. Product Overview Covered crisper box Freezer shelf Leveling feet Freezer temperature control knob Fridge door shelves Chiller zone (fresh converter box) Freezer temperature control knob Water dispenser storage container Refrigerator shelves Freezer door shelves NOTE: Due to continued product improvement, images and illustrations in this manual may vary slightly from the product purchased. -
Page 9: Getting Started
3. Getting Started 3.1 Unpacking • Packaging materials: This product has been packaged to protect it against transportation damage. Remove all packaging materials from around and inside the appliance and keep the original packaging carton and materials in a safe place. It will help prevent any damage if the product needs to be transported in the future, and you can use it to store the appliance when it is not in use. - Page 10 3. Getting Started (Continued) 3.3 Space Requirements Fig. 1 • Door opening: Place the unit so there is enough space for the door to open easily (Fig. 1). • Clearances: Ensure that air can circulate freely around the back of the cabinet, which is necessary to cool the compressor and condenser.
-
Page 11: Operating Instructions
4. Operating Instructions 4.1 Temperature control • This appliance has two separate temperature controls, one (a dial control) in the freezer (for the freezer compartment) and one on the outer freezer door (electronic display) so you can adjust the temperature in each compartment separately according to the food stored. - Page 12 4. Operating Instructions (continued) 4.3 Fridge temperature The fridge temperature is selectable by using the electronic control panel on the outside of the freezer door. (Fig. 5). Fig. 5 1: Express Cooling Mode indicator 2: Keypad locked indicator 3: Set temperature display indicators A: Fridge temperature select button B: Express cooling mode / Keypad lock button •...
- Page 13 4. Operating Instructions (continued) 4.4 Water Dispenser Fig. 6 The refrigerator is equipped with a water dispenser located in the door (Fig. 6), which allows for convenient access to chilled water at the touch of a button. Cleaning the Water Dispenser Before using the water dispenser for the first time, remove and clean the water tank.
- Page 14 4. Operating Instructions (continued) Filling the Water Dispenser • Open the small lid on the tank top (Fig. 9). • Carefully fill the water tank with clean, drinkable water up to the 3.5 L mark. • Close the lid securely. NOTE: •...
- Page 15 4. Operating Instructions (continued) 4.5 Fresh food storage Fig. 10 The fridge compartment is suitable for short-term storage of all your fresh food. The temperature inside the fridge compartment varies depending on the amount of food stored and the frequency of door opening. It is low enough to limit some bacterial growth, but it is not suitable for long-term storage of perishable foods.
- Page 16 Operating Instructions (Continued) 4.6 The freezer compartment The freezer compartment, located at the top of the appliance, is equipped with a glass shelf and two dor shelves for convenient access and organised storage. It is designed to operate in ambient (surrounding air) temperatures between 16°C and 43°C and is suitable for freezing domestic quantities of fresh food and long-term storage (up to three months) of frozen food.
- Page 17 4. Operating Instructions (continued) 4.7 Energy saving tips • Locate the appliance in the coolest area of the room, away from heat-producing appliances and out of direct sunlight. • Let hot foods cool to room temperature before placing them in the fridge or freezer. Overloading the freezer forces the compressor to run longer.
-
Page 18: Faqs & Troubleshooting Guide
5. FAQs & Troubleshooting Guide If you experience a problem with your appliance, check in the following table for solutions to help you solve the problem before you call customer service. Problem Possible cause The appliance does not • It is not plugged in. Ensure it is correctly plugged operate. - Page 19 5. FAQs & Troubleshooting Guide (Continued) • Reset the temperature to a colder setting. Food is not frozen • Make sure the door is only opened for as long as is enough necessary. Do not keep it open for an extended period.
-
Page 20: Other Useful Information
6. Other Useful Information WARNING! To reduce the risk of electric shock or injury, always switch off the appliance and disconnect it from the power supply before cleaning or maintenance. 6.1 Cleaning the appliance • For hygienic reasons the appliance interior surfaces and accessories should be cleaned regularly. - Page 21 6. Other Useful Information (Continued) 6.3 Door reversal This appliance has the capability of opening the door from either the left or right side. If your set-up requires changing the opening direction, proceed as follow: IMPORTANT! You will need: • Make sure you have someone there to help you, do not try to do this on your own. •...
- Page 22 Door reversal (continued) Close the freezer door and unscrew the top hinge covers using a Phillips head screwdriver, Take off the hinge covers (Fig. 6). Disconnect the electrical cable and connectors (lift the plastic tab on the connector body to allow release of the connectors). Using a Phillips head screwdriver, unscrew the fridge door by removing the middle hinge, then take off the lower door (Fig.
- Page 23 Door reversal (continued) Fig. 10 6. Tilting the fridge, remove the levelling feet and unscrew the lower hinge. (Fig. 10). 7. Unscrew and remove the bottom hinge pin, turn the bracket over and replace it. (Fig. 11A / 11B). Fig. 11A Fig.
- Page 24 Door reversal (continued) 10. Reverse the direction of the middle hinge by 180 degrees, then transfer it to the left side. Affix the middle hinge pin in the upper hole of the lower door, then tighten the screws (Fig. 14). 11.
- Page 25 6. Other Useful Information (Continued) 6.5 Service and repair Do not attempt to alter or modify this appliance in any way. Do not attempt to repair or replace any part of the appliance unless it is specifically recommended in this manual. All other servicing should be referred to a qualified technician and only genuine spare parts must be used.
-
Page 26: Warranty
7. Warranty Read the manual. It will help you get the STOP best out of your product. BEFORE RETURNING Still have questions? TO STORE Call After Sales Support 0800 422 274 living8co. Warranty We pride ourselves on producing a range of quality products that are both packed with features and completely reliable. - Page 28 CKLCO- 01...
Need help?
Do you have a question about the TWL413 and is the answer not in the manual?
Questions and answers