Advertisement
Quick Links
Advertisement

Related Manuals for SainSmart CREALITY Rotary Kit Pro

Summary of Contents for SainSmart CREALITY Rotary Kit Pro
- Page 1 V2.0 旋转套件专业版 快速使用指南 Rotary Kit Pro Quick Guide SHENZHEN CREALITY 3D TECHNOLOGY CO.,LTD.
- Page 2 尊敬的用户: 感谢您选择创想三维的产品。为了您使用方便,请您在使用之前仔细阅 读快速使用指南,并严格按照快速使用指南的指示进行操作。 创想三维团队时刻准备为您提供优质的服务。如果您在使用过程中遇到 问题,请按照快速使用指南结尾所提供的电话、邮箱与我们进行联系。为了 您能够更好地体验我们的产品,您可以登陆创想三维官网 (www.cx- sw3d.com) 寻找相关软硬件、设备操作、设备保养、联系方式等信息。 Dear Users: Thank you for choosing Creality. For your convenience, please read this user manual carefully before use, and follow the instructions in the user manual. The Creality team is always here to provide you with quality services.
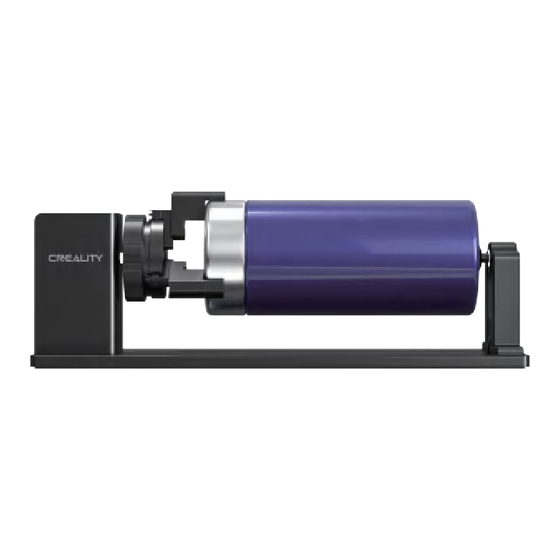
- Page 3 产品简介 Product Overview 机架手拧螺丝 Rack Hand-Twisted Screws 张紧器 Tensioner 支撑模块 Support Module 外爪 Outer Claw...
- Page 4 零部件清单 Parts List 旋转套件 *1 Rotary kit*1 六角螺柱 *3 软尺 *1 Hex Stud *3 Ruler*1 M4 内六角扳手 *1 连接线 *1 M4 Allen Wrench*1 Connection cable*1 M4*8 螺丝 *4 快速使用指南 *1 M4*8 Screw*4 Quick Guide*1...
- Page 5 组装说明 Assembly Instructions 1. 安装外爪 (默认已安装为外夹型, 可根据需要改为内撑型或六角螺柱型) 。 1. Install the outer jaws (It clamps from the outside by default, which can be changed to prop up from the inner side or install hex stud according to the needs). 外夹型 Clamp from the outside 内撑型...
- Page 6 六角螺柱型 Hex Stud 外夹型 直径为 1-110mm 的圆柱形物体 Clamp from the outside Cylindrical objects with an diameter of 1-110mm 内撑型 直径为 25-75mm 的圆柱形物体 Prop up from the inner side Cylindrical objects with an diameter of 25-75mm 直径为 10-130mm 的球体或 直径为 15-100mm 的戒指、手镯等圆环型物体 六角螺柱型...
- Page 7 备注 Notes 外爪分为外夹型与内撑型, 外夹型适用于固定外表面光滑平整的物体;当外夹型外爪不能很 好地夹持物体时, 可尝试使用内撑型外爪固定。 The outer jaw has two types: outer-clamp and inner-support. The outer-clamp is suitable for holding objects with smooth and flat surfaces. When the outer-clam jaws cannot hold the object well, you can try to use inner-support jaws.
- Page 8 3. 旋转张紧器,初步固定雕刻物,根据需要安装支撑模块:一只手扶着旋 转套件,另一只手将支撑模块向内推,直至支撑模块的托盘紧压雕刻物,然 后顺时针拧紧支撑模块上的手拧螺丝,再次轻微旋转张紧器,确保雕刻物已 被固定。 3. Rotate the tensioner to fix the engraved object. Install the support module as needed: hold the rotary chuck kit with one hand, push the support module inward with the other hand until the tray of the support module presses tightly against the engraving object, and then tighten the hand-twisted screw of the support module clockwise.
- Page 9 5. 安装增高柱(可根据实际需要安装多个增高柱)。 5. Install raiser stands (Multiple raiser stands can be installed according to actual needs).
- Page 10 6. 使用连接线连接机器的Y轴电机线与卡盘套件。 6. Connect the Y-axis motor cable and the rotary chuck module with the connecting cable. 7.确保旋转套件平行于机器工作 区域(可使用包装盒辅助调整卡 包装盒 盘位置)。 Pack 7. Make sure the rotary kit is parallel to the working area of the machine(Pack can be used to adjust the position of the chuck).
- Page 11 LightBurn 相关设置 LightBurn Settings 1. 添加“Enable Rotary”到主界面。 (1) 点击菜单栏中的“Settings”按钮; (2) 开启“Show rotary enable on main window”选项; (3) 点击“OK”; 1. Add "Enable Rotary" to the main window. (1) Click the "Settings" button in the menu; (2) Open "Show rotary enable on main window"; (3) Click "OK";...
- Page 12 2. 在旋转设置窗口中设置正确的参数: (1) 打开“Rotary Setup”窗口; (2) 设置“Rotary Type”为“Chuck”; (3) 开启“Enable Rotary”; (4) 设置“Rotary Axis”为“Y Axis”; (5) 设置“40 mm per rotation”; (6) 输入雕刻物体的直径 / 周长(可使用附赠的软尺测量) ; 备注:每次更换雕刻物体,都需要更新参数。 (7) 点击 “OK”; 2. Set the parameters in the "Rotary Setup" window: (1) Open the "Rotary Setup" window; (2) Set "Rotary Type"...
- Page 13 雕刻物体参数 Parameters of the engraved object 3. 导入图片。设置尺寸、功率、速度等参数。 3. Import the image. Set the size, power, speed and other parameters.
- Page 14 4. 将激光模组移动到预期位置。 点击“Frame”进行边框预览, 然后点击“Start” 开始工作。 4. Move the laser module to the expected position. Click "Frame" to preview the frame, and then click "Start" to start working. 备注: Position”为开始位置。 建议选择“Current Rotary”选项, 否则会出现异常。 2. 进行平面雕刻时, 请关闭“Enable Notes: 1. It is recommended to start from "Current Position". 2.
Need help?
Do you have a question about the CREALITY Rotary Kit Pro and is the answer not in the manual?
Questions and answers