Advertisement
Table of Contents
- 1 Warranty
- 2 Table of Contents
- 3 General Safety Instructions
- 4 Safe Operation
- 5 Product Diagram
- 6 Assembling the Steam Mop
- 7 Assembling the Handheld Steam Cleaner
- 8 Accessories Kit
- 9 Using the Steam Mop/Cleaner
- 10 Cleaning and Storage
- 11 Technical Specifications
- 12 Trouble Shooting Guide
- 13 Frequently Question & Answer
- 14 Contact Us
- Download this manual
Model: GF-6610/GF-6610B
Install Video
NOTE:
Please use the pure water in the hard water
area.
Please remove the carpet glider before
mopping hard floor.
Gorfanty steam mops were 100% passed
quality test before shipping from factory.
Some pure water may residue after the test.
Any problem & warranty registration please contact
Replacement
Accessories
service@gorfanty.net
1
Advertisement
Table of Contents

Related Manuals for GorFanty GF-6610


Summary of Contents for GorFanty GF-6610
- Page 1 area. Please remove the carpet glider before mopping hard floor. Gorfanty steam mops were 100% passed quality test before shipping from factory. Some pure water may residue after the test. Any problem & warranty registration please contact...
-
Page 2: Warranty
2. Your problem or question (better with pictures or videos). 2 YEAR LIMITED WARRANTY-LEGAL GorFanty warrants to the original purchaser only, that all GorFanty products will provided years warranty from date of purchase, if original purchaser registers the product within 30 days from purchasing. -
Page 3: Table Of Contents
TABLE OF CONTENT WARRANTY ..........................1 GENERAL SAFETY INSTRUCTIONS ...................3 SAFE OPERATION ........................4 PRODUCT DIAGRAM ........................6 ASSEMBLING THE STEAM MOP ....................7 ASSEMBLING THE HANDHELD STEAM CLEANER ..............9 ACCESSORIES KIT ....................10 USING THE STEAM MOP/CLEANER ..................11 CLEANING AND STORAGE ....................... -
Page 4: General Safety Instructions
GENERAL SAFETY INSTRUCTIONS Read this manual thoroughly before first use, even if you are familiar with this type of product. Always follow basic safety precautions and accident prevention measures when using an electrical appliance, including the following: Before turning on the steam mop, ensure your electrical voltage and circuit frequency correspond to those indicated on the appliance rating label. -
Page 5: Safe Operation
We assume no liability for any eventual damages due to improper use or incorrect handling. This appliance is not intended for use by persons (including children) with reduced physical, sensory or mental capabilities, or lack of experience and knowledge, unless they have been given supervision or instruction concerning use of the appliance by a person responsible for their safety. - Page 6 WARNING: Do not use any detergents in the water tank for cleaning, only use water. [ Please use distilled or purified water in hard water area. ] Ensure that all the parts are correctly assembled before operation. Do not use the steam mop without the floor cloth in place.
-
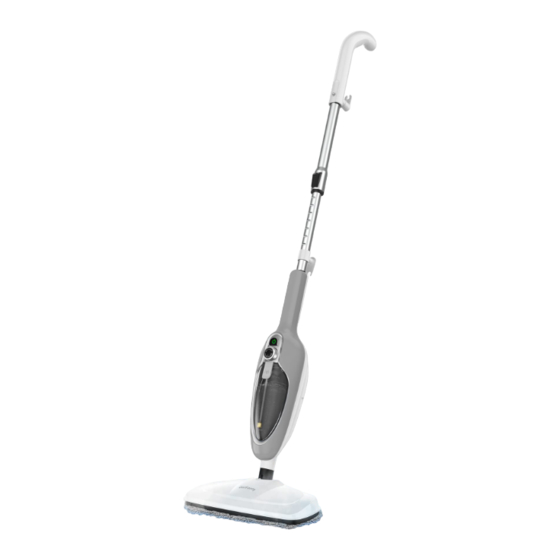
Page 7: Product Diagram
PRODUCT DIAGRAM 22. Self Stand Buckle... -
Page 8: Assembling The Steam Mop
ASSEMBLING THE STEAM MOP 1) Before assembling the steam mop ,please make sure the power switch is in the “OFF” position Connect the part as shown below: Clean Hard Floor Clean Carpet... - Page 9 3) Fit the mop pad over the mop head as shown below: Use on the Floor Use on the Carpet (MUST REMOVE the carpet glider) (Install the carpet glider ) 4) Switch the self-stand mode to flexible mopping mode Holding the mop head and pull the main body back, so that the locking buckle will be detached, and the mop head will be flexible rotating to mop.
-
Page 10: Assembling The Handheld Steam Cleaner
ASSEMBLING THE HANDHELD STEAM CLEANER 1) Before assembling the steam mop ,please make sure the power switch is in the “OFF” position 2) Remove the handle from the main body 3) Choose the appropriate accessory as shown in the Accessories List. Connect the accessory with the adaptor by inserting the tip of adaptor into the opening of the accessory and turning the adaptor clockwise to lock into place. -
Page 11: Accessories Kit
ACCESSORIES KIT... -
Page 12: Using The Steam Mop/Cleaner
USING THE STEAM MOP/CLEANER The easy,environmentally friendly way to clean your floors NO CHEMICALS Thoroughly cleans and sanitizes floor surfaces without any chemicals. NO ELBOW GREASE Easily removes dirt and grime from hard floors or carpets, leaving them hygienically clean without the need for hard physical labour. - Page 13 NOTES: Before you start steam cleaning your floor,make sure: The surfaces that you want to steam clean have been swept or vacuumed. The steam mop is fully assembled. The microfibre cloth sits tightly around the steam head.[Do not use the mop without the microfibre cloth! ] ...
-
Page 14: Cleaning And Storage
CLEANING AND STORAGE ·Always switch off the appliance, disconnect the appliance from the power source, and let it cool thoroughly before cleaning. ·Wipe the exterior of the appliance with damp cloth. ·The accessories can be washed in water with mild detergent. -
Page 15: Trouble Shooting Guide
TROUBLE SHOOTING GUIDE Problem Reason Solution Can Not Turn On Doesn’t plugged in 1.Unplug and then plug it again. /Poor connection 2.Plug the product beside the socket Power switch not turn on Press the power button to ON status Product Damage Stop Using &... -
Page 16: Frequently Question & Answer
CONTACT US Company: Onewin Trade Limited Customer support: service@gorfanty.net Address: 12/F., San Toi Building, 137-139 Connaught Road Central, Hong Kong Made in China...
Need help?
Do you have a question about the GF-6610 and is the answer not in the manual?
Questions and answers
I cannot remove the adapter from the main body
To remove the accessory adapter from the main body of the GorFanty GF-6610, press the Release Button on the accessory adapter.
This answer is automatically generated