Table of Contents
Advertisement
Quick Links
Advertisement
Chapters
Table of Contents
Troubleshooting

Subscribe to Our Youtube Channel
Related Manuals for Directed NS1000 AVN

Summary of Contents for Directed NS1000 AVN
- Page 1 Infotainment System USER MANUAL NS1000 AVN JUNE 2024...
- Page 2 QR CODE To access the full User Manual from the internet for your vehicle’s infotainment system, scan the QR code below.
-
Page 3: Table Of Contents
CONTENTS Introduction ........................5 Warning ..................................5 Button functions ........................ 6 Button operation .............................6 Volume ..................................7 Screen functions ....................... 8 Home screen ...............................8 Menu............................9 Side menu ................................9 Radio ............................. 10 DAB+(Digital Aucio Broadcast)......................10 DAB+ radio ................................11 DAB+ DLS ..................................12 FM/AM radio................................. - Page 4 CONTENTS Camera ..........................32 Camera configuration ...........................32 View camera ..............................33 Playback ..........................34 USB audio ................................34 USB video ................................36 USB image ................................37 Bluetooth audio .............................38 Apps ....................................Setup ............................ 43 Audio ..................................43 Video ..................................45 System ..................................46 Clock ..................................47 OTA update ................................
-
Page 5: Introduction
INTRODUCTION WARNING Always be careful when Avoid any activities requiring consuming liquids and other high levels of concentration substances in the vehicle. This such as adjusting device may cause damage to the settings while driving. product voiding the warranty. When cleaning, turn off the unit and use a soft cleaning For the safety of all road cloth. -
Page 6: Button Functions
BUTTON FUNCTIONS BUTTON OPERATION Apple CarPlay/Android Auto Devices Apps Favourites Media APP TRAY Navigation Camera Accessories Settings Favourites Phone screen Call Answer/Decline Active cameras Media Power/Volume knob Activate voice control Home Navigation... -
Page 7: Volume
BUTTON FUNCTIONS VOLUME To set and adjust volume levels, simply rotate the rotary volume knob. This also brings up the volume control tile. There are three (3) independent types of volume, media, phone and navigation. The three methods by which you can adjust volume are, touch and slide adjust volume bar, one touch the desired volume bar and then rotate the volume knob or tap the ‘+’... -
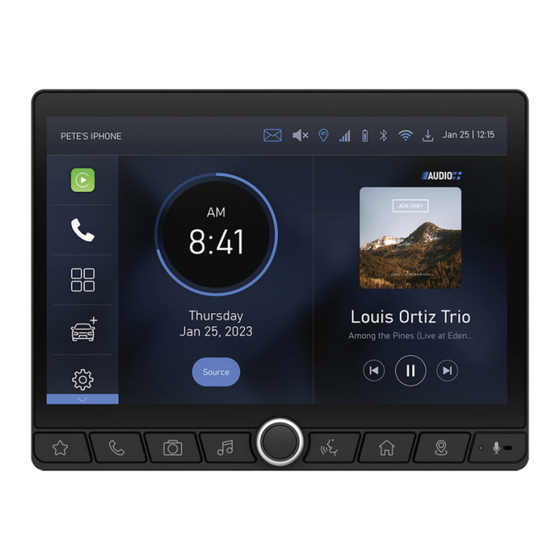
Page 8: Screen Functions
SCREEN FUNCTIONS HOME SCREEN From the HOME SCREEN you can view all information of operating functions. This may include: ITEM FUNCTION Apple CarPlay / Android Auto Devices Apps Favourites Media Navigation Camera Accessories Settings Unread Messages GPS, Signal Strength, Battery level, Bluetooth & Wi-Fi Status OTA Firmware Available Current Playing Media Information Source... -
Page 9: Menu
MENU SIDE MENU The SIDE MENU on the left of the home screen allows selection of the main operating modes of the unit. The menu consists of the following options: DEVICE MENU Pair phones via Bluetooth or by using Apple Carplay/ Android Auto. -
Page 10: Radio
RADIO DAB+ (DIGITAL AUDIO BROADCAST) Digital radio is a broadcast format that offers exceptionally high- quality sound, useful station information and a range of exciting features to enhance your listening experience: • Clearer sound. • Genre-specific stations including sports, classic, modern, country and many more. -
Page 11: Dab+ Radio
RADIO DAB+ RADIO Select the MEDIA MENU by touching the button in the SIDE MENU. Then touch the DAB+ Radip tab. FINDING AND STORING STATIONS Scan DAB+ stations by touching the scanning button Once the scanning stops, touch listed categories to display respective stations and touch again to start playing. -
Page 12: Dab+ Dls
RADIO While playing any station, touch to tune to the next station. To store any saved station to the preset list, open the station to be saved and touch . The preset list for all radio types can be accessed/managed inside ‘My Presets’ list inside the radio menu on the left. -
Page 13: Fm/Am Radio
RADIO FM/AM RADIO Select the RADIO MENU by touching the button in the side menu and then FM or AM the Radio tabs. FINDING AND STORING STATIONS Touch to automatically tune and store FM stations. The station list can be accessed inside the FM Radio tab. Scroll and touch to select any station or alternatively select any station and skip to next or previous station using buttons. -
Page 14: Connection
CONNECTION DEVICE Up to four (4) devices can be paired to the infotainment system. Only one (1) device is connected at a time. BLUETOOTH PAIRING To connect your Phone: Either touch the icon on the home screen or press the physical button of the unit to go to the DEVICES screen. - Page 15 CONNECTION After selecting your device, the PAIR button will illuminate. Touch the PAIR button to start pairing your device.
-
Page 16: Disconnect And Delete Pairing
CONNECTION Touch the Pair button on the unit and then on your device. Press Allow on your device if you would like your contacts and messages to be accessible via the head unit. Your device is connected to the unit and the device’s name is displayed on top left corner of the screen. -
Page 17: Add Pairing
CONNECTION ADD PAIRING If there is a phone currently connected to the unit, it must be disconnected before adding another device. Follow Step 2 to 7 of the Bluetooth Pairing to add another device. -
Page 18: My Presets
CONNECTION MY PRESETS Once your phone is connected via Bluetooth, up to 24 contacts can be saved in My Presets. Open the contact that needs to be saved from the Contacts list then touch the symbol located at right of each contact. -
Page 19: Keypad
CONNECTION Return to My Presets. Your saved contacts can be now viewed here. Touch the required contact to make a call. To remove a contact from My Presets, repeat steps 1 and 2. KEYPAD From the phone menu touch the button at the bottom of screen to open the phone keypad. -
Page 20: Contacts
CONNECTION CONTACTS Select CONTACTS from the phone menu to view your contact list. To search for a contact, touch the screen and slide the list up and down to locate your required contact. Alternatively, touch once on the alphabet symbol on the left- hand side of the contact list and then touch any letter to filter by the first letter of contact names. -
Page 21: Recents
CONNECTION Touch the screen and slide the list down to locate your required contact. RECENTS Select RECENTS from the phone menu to view all recent received and dialled numbers or contact names if saved in your contact list. To re-dial a recent call, touch the corresponding listed number or contact name. -
Page 22: Messages
CONNECTION MESSAGES Select Messages from the phone menu to view all recent messages. The date and time for each message are also displayed. - Read messages are depicted by an icon. - Unread messages are depicted by an icon. - New message notification is also displayed in the top information bar with unread messages depicted by the icon. -
Page 23: Incoming Calls
CONNECTION INCOMING CALLS Incoming call information is displayed on any screen. Calls can be answered or rejected by touching the corresponding button. Touch the symbol to minimise the call screen to a small tab size at the top. To bring the call screen back to full screen mode touch... -
Page 24: Call Waiting
CONNECTION CALL WAITING PLEASE NOTE: Call waiting function needs to be activated in your mobile phone settings. Whilst on a current call, there is another incoming call. Touch Answer + End to answer second call and end the first call. Touch Reject Call to reject the second call. - Page 25 CONNECTION Toggle between first and second call by touching either box. Touch the button to end the call that is currently active. When an active call has been ended, the call that was on hold will resume.
-
Page 26: Outgoing Calls
CONNECTION OUTGOING CALLS Touch the button on the front panel to open My Presets within the phone menu. Touch any preset contact to make a call or alternatively select any contact from the listings. • My Presets • Contacts • Recents A call can be made by pressing the phone number or contact in the listings. -
Page 27: Mute A Call
CONNECTION Touch to start dialling. MUTE A CALL Once connected, the call duration is displayed. To mute a call, touch the Mute button. Touch to return to the keypad when numeric input is required for menu selections. -
Page 28: Wired And Wireless Apple Carplay And Android Auto
CONNECTION ABOUT WIRED & WIRELESS APPLE CARPLAY OR ANDROID AUTO Wired and wireless Apple CarPlay or Android Auto projects some of the useful apps on your compatible Apple or Android phone onto the unit’s display screen. You will then be able to control calls, messages and music and navigate with maps on the unit’s display screen.. -
Page 29: Connect Wireless Apple Carplay And Android Auto
WIRED AND WIRELESS APPLE CARPLAY OR ANDROID AUTO CONNECT WIRELESS APPLE CARPLAY OR ANDROID AUTO • Once the unit is connected to Bluetooth, touch the ‘Apple CarPlay or Android Auto’ button to turn it on. Selection is indicated by a blue colour •... -
Page 30: Disconnect Wireless Apple Carplay And Android Auto
WIRED AND WIRELESS APPLE CARPLAY OR ANDROID AUTO DISCONNECT WIRELESS APPLE CARPLAY OR ANDROID AUTO • Touch next to ‘Apple CarPlay or Android Auto’ to disconnect the wireless connection between your phone and the unit. Once wireless is disconnected unit is switched to Bluetooth connection. -
Page 31: Wi-Fi
WI-FI WI-FI To connect to a Wi-Fi network or hotspot on your phone. Touch the Wi-Fi symbol to open the Wi-Fi setting menu which is automatically switched to On. The system will automatically search for available networks. Select the required network/hotspot and enter the password. The connected network will be displayed with a blue higlight. -
Page 32: Camera
CAMERA CAMERA CONFIGURATION Connect an approved and genuine Nissan camera to the unit. Touch the SETTINGS button at the bottom of slider menu from the home screen to open the setup menu. Touch the Camera button from the list to configure your cameras. -
Page 33: View Camera
CAMERA VIEW CAMERA To view the Camera (s), push the button (refer to Page 6) on the front panel or alternatively touch the soft touch button found on the slide menu (refer to page 9). Touch any image to zoom in full screen. Touch the screen again to return to a 4-way view. -
Page 34: Playback
PLAYBACK USB AUDIO USB-A port located below the HVAC controls and to the left of 12V socket is media compatible. Note: USB-C port located above USB-A port is for charging only and is not media compatible. Connect a USB memory stick containing media files To access an audio file, touch the button on the Home screen and choose... - Page 35 PLAYBACK Touch the button to cycle between repeat album, repeat folder, and repeat a song. Touch the button to shuffle your playlist. When playing back files, you can select which file type you wish to play. This is particularly helpful when there are different file types stored on the USB drive.
-
Page 36: Usb Video
PLAYBACK USB VIDEO NOTE: There is no video playback if the vehicle is not GPS stationary or no GPS signal. A cautionary message will be displayed on the screen as shown below: To View a video file, touch the Video tab to display video files inside the selected folder. - Page 37 PLAYBACK Touch the screen again to display the control panel to Replay Movie, Rewind, Pause, Play or Forward the video. To return to the files screen, touch the back button. Touch the button to cycle between repeat album, repeat folder, and repeat a song.
-
Page 38: Usb Image
PLAYBACK USB IMAGE To view an image file, touch the PHOTO tab at the top to view pictures saved inside the selected folder. Select the required file found on the left side of the screen to open Image. Your selected image file will be displayed with the image control panel visible at the bottom of the screen. - Page 39 PLAYBACK To return to the files screen touch the List button.
-
Page 40: Bluetooth Audio
PLAYBACK BLUETOOTH AUDIO BT Music allows you to wirelessly play audio from your phone via A2DP Bluetooth Streaming. Connect your phone to the unit via BLUETOOTH. Touch the Source button from the home screen or from the media menu and then select BLUETOOTH to go to BT music. Select the desired music files or streaming media on your phone. -
Page 41: Apps
PLAYBACK APPS From the side bar menu of the home screen, touch the Apps icon to go to the Apps screen. Touch the required App to open. -
Page 42: Audio
PLAYBACK AUDIO Touch the SETTINGS button found in the bottom left corner of any screen to open the SETUP MENU. Touch the Audio button to setup Balance, Fader and EQ levels. To adjust the speaker balance and fader, touch the blue dot on the centre of the displayed grid, then slide to the required position –... -
Page 43: Setup
SETUP There are five (5) pre-set equalizer settings, Rock, Pop, Electronic, Classical and Podcast. Select the preset settings to best suit the audio types that you are listening to. Touch the Custom button to manually adjust equalizer levels to best suit your audio experience. Touch the relevant frequency band and then touch on the orange level indicator. -
Page 44: Video
SETUP VIDEO Touch the SETTINGS button found at the bottom of the side menu on home screen. Touch on the side bar list to open the Video Settings screen. From here you can adjust Brightness, Contrast and Saturation of the video playback by touching the corresponding plus/minus buttons or by adjusting the slider with your finger across the screen. -
Page 45: System
SETUP SYSTEM Touch the SETTINGS button at the bottom left corner of any screen to open the SETUP MENU and scroll down to System. • Set the time, date, month and year. • Edit Wi-Fi settings. • Turn screen audible tones Off or On. •... -
Page 46: Clock
SETUP CLOCK The time is automatically set to your time zone when the unit is installed. GPS AUTO TIME turned On is the default setting. Touch the SETTINGS button found at the bottom of the side menu on home screen and select System followed by Time & Date. -
Page 47: Ota Update
SETUP OTA UPDATE The unit’s firmware and navigation software can be updated Over-the-Air (OTA). To perform OTA updates, the unit must be connected to a Wi-Fi network or mobile hotspot. (Refer page 32) Touch the SETTINGS button found at the bottom of the side menu on home screen. - Page 48 SETUP Once downloaded, the unit will automatically unzip and install the update. The unit will reboot to normal operation with the latest update. DO NOT TURN THE UNIT OFF during the update process.
-
Page 49: Troubleshooting
TROUBLESHOOTING USER GUIDE Touch the Settings button found at the bottom of the side menu on home screen followed by System. Touch the User Guide button. A QR code will b displayed. Scan the QR code with any Barcode /QR code reader app on your mobile phone. -
Page 50: Factory Reset
TROUBLESHOOTING FACTORY RESET This operation will reset the unit to factory settings. Touch the SETTINGS button found at the bottom of the side menu on the home screen. Scroll down then touch Touch Touch the Reset button. The unit will erase all settings and then reboot before opening to the home screen. -
Page 51: Specifications
SPECIFICATIONS Radio Modes AM/FM/DAB+/RDS AM Frequency Range 522 – 1710 kHz FM Frequency Range 87.5 – 108 MHz 9A 202.928 MHz, 9B 204.640MHz, 9C DAB+ Frequency Range 206.352 MHz RADIO Station Memory AM/FM/DAB+ 12 Pre-Sets Tune Seek Scan Power Output 4 X 45W Balance Control Fader Control... - Page 52 NOTES...
-
Page 53: Navigation Manual
Infotainment System NAVIGATION MANUAL NS1000 AVN JUNE 2024... - Page 55 CONTENTS Introduction .......................57 Warnings and safety information ...................57 Free map updates ...........................57 1.0 Getting started ....................58 Initial set-up ..................... 58 2.0 Navigation operation ..................61 2.1 Map screens ...................... 61 2.1.1 Street signs ............................62 2.1.2 Tunnel view ............................. 65 2.1.3 Trip computer ..........................
- Page 56 3.2 Route preferences, itinerary and alternatives ........92 3.2.1 Alternative routes ........................93 3.2.1.1 Route preferences ....................93 3.2.1.2 Itinerary ......................... 94 3.3 Checking traffic events ................94 3.3.1 Traffic summary with no active route ..............95 3.3.2 Traffic summary with active route ................. 96 3.3.3 Traffic map current and historic ................98 3.4 Editing a route ....................99 3.4.1 Adding an additional destination .................100 3.4.2 Saving a location ........................100 3.4.3 Editing a location ........................
-
Page 57: Introduction
INTRODUCTION WARNINGS AND SAFETY INFORMATION This navigation system is designed to provide driving information and directions to destinations using the built-in GPS receiver and navigation software. Looking at the display while driving should only be done when safe to do so. -
Page 58: Getting Started
GETTING STARTED Operation of navigation functions is achieved by simply touching the navigation screen. INITIAL SET-UP When using navigation for the first time, the Set-up Wizard will initialise automatically. Select the preferred language and then touch the button to save the selection. Regional settings can be changed at any time from the menu. (See 4.1.5) 2. - Page 59 3. Select the language and voice (Natural or TTS) for guidance messages. Touch to continue. TTS technology enables machine-generated vocal instructions. The advantage of TTS is that it can announce street names, traffic events, route summary, and traffic rules. The language used can be changed at any time from the menu. (See 4.1.5) 4.
- Page 60 5. Edit route preferences including toll roads, ferries and unsealed roads. Touch to continue. Route preferences can be changed at any time from the menu. (See 4.1.1) 6. Touch the button to complete the wizard setup and start using the navigation.
-
Page 61: Navigation Operation
NAVIGATION OPERATION When navigation initialises and there is no active or planned route saved, the default Map screen will open to display the current time and location of the vehicle. MAP SCREENS Live traffic information can be accessed by touching the button. At the bottom of the screen, touch the button to access the Main Menu. -
Page 62: Street Signs
When navigating on a current trip, the name of the next road is displayed at the top of the screen and an arrow below indicating the direction of the next manoeuvre. Distance to the next manoeuvre is displayed at the top left corner. A traffic condition icon will appear if there are incidents along the route. - Page 63 The current travelled road is displayed at the bottom centre of the screen. If two manoeuvres are required close to each other, a second direction arrow will appear to the right of the first arrow. Speed limit audio warnings will also be generated when the navigation detects a vehicle speed that exceeds the speed limit of that road.
- Page 64 Lane information is displayed at the bottom of the screen. An icon with the next manoeuvre and distance is displayed at the top left corner. In built-up areas with large structures, the map will automatically zoom to a 3D view to show buildings and bridges. This is a default feature of navigation. The map will then zoom back out to a 2D screen. The 3D mode can be turned on and off by touching the buttons.
-
Page 65: Tunnel View
2.1.2 TUNNEL VIEW As the vehicle enters a tunnel, the screen changes to a visual representation of a tunnel. At the right hand side of the screen there is a small display that shows the vehicle’s progress through the tunnel and the distance remaining Lane information is displayed at the bottom of the screen. -
Page 66: Map Symbols
MAP SYMBOLS Table 1: Map Symbols SYMBOL DESCRIPTION Displays the current GPS location of the vehicle Approaching the waypoint destination of the current route Approaching the destination of the current route The current route includes expressways Details of petrol stations and restaurants available (touch to view) This route Includes includes tollways This route includes ferries Switch between a 2D and 3D interpretation of the map. -
Page 67: Alert Symbols
ALERT SYMBOLS Table 2: Alert Symbols SYMBOL FUNCTION Indicates traffic events along a route are not available Indicates that there are no traffic events affecting the current route Indicates roadworks with no information available Indicates roadworks with information available Indicates traffic congestion including the expected delay time Indicates no traffic congestion or the delay is not known Displays speeding alert whether the current road is B-Double rated Displays speed camera alerts with speed limit and distance to speed camera... -
Page 68: Manoeuvre Symbols
MANOEUVRE SYMBOLS Table 3: Manoeuvre Symbols SYMBOL FUNCTION Continue straight Veer left or right Turn left or right Keep left or right Turn sharp right Turn back Enter roundabout and take exit number Continue along highlighted lanes... -
Page 69: Navigation Menu
NAVIGATION MENU To access the Main Menu, touch the button at the bottom right corner of the Map screen. From the menu list, add a new destination, create a multipoint route, check map updates or access settings. Touch anywhere on the screen to return to the Map screen. When a route has commenced, more options become available to add waypoints, view a route summary, or delete the route. -
Page 70: Menu Buttons
MENU BUTTONS Table 4: Menu buttons BUTTON FUNCTION Select the destination by entering an address or co-ordinates or by selecting a place, a saved location, or a saved route. Recent destinations can also be viewed from history. View the route in full on the map and check route parameters and alternatives. -
Page 71: Using Navigation
USING NAVIGATION By default, the navigation calculates routes using the road network with vehicle specific maps provided with this product. DESTINATION OPTIONS A destination can be selected by any of the following options: • Selecting a point on the map screen (see 3.1.1) •... -
Page 72: Selecting A Point On The Map
3.1.1 SELECTING A POINT ON THE MAP The fastest way to enter a destination is to simply touch a point on the Map screen. Touch and slide across the screen to move the map to the desired area. 2. Use your thumb and finger to zoom in the location if required or use the buttons. -
Page 73: Using Combined Search
7. Touch the button to commence the route. 3.1.2 USING COMBINED SEARCH The fastest way to search for a destination is to use combined search. From the Map screen, touch or alternatively touch open the Main Menu screen, then the button to open the New Route screen. - Page 74 4. A filtered list will display under the field with combinations of the input text. 5. Touch the button to hide the keyboard and reveal the list. 6. Touch anywhere on the screen and slide up and down the list to locate the correct location. 7. Touch the required list item to select it.
-
Page 75: Entering An Address In Another State
8. At the right hand side of the screen, there are options to avoid expressways, tollways and ferries. 9. Touch the button to save as the destination and advance to the Map screen. 3.1.3 ENTERING AN ADDRESS IN ANOTHER STATE From the Map screen, touch the button to open the Main Menu button to open the New Route screen. -
Page 76: Entering Address Or Crossroad In The Same State
3. Slide up and down anywhere on the screen to scroll up or down the list, to locate the required state.. 4. Touch the required state to save and move to the next fields. 3.1.4 ENTERING ADDRESS OR CROSSROAD IN THE SAME STATE Start entering the name of the town/suburb required. Only a partial name is required, when entering the text. A filtered list will display under the field with combinations of the input text. - Page 77 3. Touch the required town/suburb to save and move to the next field. 4. Now, type the address/name in the field. 5. Slide up and down anywhere on the screen, to touch the result under the search field to save and continue. 6. O nce all fields have been completed, the input destination will be pinned to the map.
-
Page 78: Entering Address With Street Name Only
7. At the right-hand side of the screen, there are options to avoid freeways, tollways and ferries. 8. Touch the button to save as destination and advance to the map screen. 3.1.5 ENTERING ADDRESS WITH STREET NAME ONLY From the Map screen, touch the button to open the Main Menu button to open the New Route screen. -
Page 79: Selecting A Place Of Interest
3.1.6 SELECTING A PLACE OF INTEREST Places of interest can be selected as the destination or a waypoint within a trip. See 3.4.2 for adding as a waypoint. From the Map screen, touch the button to open the Main Menu screen, then the button to open the New Route screen. - Page 80 Scroll up or down the list to locate the required category. 2. Touch the required category to open the List of Places screen. 3. Scroll up or down the list to locate the required place. At the right of the places listed, the distance in kilometres from the current location is displayed.
-
Page 81: Searching By Category
3.1.6.2 SEARCHING BY CATEGORY From the Map screen, touch the button to open the Main Menu button to open the New Route screen. screen, then the Touch the button on the New Route To screen to open the Nissan Dealerships screen. 2. - Page 82 3. Touch the button to select the area to search for the required place. 4. All search options are only available if there is a current or planned trip. 5. By default, the search area is ‘Around Here’. This search will show results in the area around the current location and sorted by distance from location.
- Page 83 10. Scroll up or down the list to locate the required place. 11. Touch the required place to save and move to the next field. 12. Touch the button to save as destination and advance to the map screen. 13. T o search in a specific town, touch the button to open the Select Town/Suburb screen.
-
Page 84: Selecting A Saved Location
14. Enter the required town, suburb. As each character is entered a filtered list of locations is displayed under the search field. 15. Touch the button to hide the keyboard and reveal the list. 16. Scroll up or down the list to locate the required place. 17. Touch the required place to save and move to the next field. 3.1.6.3 SELECTING A SAVED LOCATION From the Map screen, touch the button to open the Main Menu... -
Page 85: Selecting A Destination From History
If a user has saved additional locations, they will be displayed under the Home and Work buttons 3. Scroll through the list to locate the required saved location. 4. Touch the required location to open the Map Location screen. 5. Touch the button to save as destination and advance to map screen. - Page 86 2. A list of history items displays with the top three most used routes displayed in the ‘Smart History Items’ list. 3. Scroll up or down the list to locate the required place. 4. Alternatively touch the ‘Name or address’ field to display the keyboard.
-
Page 87: Selecting Coordinates
8. Touch the button to save as destination and advance to the Route Summary screen. 3.1.6.5 SELECTING COORDINATES From the Map screen, touch the button to open the Main Menu screen, then the button to open the New Route screen. Touch the button to open the Coordinates screen. - Page 88 Only two coordinates need to be entered in combination, South and East or North and West. Touch the button to change to North, touch the button to change to South, touch the button to change to West and touch the button to change to East.
- Page 89 4. Touch the button to advance to the next screen. 5. Follow steps 1-4 to enter the next coordinates for East or West. 6. Touch the button to advance to the next screen. 7. The location will be centred on the map, pinned with a icon.
- Page 90 UTM coordinates can also be entered in Easting and Northing. To change coordinates to UTM, touch the button on the Coordinates screen. Touch the button on the Coordinates screen to advance to the UTM Coordinates screen. 2. If required, the UTM Zone can be changed by touching the button.
-
Page 91: Selecting A Multipoint Route
3.1.7 SELECTING A MULTIPOINT ROUTE From the Map screen, touch the button to open the Main Menu screen, then the button to open the Multipoint Route screen. Touch the Destination button to open the New Route To screen to search for a new address or add from places, saved locations, history, saved routes or coordinates. -
Page 92: Route Preferences, Itinerary And Alternatives
6. Touch the next to any address of a waypoint or destination to re-order the route or current GPS position, to save the location, set as the starting point, or show on the map. 7. Touch the button to advance to the Route Summary screen. -
Page 93: Alternative Routes
3.2.1 ALTERNATIVE ROUTES To view alternative routes to avoid certain roads or congestion, touch the button on the Route Summary screen to display a list of different route options. Touch the required alternative route and appears to indicate the selected route. 2. -
Page 94: Itinerary
2. User can touch and change route preference by adjusting the below options: • Route Planning Method (Easy, Fast, Green) • Motorways • Toll Roads • Ferries • Car Shuttle Trains • Carpool Lanes • 4WD Tracks (On Road or Off Road) •... -
Page 95: Traffic Summary With No Active Route
3.3.1 TRAFFIC SUMMARY WITH NO ACTIVE ROUTE Touch the button to open the Traffic Summary screen. 2. If there is no active route entered, the Traffic Summary screen will display all events. 3. Touch the button to open the Traffic Events screen. 4. -
Page 96: Traffic Summary With Active Route
5. Scroll up or down the list to view the complete list of traffic events. 6. Touch the required event to open the Event Details screen. 7. Touch the button to return to the Traffic Summary list screen. 8. Touch the button to return to the Traffic Events list screen. 3.3.2 TRAFFIC SUMMARY WITH ACTIVE ROUTE Touch the button to open the Traffic Summary screen. - Page 97 4. Touch the button to open the Traffic Events screen. 5. Touch the button to return to the Map screen. 6. Scroll up or down the list to view the complete list of traffic events. 7. Touch the required event to open the Event Details screen.
-
Page 98: Traffic Map Current And Historic
8. Touch the button to return to the Traffic Summary screen. 9. Touch the buttons to view previous or next page. 10. Touch the button to return to the Traffic Events screen. 11. Road segments affected by traffic events are displayed in a different colour (blue) on the map, and small symbols above the road show the nature of the event. -
Page 99: Editing A Route
3. The map displays the current vehicle location and real time traffic information. Traffic impact flow is indicated on the map with coloured sections of the route. Heavy traffic is represented by a dark red line. As traffic flow and density reduce, the colour will change to red, orange, yellow and finally green to represent light traffic. 4. Touch the button to open the Historical Traffic Map” screen. 5. Touch the button to return to the Traffic Summary screen. 6. The map is displayed with road segments coloured by the likely density of the traffic in the given period. The information relevant for the current period is shown when opening the screen. -
Page 100: Adding An Additional Destination
3.4.1 ADDING AN ADDITIONAL DESTINATION If a route has already been planned and a new destination is selected as described in the above sections, the route to the previous destination is deleted and a new route is calculated. To add a new intermediate destination to an active route, perform one of the following actions: On the Map screen, zoom in or out on the map to locate the additional destination, then touch the screen to place a cursor... - Page 101 2. Touch the button to display a list of options. 3. Touch the button to open the Save location screen. 4. I f searching by address, the street name will auto fill the ‘Location Name’ field. 5. Touch the button to delete the field text or touch the button to backspace and edit the text. 6. Once the desired name has been entered, touch the button to return to the Map Location screen.
-
Page 102: Editing A Location
3.4.3 EDITING A LOCATION From the Map screen, touch the button to open the Main Menu button to open the New Route screen. screen, then the Touch the button to open the Saved Location screen. 2. Touch the button to display the button. -
Page 103: Gps Information
4. Touch the required option to open the Rename Saved Location screen or the Delete Saved Location screen. 6. Touch the button to return to the Map button then the screen. 3.4.4 GPS INFORMATION From the Map screen, touch the button to open the Main Menu screen, then the button to open the Settings... -
Page 104: Updates
UPDATES Map updates are achieved OTA (Over-the-Air) and require a Wi- Fi connection. Please refer to the Setup section on page 48 of the Infotainment User Manual for Wi-Fi connection instructions. From the Map screen, touch the button to open the Main Menu button to open the Update screen, then the screen. -
Page 105: Settings
SETTINGS From the Map screen, touch the button to open the Main Menu button to open the Settings screen and screen, then the configure the navigation settings and modify the behaviour of the infotainment system. 4.1.1 ROUTE PREFERENCES Touch the button to open the Route Preferences screen. 4.1.1.1 ROUTE PLANNING METHOD/NAVIGATION MODE Touch to change the route planning method from:... -
Page 106: Road Types
4.1.1.2 ROAD TYPES Scroll up or down the list to view the complete list of settings. 2. Touch the required item to turn the item On or Off 3. Touch the button to return to the Settings screen. 4.1.2 SOUND Touch the button to open the Sound screen. -
Page 107: Warnings
5. Touch the button to return to the Settings screen. 4.1.3 WARNINGS 1. Touch the button to open the Warnings screen. 2. Touch the button to open the Speed Limit screen. -
Page 108: Navigation View
3. S elect the required field to adjust the parameter. 4. Touch the button to return to the Warnings screen. 5. Under section alert point warnings can be adjusted. 6. Turn alert point warnings On Off. 7. S elect the required field to adjust the parameter. 8. Touch the button to return to the Warnings screen. 4.1.4 NAVIGATION VIEW Touch the button to open the Navigation View... - Page 109 4. Scroll down further to On/Off other map items such as: • Landmarks • Buildings • Enhance 3D • Route Progress Bar • Offer Motorway Services • Automatic Overview • Signposts • Junction View • Tunnel View...
-
Page 110: Regional
4.1.5 REGIONAL Touch the button to open the “Regional” screen. 2. Touch the required field to change the language, voice, units and formats or time preferences. 4.1.6 START CONFIGURATION WIZARD Touch to step through the setup screen to change language, default units, route preferences and speed limit. ABOUT From the Map screen, touch the button to open the Main Menu screen, then the button followed by... -
Page 111: Troubleshooting
TROUBLESHOOTING This section offers possible solutions to issues that may occur during the operation of this navigation system. GPS SIGNAL CANNOT BE RECEIVED ISSUE: The current location is not available, because the GPS signal cannot be received. CAUSE 1: GPS signal is weak or may not be available between tall buildings, in garages or tunnels as the signal weakens or distorts as it travels through solid material. -
Page 112: The Speed Limit Warning Is Not Accurate
THE SPEED LIMIT WARNING IS NOT ACCURATE ISSUE: The speed limit warning is signalling even when the actual speed limit is kept. CAUSE 1: The speed limit in the digital map data might differ from the actual speed limit of the current location. SOLUTION 1: Disable the speed warning by performing the following steps: •... -
Page 113: Copyright
This manual may not, in whole or in part, be reproduced or transmitted in any form either electronically or mechanically, including photocopying and recording, without the express written consent of Directed Technologies. © 2024 - Directed Technologies. All rights reserved. -
Page 114: Notes
NOTES... - Page 115 NOTES...
- Page 116 Directed Technologies 115-119 Link Road, Melbourne VIC 3045, Australia © COPYRIGHT DIRECTED ELECTRONICS OE PTY LTD...
Need help?
Do you have a question about the NS1000 AVN and is the answer not in the manual?
Questions and answers