Advertisement
Quick Links
2650-2032-77 Rev. A
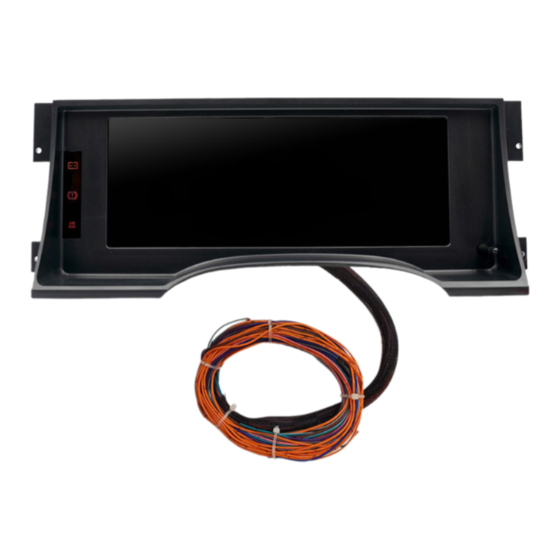
Fits 1995 to 1998 C & K Series Trucks. This kit will re-use your original instrument cluster bezel
What is Included:
Preassembled Truck Dash with Digital Gauge Display &
Universal Wire Harness
Oil pressure Sending Unit
Temperature Sending Unit
Step 1, Removal:
It is recommended to turn the vehicle power on and take note of where the fuel level gauge reads (if it works) prior to removal of the
factory dash.
Once the fuel level is noted, disconnect the vehicle battery.
Start to remove the original dash bezel. These are held in with push clips, and can be removed by grasping it around the edges, and pulling
the bezel loose.
Before the bezel comes all of the way out, you will have electrical connectors to disconnect for items such as the headlight switch, cargo light
switch, 4wd buttons (if equipped), and any other accessories the truck is equipped with, with switches in the bezel.
It is helpful to lower the tilt steering column all the way down, and put the column shifter all the way down, to fit the removal of the bezel.
Now you may remove the cluster which may be held into place with (4) 7mm head screws. Save these screws for later.
When you pull the cluster toward you, the factory wire harness will automatically unplug from the cluster, and stay in the dash.
You may completely remove the original cluster.
To prep for the next step, you will have to dislodge the factory connector from the rear plastic wall, and pull it toward you for wiring access,
and remove some of the factory tape to better expose the factory wires.
Invision 1995-1998 Chevy Truck
Direct Fit Digital Dash
Recommended Tools & Supplies:
Screwdriver set (including both flathead & Phillips)
1/4" drive standard & metric socket set
3/8" drive standard & metric socket set
Standard & Metric open end wrenches
Wire strippers
Wire crimpers
Wire splice connectors for connecting wires to your vehicle harness.
Wire coverings or zip ties for neatly organizing or bundling wires.
Wire diagram of your vehicle
Soldering iron, solder & various sizes of heat shrink tubing.
Digital volt/ohm meter
Electrical, 12v test light
Advertisement

Related Manuals for AutoMeter Invision 7006

Summary of Contents for AutoMeter Invision 7006
- Page 1 Invision 1995-1998 Chevy Truck Direct Fit Digital Dash 2650-2032-77 Rev. A Fits 1995 to 1998 C & K Series Trucks. This kit will re-use your original instrument cluster bezel Recommended Tools & Supplies: What is Included: Screwdriver set (including both flathead & Phillips) Preassembled Truck Dash with Digital Gauge Display &...
- Page 2 If you have questions on this, please call AutoMeter Tech Support at (866)-248-6357. If still using the factory, original engine and ignition system, you may connect to pin 6/white wire of the factory cluster connector.
- Page 3 NOT function, you may have further diagnosis to do to test the sender in the tank, the sender ground, and the sender wire itself. Call AutoMeter Tech Support at (866)-248-6357 if further assistance is needed. Check pin 16/Purple wire of the factory cluster connector.
- Page 4 Step 3, Senders: Water temperature: The InVision Digital Dash must use the included Auto Meter temperature sender. If you are still using the factory engine management system, you can remove the temp sender that is located in the drivers bank cylinder head. Install the Auto Meter sender, with the 3/8”NPT adapter bushing.
- Page 5 Step 4, Set up: This dash comes equipped with a button/knob referred to as the “Selector Knob”. To enter the dash menu, simply push & release the Selector Knob one time. The menu will appear. The knob also turns slightly left or right. Use the left or right motion to scroll through the menu.
- Page 6 Once you have chosen the correct PPR, simply scroll up to Back, and press Enter. Then, scroll up to Back again, and press Enter. Next, once you are back into the Main Menu, scroll to Close and press Enter. Tachometer Scaling The standard scale is 0-10,000 RPM, though you can adjust the tachometer scale to be 0-8,000 RPM if desired. To adjust the scaling, enter into the Main Menu.
- Page 7 Fuel gauge set up If you are running a 0-90 fuel sender, there is no further set up required regarding the fuel gauge. This step can then be skipped. You have 7 different fuel sensor ranges to select from, select the one that matches your vehicles fuel sender and press enter. Once you have chosen the correct sensor range, scroll up to Back, and press Enter.
- Page 8 Display One Display Two...
- Page 9 Display Three Display Four If you choose Display three, you also have a choice of colors. Displays one, two, and four do not have a choice of colors. When you choose Display three, and press Enter the unit will go to Display three, then to access the color options, Enter into the main menu again, choose Display, then scroll to Display three (which will already be in bold white), and press Enter.
- Page 10 To Exit, simply scroll up to Back, and press Enter., then scroll up to Back on the Display menu, and press Enter, then scroll up to Close on the Main menu and press Enter. Brightness You will no longer adjust brightness with the factory dash light dimmer. Once power is applied from the lighting to the dash, it will automatically dim down to the brightness as adjusted by the dash via the Selector Knob.
- Page 11 Odometer The odometer can be set to match your factory mileage on your vehicle. This can only be done one time, and within the first 500 miles. After being set, or 500 miles have been accumulated, this option will disappear. It can not be set again. To set your odometer, enter into the Main Menu, scroll to Speedometer, and push Enter.
- Page 12 Units Here you can choose Imperial, or Metric. U.S. users will generally choose Imperial. Other users may choose Metric, which changes your temperature to “C”, Oil Pressure to “BAR”, Odometer to “km”, and Speedometer to “km/h”. To change the units of measure, Enter into the Main Menu, and then scroll to Units, and press Enter. Then choose either Imperial, or Metric by scrolling to highlight your choice, then press Enter.
-
Page 13: 12 Month Limited Warranty
AutoMeter Products, Inc. warrants to the consumer that all AutoMeter High Performance products purchased from an Authorized AutoMeter Reseller will be free from defects in material and workmanship for a period of twelve (12) months from date of the original purchase. Products that fail within this 12 month warranty period will be repaired or replaced at AutoMeter’s option, when determined by AutoMeter that the product failed due to defects in material or workmanship.
Need help?
Do you have a question about the Invision 7006 and is the answer not in the manual?
Questions and answers