Table of Contents
Advertisement
Available languages
Available languages
Quick Links
Advertisement
Chapters
Table of Contents

Related Manuals for Premium PPA1209J


Summary of Contents for Premium PPA1209J
- Page 1 AIRE ACONDICIONADO PORTATIL PORTABLE AIR CONDITIONER PPA1209J...
-
Page 2: Table Of Contents
CONTENTS IMPORTANT SAFEGUARDS…..............2 PLACEMENT AND INSTALLATION…............3 PARTS NAME…..................5 CONTROL PANEL…...................6 SCREEN…....................7 OPERATION METHODS….................8 REMOTE CONTROL…................9 WATER DRAINAGE…................9 MAINTENANCE…..................10 TROUBLE SHOOTING…................11 WIRING DIAGRAM….................12... -
Page 3: Important Safeguards
IMPORTANT SAFEGUARDS Please read following safeguards carefully before using the machine: ● This machine just for domestic use, please don’t use it in any other places. ● Please use this machine indoor not outdoor, and place it in a dry environment. ●... -
Page 4: Placement And Installation
Note : ● Place the machine on flat ground, and keep it far from around things at least 50cm. ● Make sure the socket can be reached from machine location. ● Keep the machine stand upright so that compressor can work well. ●... - Page 5 Installation ● Spin adapter into exhaust pipe first, then spin the exhaust pipe into exhaust connector . (fig.2) ● Put adapter into window sealplate, adjust window open width in order sealplate match window well, and the length of sealplate is adjustable. (fig.2) Installation Errors ●...
-
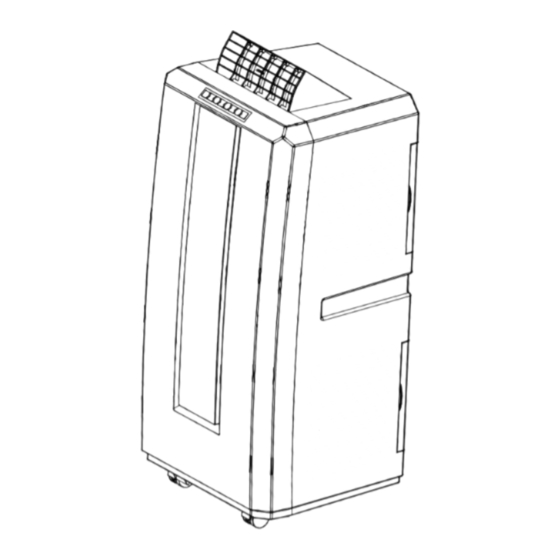
Page 6: Parts Name
PARTS NAME Front side 1. Air-inlet 2. Control Panel 3. Screen 4. Castor Back Side 5. Filter frame upper 6. Power Cord Location 7. Filter frame lower 8. Plug cap 9. Exhaust Pipe 10. Handle 11. Exhaust Connector Check packing accessories, read user’s manual to get how to use them. (fig.4) Temperature Sleep... -
Page 7: Control Panel
CONTROL PANEL Timer Sleep DOWN Mode Power POWER: press this key to turn on/off machine. After machine turns on, default value is cooling mode with low fan speed. MODE: after machine turns on, for cooling only model, press this key to select cooling, fan mode FAN: after machine turns on, press this key to select fan speed (high ,medium and low). -
Page 8: Screen
SCREEN 1. Temperature display 2. Cooling mode indicator 3. Fan mode indicator 4. Sleeping mode indicator 5. Timer mode indicator 6. Receiver 7. Light display 8. Water full indicator 9. Low fan speed 10. Medium fan speed 11. High fan speed... -
Page 9: Operation Methods
OPERATION METHODS Cooling mode ● After machine turns on, default value is cooling mode with 22℃ and low fan speed. ● Press “ MODE” to select cooling mode, cooling mode indictor turns on . ● Press “ UP” or “ DOWN” to adjust temperature ( from 16℃ to 31℃). ●... -
Page 10: Remote Control
REMOTE CONTROL Temperature control set button Temperature Sleep mode button Sleep LCD screen Timer mode selection button Timer A/C fan speed button (high, medium, low) Mode button (cool, fan, dehumidify) Mode Power On/Off WATER DRAINAGE This machine with auto-water-evaporating system. Condensed-water cycle to cool down the condenser, which will not only improve cooling efficiency, but also save energy. -
Page 11: Maintenance
MAINTENANCE Note: in order to avoid electric shocks, please power-off the machine and pull out plug before maintenances or repairs. Cleaning ● Please pull out plug before cleaning . ● Use soft semi-dry cloth to clean the machine. Don’t use chemical agents, such as benzene, alcohol, gasoline and so on ;... -
Page 12: Trouble Shooting
TROUBLE SHOOTING Please contact professional serviceman without delay in following situation Power off Power on Machine water-full indicator turns on Drain water out cannot work Turn off machine for three minutes, Timer-off turns on then restart it. Direct sunlight Draw the curtains Door and windows are open , Machine Close the door and windows, move... -
Page 13: Wiring Diagram
DISPLAY PCB CNKEY-2 SM-4A SM-4Y CONNECTOR DISPLAY MAIN PCB RLY1 SWING DOWNFAN PUMP UPFAN N1N2N3N4 AC-N CAP1 CAP2 CAP1 CAP2 AC-N EL-2A EL-2Y DOWN PUMP MOTOR COMP TY-* MOTOR MOTOR PPA1209J Remarks: The wiring diagram is for maintenance purpose only. - Page 14 CONTENIDO PRECAUCIONES DE SEGURIDAD…............14 INSTALACIÓN…...................15 COMPONENTES…..................16 PANEL DE CONTROL…................17 PANTALLA…....................17 FUNCIONAMIENTO…................. 18 MANDO A DISTANCIA…................19 DRENAJE…....................19 MANTENIMIENTO Y LIMPIEZA…..............20 SOLUCION DE PROBLEMAS……...............21 ESQUEMA ELÉCTRICO…................22...
-
Page 15: Precauciones De Seguridad
PRECAUCIONES DE SEGURIDAD PARA SU SEGURIDAD • No instale el aparato cerca de fuentes directas de calor tales como cocinas o radiadores ni utilice líquidos inflamables alrededor del aire acondicionado. Coloque el aire acondicionado en una superficie sólida, plana y nivelada y evite instalarlo en lugares en los que esté... -
Page 16: Instalación
• No utilice detergentes ni materiales abrasivos que podrían deteriorar el aspecto del aparato. • Asegúrese de desenchufar el cable de corriente, antes de proceder a la limpieza del aparato. LUGAR DE INSTALACIÓN Coloque el aire acondicionado en una superficie sólida, plana ●... -
Page 17: Componentes
COMPONENTES PANEL FRONTAL 1.Entrada de aire 2. Panel de control 3. Pantalla 4. Ruedas PANEL TRASERA 5. Filtro de aire superior 6. Recogecables 7. Filtro de aire inferior 8. Tapon del desagüe 9. Tubo de extracción 10. Asa 11. Conector tubo de extracción ACCESORIOS INCLUIDOS Temperature Sleep... -
Page 18: Panel De Control
PANEL DE CONTROL Temporizador Noche Menos Velocidad Modo Power POWER: Pulse el botón On/Off para encender o apagar el aparato. La temperatura predeterminada del aparato es de 22ºC. MODO: Pulse este botón para seleccionar el modo de funcionamiento: aire acondicionado o ventilación. La pantalla indicará automáticamente el modo elegido. VELOCIDAD: Se pueden escoger entre tres velocidades en los modos de refrigeración y ventilación: baja (LOW), Normal (MID) y Alta (HIGH). -
Page 19: Funcionamiento
FUNCIONAMIENTO MODO AIRE ACONDICIONADO REFRIGERACIÓN La temperatura predeterminada del aire acondicionado a la hora de encenderlo es de 22ºC. Pulse el botón “modo” para eligir el modo de refrigeración (aire acondicionado o ventilación) y utilice los botones ▼ y ▲ para ajustar la temperatura (el rango de temperatura oscila entre 16ºC-31ºC). -
Page 20: Mando A Distancia
MANDO A DISTANCIA Botón de control de temperatura Temperature Botón función noche Sleep Display Temporizador Timer Botón de Velocidad del ventilador (alta, media, baja) Botón de Funciones (Frio, ventilador, Mode deshumidificador o calor) Encendido / Apagado DRENAJE Cuando el equipo está trabajando en el modo de refrigeración, el agua de condensación es evacuada hacia el depósito de agua. -
Page 21: Mantenimiento Y Limpieza
MANTENIMIENTO Y LIMPIEZA : Desenchufar el cable de corriente, antes de proceder a la limpieza del aparato. AVISO LIMPIEZA DEL APARATO Limpie la superficie del dispositivo con un paño suave y húmedo. No utilice detergentes ni materiales abrasivos que podrían deteriorar el aspecto del aparato. LIMPIEZA DE LOS FILTROS El aparato tiene incorporado unos filtros de aire para eliminar cualquier tipo de suciedad. -
Page 22: Solucion De Problemas
SOLUCION DE PROBLEMAS A continuación exponemos posibles problemas con los que pueda encontrarse. Intente primero las soluciones que aportamos, si los problemas persisten, acuda a un servicio técnico cualificado. Problema Causa Solución Está conectado a la corriente? Enchúfelo El indicador de depósito El aparato no lleno está... -
Page 23: Esquema Eléctrico
CNKEY-2 SM-4A SM-4Y CONNECTOR DISPLAY MAIN PCB RLY1 SWING DOWNFAN PUMP UPFAN N1N2N3N4 AC-N CAP1 CAP2 CAP1 CAP2 AC-N EL-2A EL-2Y DOWN PUMP MOTOR COMP TY-* MOTOR MOTOR PPA1209J Observaciones: El esquema eléctrico es para el propósito de mantenimiento solamente.
Need help?
Do you have a question about the PPA1209J and is the answer not in the manual?
Questions and answers