Advertisement
Quick Links
2384905COM
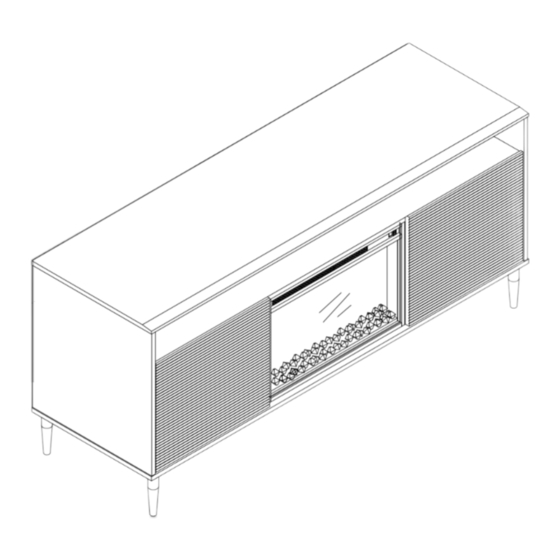
Fireplace TV Stand-Walnut/Black
Date of Purchase ___ / ___ / ___
Lot Number:
THIS INSTRUCTION BOOKLET CONTAINS IMPORTANT SAFETY INFORMATION. PLEASE READ AND KEEP FOR FUTURE REFERENCE.
Do Not Return This Product!
Contact our customer service team for help first.
Call: 1-800-489-3351 (toll free)
Visit: www.ameriwoodhome.com
WARNING
- Unit can tip over causing severe injury or death.
- Anchor unit to stud in wall (if instructed to).
- Do Not allow children to climb on unit.
- Put heavy items on lower shelves or drawers.
Easy
Assembly Difficulty Meter
Follow Ameriwood Home
Follow Ameriwood Home
B342384905COM00SF
Tough
Advertisement

Subscribe to Our Youtube Channel
Related Manuals for mr.Kate 2384905COM


Summary of Contents for mr.Kate 2384905COM
- Page 1 2384905COM Fireplace TV Stand-Walnut/Black B342384905COM00SF Date of Purchase ___ / ___ / ___ Lot Number: THIS INSTRUCTION BOOKLET CONTAINS IMPORTANT SAFETY INFORMATION. PLEASE READ AND KEEP FOR FUTURE REFERENCE. Do Not Return This Product! Contact our customer service team for help first.
-
Page 2: Helpful Hints
Contact Us! Do NOT return this product! Contact our friendly customer service team first for help. Assembly Tips Call us! 1-800-489-3351 Visit ameriwoodhome.com Helpful Hints PEOPLE NEEDED FOR ASSEMBLY: 2 ESTIMATED ASSEMBLY TIME: 1 HOUR - Open your item in the area you plan to keep it to avoid excessive heavy lifting. - Identify, sort and count the parts before attempting assembly. -
Page 3: Before You Start
Before You Start Read through each step carefully and follow the proper order Separate and count all your parts and hardware Give yourself enough room for the assembly process Have the following tools: Flat Head Screwdriver, #2 Phillips Head Screwdriver and Hammer Caution: If using a power drill or power screwdriver for screwing, please be aware to slow down and stop when screw is tight. -
Page 4: Board Identification
Board Identification Not Actual Size Top panel Bottom panel T2384905010SF T2384905020SF Fixed shelf Left side panel T2384905030SF T2384905040SF Right side panel Upper back panel T2384905050SF T2384905060SF ameriwoodhome.com... - Page 5 Board Identification Not Actual Size Upper partition Left partition Right partition T2384905090SF T2384905070SF T2384905080SF Foot Left door Lower back panel T2384905110SF T2384905120SF T2384905100SF QTY: 5 QTY: 2 Adjustable shelf Right door T2384905140SF T2384905130SF QTY: 2 Fireplace ameriwoodhome.com...
- Page 6 Board Identification Not Actual Size ameriwoodhome.com...
- Page 10 STEP Quick Assembly Wooden Dowel Ø15X12mm LOCK Hole for Proper orientation of CAM LOCK wooden dowel Use one drop of glue 3.1 Attach (D) & (E) to (C) with (9) as illustrated. in dowel hole. Finished Edge ameriwoodhome.com...
- Page 11 STEP Quick Assembly Wooden Dowel Ø15X12mm LOCK Hole for Proper orientation of CAM LOCK wooden dowel Use one drop of glue 4.1 Attach (G) & (H) to (C) with (9) as illustrated. in dowel hole. Finished Edge ameriwoodhome.com...
- Page 12 STEP Wooden Dowel Ø4X40mm x 14 Hole for wooden dowel Use one drop of glue 5.1 Attach (I) to (C) with (4) as illustrated. in dowel hole. 5.2 Attach (B) to (D) ,(E), (G)& (H) with (4) as illustrated. Finished Edge ameriwoodhome.com...
- Page 13 STEP M4X54mm Ø1/4X12mm x 20 6.1 Attach (K) to (B) with (5) as illustrated. ameriwoodhome.com...
- Page 14 STEP Quick Assembly Wooden Dowel Ø15X12mm LOCK Hole for Proper orientation of CAM LOCK wooden dowel Use one drop of glue 7.1 Attach (A) to (D) ,(E) & (I) with (9) as illustrated. in dowel hole. ameriwoodhome.com...
- Page 16 STEP 9.1 Insert (11) to (D), (E), (G) & (H) as illustrated. 9.2 Insert (N) as illustrated. ameriwoodhome.com...
- Page 17 STEP 10.1 Attach (L) to (D) with (6) & (10) as illustrated. 10.2 Attach (M) to (E) with (6) $ (10) as illustrated. Ø3.5X14mm x 24 ameriwoodhome.com...
- Page 18 STEP NOTE: The following instruction for door adjustment is useful when you need to align the door with the console frame. To adjust the vertical height. Loosen the four screws "A" on both hinges. Two of them are usually in slotted holes which allows you to adjust up or down by a few mm.
- Page 19 STEP 12.1 Insert the fireplace (O) into the assembled mantel as illustrated. Ensure the front facade of the fireplace and the front edge of the fixed shelf are flush. ameriwoodhome.com...
- Page 20 STEP Remote control (1) L-Bracket (3) Ø4X12mm (included in the fireplace package) Handling with 2 person 13.1 Slide the L-Brackets (3pcs) into pre-assembled bolts on rear panel of the fireplace. 13.2 Have one person from the front of the unit to hold the fireplace at the center and flush with the front edges of the left partition, the right partition and the fixed shelf.
- Page 21 STEP BEFORE CONNECTING THE UNIT TO A WALL ELECTRIC OUTLET Please carefully read and follow instructions and safety warnings in “Fireplace Homeowners Operating Manual” to operate your fireplace. WARNING IF THE INFORMATION IN THE FIREPALCE OPERATING MANUAL IS NOT FOLLOWED, AN ELECTRIC SHOCK OR FIRE MAY RESULT IN PROPERTY DAMAGE, PERSONAL INJURY , OR LOSS OF LIFE .
- Page 22 STEP WARNING ADVERTENCIA AVERTISSEMENT × 1 15.1 Apply the TV warning label (13) to your unit so you will always have the model's weight. ameriwoodhome.com...
Need help?
Do you have a question about the 2384905COM and is the answer not in the manual?
Questions and answers