Table of Contents
Advertisement
Available languages
Available languages
Quick Links
[Sidebars are great for calling out important points from your text
or adding additional info for quick reference, such as a schedule.
They are typically placed on the left, right, top or bottom of the
page. But you can easily drag them to any position you prefer.
Οδηγίες Χρήσης
Πλ. Ρούχων
When you're ready to add your content, just click here and start
typing.]
ES WM6F1002
Advertisement
Chapters
Table of Contents

Related Manuals for Eskimo ES WM6F1002


Summary of Contents for Eskimo ES WM6F1002
- Page 1 They are typically placed on the left, right, top or bottom of the page. But you can easily drag them to any position you prefer. Οδηγίες Χρήσης Πλ. Ρούχων When you’re ready to add your content, just click here and start typing.] ES WM6F1002...
- Page 2 Συγχαρητήρια για την αγορά της νέας συσκευής! Αυτό το εγχειρίδιο χρήσης θα σας βοηθήσει να ανακαλύψετε όλα τα πλεονεκτήματα της συσκευής σας και να τη χρησιμοποιείτε με τον τρόπο που θέλετε. Σας συνιστούμε να διαβάσετε προσεκτικά αυτό το εγχειρίδιο πριν χρησιμοποιήσετε το πλυντήριο...
-
Page 3: Table Of Contents
ΠΕΡΙΕΧΟΜΕΝΑ ΟΔΗΓΙΕΣ ΑΣΦΑΛΕΙΑΣ ...... 3 ΣΥΝΤΗΡΗΣΗ ........30 1.1 Οδηγίες ασφαλείας ......3 4.1 Καθαρισμός και περιποίηση ..30 ΕΓΚΑΤΑΣΤΑΣΗ ......... 11 Καθαρισμός της μονάδας ....30 2.1 Περιγραφή προϊόντος ....11 Καθαρισμός του κάδου ....30 Εξαρτήματα ........11 Καθαρισμός... - Page 4 1 ΟΔΗΓΙΕΣ ΓΙΑ ΤΗΝ ΑΣΦΑΛΕΙΑ ΠΡΟΒΛΕΠΟΜΕΝΗ ΧΡΗΣΗ Το προϊόν προορίζεται μόνο για οικιακή χρήση και για υφάσματα σε οικιακές ποσότητες κατάλληλα για πλύσιμο στο πλυντήριο. Αυτή η συσκευή προορίζεται μόνο για χρήση σε εσωτερικό χώρο και δεν προορίζεται για εντοιχισμένη χρήση. Χρησιμοποιήστε τη μόνο σύμφωνα...
- Page 5 1 ΟΔΗΓΙΕΣ ΓΙΑ ΤΗΝ ΑΣΦΑΛΕΙΑ Προειδοποίηση! ΚΙΝΔΥΝΟΣ ΗΛΕΚΤΡΟΠΛΗΞΙΑΣ • Αν το καλώδιο ρεύματος είναι φθαρμένο, θα πρέπει να αντικατασταθεί από τον κατασκευαστή, τον αντιπρόσωπο σέρβις ή ανάλογα ειδικευμένο προσωπικό για την αποφυγή τυχόν κινδύνων • Εάν η συσκευή έχει υποστεί βλάβη, δεν πρέπει να τεθεί...
- Page 6 1 ΟΔΗΓΙΕΣ ΓΙΑ ΤΗΝ ΑΣΦΑΛΕΙΑ ΤΟΠΟΘΕΣΙΑ ΚΑΙ ΠΕΡΙΒΑΛΛΟΝ ΕΓΚΑΤΑΣΤΑΣΗΣ • Όλα τα προϊόντα και τα πρόσθετα πλύσης πρέπει να φυλάσσονται σε ασφαλές μέρος, μακριά από παιδιά. • Μην εγκαθιστάτε τη συσκευή σε δάπεδο με μοκέτα. Ο φραγμός των ανοιγμάτων από χαλί ή μοκέτα μπορεί να προκαλέσει...
- Page 7 1 ΟΔΗΓΙΕΣ ΓΙΑ ΤΗΝ ΑΣΦΑΛΕΙΑ ΕΓΚΑΤΑΣΤΑΣΗ • Αφαιρέστε όλα τα υλικά συσκευασίας και τα μπουλόνια μεταφοράς πριν χρησιμοποιήσετε τη συσκευή. Διαφορετικά, μπορεί να προκληθεί σοβαρή ζημιά. • Αυτή η συσκευή είναι εξοπλισμένη με μία βαλβίδα εισαγωγής και μπορεί να συνδεθεί μόνο στην παροχή κρύου...
- Page 8 1 ΟΔΗΓΙΕΣ ΓΙΑ ΤΗΝ ΑΣΦΑΛΕΙΑ • Οι συνδέσεις νερού και ρεύματος πρέπει να πραγματοποιούνται από εξειδικευμένο τεχνικό σύμφωνα με τις οδηγίες του κατασκευαστή και τους τοπικούς κανονισμούς ασφαλείας. Προειδοποίηση! • Μη χρησιμοποιείτε πολύπριζα ή καλώδια προέκτασης. • Η συσκευή δεν πρέπει να έχει εξωτερική διάταξη...
- Page 9 1 ΟΔΗΓΙΕΣ ΓΙΑ ΤΗΝ ΑΣΦΑΛΕΙΑ Μην αφαιρείτε το φίλτρο της αντλίας αποστράγγισης ενώ • εξακολουθεί να υπάρχει νερό στη συσκευή. Μπορεί να διαρρεύσει μεγάλη ποσότητα νερού και υπάρχει κίνδυνος εγκαύματος λόγω του ζεστού νερού. ΧΕΙΡΙΣΜΟΣ ΚΑΙ ΣΥΝΤΗΡΗΣΗ Μη χρησιμοποιείτε ποτέ εύφλεκτους, εκρηκτικούς ή •...
- Page 10 1 ΟΔΗΓΙΕΣ ΓΙΑ ΤΗΝ ΑΣΦΑΛΕΙΑ Η πόρτα θα ξεκλειδώσει λίγο μετά το τέλος ενός • προγράμματος. Μην κλείνετε την πόρτα με υπερβολική δύναμη. Εάν δυσκολεύεστε να κλείσετε την πόρτα, ελέγξτε εάν τα ρούχα έχουν τοποθετηθεί και κατανεμηθεί σωστά. Πάντα να αποσυνδέετε τη συσκευή από την πρίζα και •...
- Page 11 αποτέλεσμα να ελαττώνεται η επιβάρυνση πληροφορίες σχετικά με τη συλλογή και των ΧΥΤΑ και του περιβάλλοντος. Μαζί, την τελική διάθεση, επικοινωνήστε με συνεισφέρουμε σημαντικά στην προστασία τον τοπικό φορέα, τον Δήμο ή το του περιβάλλοντος. Μοντέλο Χωρητικότητα πλύσης ES WM6F1002...
-
Page 12: Εγκατασταση
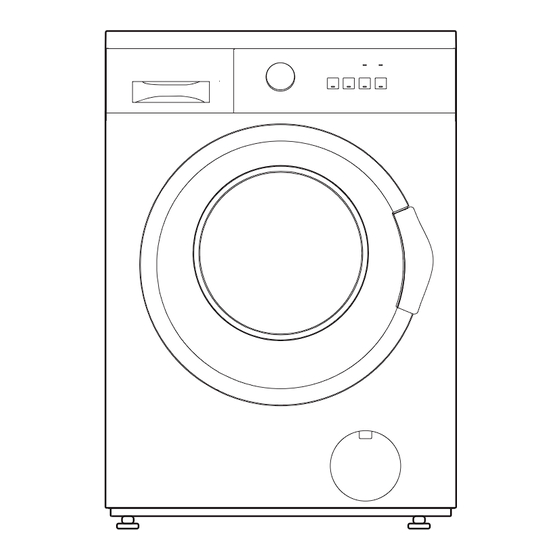
2 ΕΓΚΑΤΑΣΤΑΣΗ 2.1 Περιγραφή προϊόντος Θυρίδα συντήρησης Πίνακας χειρισμού Πόρτα Σωλήνας αποστράγγισης Θήκη απορρυπαντικού Καλώδιο ρεύματος Σημείωση! • Η εικόνα του προϊόντος είναι μόνο ενδεικτική, δείτε το πραγματικό προϊόν. Εξαρτήματα 1 εγχειρίδιο Ηχοαπορροφητικό 4 τάπες 1 εύκαμπτος χρήσης σφουγγάρι σωλήνας παροχής (προαιρετικό) κρύου... -
Page 13: Εγκατάσταση
2 ΕΓΚΑΤΑΣΤΑΣΗ 2 INSTALLATION 2 INSTALLATION 2 INSTALLATION 2.2 Εγκατάσταση 2.2 Installation 2.2 Installation 2.2 Installation Εργαλεία που απαιτούνται για να κάνετε την εγκατάσταση μόνοι σας (δεν Tools Needed If Installation By Yourself (not include) περιλαμβάνονται) Tools Needed If Installation By Yourself (not include) Tools Needed If Installation By Yourself (not include) Installation area Χώρος... -
Page 14: Αποσυσκευασία Της Συσκευής
2 INSTALLATION 2 ΕΓΚΑΤΑΣΤΑΣΗ 2 INSTALLATION Unpacking the machine Αποσυσκευασία της συσκευής Unpacking the machine Warning! Προειδοποίηση! • Packaging material (e.g. Films, Warning! • Τα υλικά συσκευασίας (π.χ. Styrofoam) can be dangerous for • Packaging material (e.g. Films, μεμβράνες, φελιζόλ) μπορεί να είναι children. -
Page 15: Οριζοντίωση Της Συσκευής
2 ΕΓΚΑΤΑΣΤΑΣΗ Οριζοντίωση της συσκευής Προειδοποίηση! • Τα παξιμάδια ασφάλισης και στα τέσσερα πόδια πρέπει να βιδωθούν σφιχτά στο περίβλημα. 1. Χαλαρώστε το παξιμάδι ασφάλισης. 2. Γυρίστε το πόδι μέχρι να φτάσει στο πάτωμα. 3. Ρυθμίστε τα πόδια και ασφαλίστε τα... -
Page 16: Ηχοαπορροφητικό Σφουγγάρι
2 ΕΓΚΑΤΑΣΤΑΣΗ Υπάρχουν δύο τρόποι για να τοποθετήσετε το άκρο του σωλήνα αποστράγγισης: Σχάρα νερού 1. Βάλτε το στη σχάρα (σιφώνι) 2. Συνδέστε το στον σωλήνα αποχέτευσης νερού. αποστράγγισης του σιφωνιού. Ηχοαπορροφητικό σφουγγάρι Σημείωση! • Βεβαιωθείτε ότι έχετε συναρμολογήσει τα ηχοαπορροφητικά σφουγγάρια, τα... -
Page 17: Λειτουργια
3 ΛΕΙΤΟΥΡΓΙΑ 3.1 Σύντομες οδηγίες για θέση σε λειτουργία Προσοχή! • Πριν από την πλύση, βεβαιωθείτε ότι το πλυντήριο έχει εγκατασταθεί σωστά. • Η συσκευή σας ελέγχθηκε διεξοδικά πριν φύγει από το εργοστάσιο. Για να αφαιρέσετε τυχόν υπολείμματα νερού και να εξουδετερώσετε πιθανές οσμές, συνιστάται... - Page 18 3 ΛΕΙΤΟΥΡΓΙΑ 2. Πλύση Επιλέξτε πρόγραμμα Επιλέξτε λειτουργία ή διατηρήστε τις προεπιλεγμένες ρυθμίσεις Πατήστε Start/Pause για να ξεκινήσει το πρόγραμμα 3. Μετά από την πλύση Ηχητικό σήμα.
-
Page 19: Πριν Από Κάθε Πλύση
3 ΛΕΙΤΟΥΡΓΙΑ 3.2 Πριν από κάθε πλύση • Η θερμοκρασία περιβάλλοντος του πλυντηρίου πρέπει να είναι 5°C έως 40°C. Εάν χρησιμοποιηθεί κάτω από τους 0°C, η βαλβίδα εισαγωγής και το σύστημα αποστράγγισης μπορεί να πάθουν βλάβη. Εάν η συσκευή εγκατασταθεί σε... -
Page 20: Θήκη Απορρυπαντικού
3 ΛΕΙΤΟΥΡΓΙΑ 3 OPERATION 3.3 Θήκη απορρυπαντικού 3.3 Detergent Dispenser Πρόπλυση Pre wash Κύρια πλύση Ⅱ Main wash Ⅱ Ⅱ Μαλακτικό Softener Ⅱ Release button to Κουμπί απελευθέρωσης pull out the dispenser για να τραβήξετε έξω τη θήκη Προσοχή! Caution! •... -
Page 21: Σύσταση Απορρυπαντικού
3 ΛΕΙΤΟΥΡΓΙΑ Σύσταση απορρυπαντικού Συνιστώμενο απορρυπαντι- Προγράμματα Θερμοκρασία Τύπος ρούχου και κό πλύσης πλύσης πλύσης υφάσματος Λευκά ρούχα από Απορρυπαντικό βαρέως Βαμβακερά, ECO βαμβάκι ή λινό που τύπου με λευκαντικές ουσίες 30/40/60/90 40-60 πλένονται σε θερ- και λαμπρυντικά μοκρασία βρασμού Απορρυπαντικό... -
Page 22: Πίνακας Χειρισμού
3 ΛΕΙΤΟΥΡΓΙΑ 3 OPERATION 3.4 Πίνακας χειρισμού 3.4 Control Panel Πλύσιμο με ατμό Ενεργοποίηση ή απενεργοποίηση της συσκευής. Start/Pause Εκκίνηση ή διακοπή του επιλεγμένου προγράμματος. Επιλογή Με αυτά, μπορείτε να επιλέγετε πρόσθετες λειτουργίες και ανάβουν όταν επιλεγούν. Προγράμματα Διατίθεται ανάλογα με τον τύπο των ρούχων για πλύσιμο. -
Page 23: Προγράμματα
3 ΛΕΙΤΟΥΡΓΙΑ 3.5 Προγράμματα Διατίθενται προγράμματα ανάλογα με τον τύπο πλυντηρίου. Προγράμματα Συνθετικά Πλένετε συνθετικά είδη, για παράδειγμα: πουκάμισα, παλτά, ανάμει- κτης σύνθεσης. Κατά το πλύσιμο πλεκτών υφασμάτων, η ποσότητα του απορρυπαντικού πρέπει να μειωθεί λόγω της χαλαρής κατα- σκευής του νήματος και τη ευκολίας σχηματισμού φυσαλίδων. Πλύση... - Page 25 3 ΛΕΙΤΟΥΡΓΙΑ ES WM6F1002 Πρόγραμμα Πλύση με κρύο νερό 1:01 0,207 65%/1000 20°C 2:45 1,280 70%/1000 Βαμβακερά 60°C Κρύο 2:20 0,327 Κρύο 65%/1000 Συνθετικά Κρύο 0:15 0,035 Κρύο 75%/800 Σύντομη πλύση 15’ Βαμβακερά λερωμένα 3:48 1,085 65%/1000 40°C – 3:18...
- Page 26 3 ΛΕΙΤΟΥΡΓΙΑ Η υψηλότερη θερμοκρασία που φτάνουν τα ρούχα στον πρόγραμμα πλύσης για τουλάχι- στον 5 λεπτά. Υπολειπόμενη υγρασία μετά το πρόγραμμα πλύσης σε περιεκτικότητα σε νερό και ταχύτη- τα στυψίματος όπου επιτεύχθηκε. Το πρόγραμμα ECO 40-60 μπορεί να καθαρίσει κανονικά λερωμένα βαμβακερά ρούχα που...
-
Page 27: Επιλογή
3 ΛΕΙΤΟΥΡΓΙΑ 3.6 Επιλογή Προεπιλογή Προεπιλεγμένη ταχύ- Πρόγραμμα Θερμοκρα- Πρόσθετες λειτουργίες τητα στυψίματος σία ( Πρόπλυση, Επιπλέον ξέβγαλμα, Χωρίς Συνθετικά Κρύο 800/1000 στύψιμο Πρόπλυση, Επιπλέον ξέβγαλμα, Χωρίς Συνθετικά 40°C 800/1000 στύψιμο Πρόπλυση, Επιπλέον ξέβγαλμα, Χωρίς Πλύση με κρύο νερό Κρύο 800/1000 στύψιμο... - Page 28 3 ΛΕΙΤΟΥΡΓΙΑ Πρόπλυση Η λειτουργία πρόπλυσης παρέχει μια επιπλέον πλύση πριν από την κύρια πλύση, είναι κατάλληλη για την αφαίρεση της σκόνης που βρίσκεται στην επιφάνεια των ρούχων. Πρέπει να βάλετε απορρυπαντικό στη θήκη (I) όταν την επιλέξετε. Επιπλέον ξέβγαλμα Τα...
-
Page 29: Συντηρηση
4 ΣΥΝΤΗΡΗΣΗ 4.1 Καθαρισμός και περιποίηση Προειδοποίηση! Πάντα να αποσυνδέετε τη συσκευή από την πρίζα και να κλείνετε τη • βρύση πριν από τον καθαρισμό και τη συντήρηση. Καθαρισμός της μονάδας Η σωστή συντήρηση του πλυντηρίου μπορεί να παρατείνει τη διάρκεια ζωής του. Η επιφάνεια μπορεί να... -
Page 30: Καθαρισμός Του Φίλτρου
4 ΣΥΝΤΗΡΗΣΗ Καθαρισμός του φίλτρου εισαγωγής Σημείωση! • Η μείωση της ροής του νερού είναι σημάδι ότι το φίλτρο πρέπει να καθαριστεί. 1. Κλείστε τη βρύση και 2. Καθαρίστε το φίλτρο με αφαιρέστε τον εύκαμπτο βούρτσα. σωλήνα παροχής νερού από αυτήν. 3. -
Page 31: Καθαρισμός Της Θήκης Του
4 ΣΥΝΤΗΡΗΣΗ Καθαρισμός της θήκης του απορρυπαντικού 1. Πιέστε την ασφάλεια που βρίσκεται στο κάλυμμα του χώρου του μαλακτικού προς τα κάτω και τραβήξτε συρταρωτά τη θήκη από την υποδοχή. Καθαρίστε το εσωτερικό της υποδοχής με μια βούρτσα. 2. Βγάλτε το κάλυμμα του χώρου του μαλακτικού από τη θήκη και πλύνετε και τα... - Page 32 4 ΣΥΝΤΗΡΗΣΗ Καθαρισμός του φίλτρου της αντλίας αποστράγγισης Προειδοποίηση! • Βεβαιωθείτε ότι η συσκευή έχει ολοκληρώσει το πρόγραμμα πλύσης και είναι άδεια. Απενεργοποιήστε το και αποσυνδέστε το πριν καθαρίσετε το φίλτρο της αντλίας αποστράγγισης. • Προσοχή στο ζεστό νερό. Περιμένετε να κρυώσει το νερό. Κίνδυνος ζεματίσματος! •...
-
Page 33: Απορρυπαντικού
4 ΣΥΝΤΗΡΗΣΗ 4.2 Αντιμετώπιση προβλημάτων Κάθε φορά που υπάρχει κάποιο πρόβλημα με τη συσκευή, δείτε αν μπορείτε να το αντιμετωπίσετε ακολουθώντας τους παρακάτω πίνακες. Εάν το πρόβλημα εξακο- λουθεί να υφίσταται, επικοινωνήστε με το τμήμα εξυπηρέτησης πελατών. Περιγραφή Πιθανή αιτία Λύση... -
Page 34: Εξυπηρέτηση Πελατών
4 ΣΥΝΤΗΡΗΣΗ Εξυπηρέτηση πελατών Τα ανταλλακτικά για τη συσκευή σας είναι διαθέσιμα για τουλάχιστον 10 χρόνια σύμ- φωνα με το παράρτημα ΙΙ του κανονισμού (ΕΕ) 2019/2023 για τις απαιτήσεις οικολογι- κού σχεδιασμού. Αν έχετε απορίες, επικοινωνήστε με το τοπικό κέντρο εξυπηρέτησης πελατών της εταιρείας... - Page 35 5 TECHNICAL SPECIFICATION 5 TΕΧΝΙΚΑ ΧΑΡΑΚΤΗΡΙΣΤΙΚΑ Model MFE50-JU802/C31-EU(ND) Μοντέλο ES WM6F1002 MFE50-JU1002/C31-EU(ND) MFE60-U1002/C31-EU(ND) Παροχή ρεύματος 220-240V~,50Hz Power Supply 220-240V~,50Hz Μέγ. τιμή ρεύματος MAX.Current Τυπική πίεση νερού 0,05MPa~1MPa Standard Water Pressure 0.05MPa~1MPa Χωρητικότητα πλύσης 5,0/6,0kg Washing Capacity 5.0/6.0kg Διαστάσεις Dimension 595mm...
-
Page 36: Φυλλο Δεδομενων Προϊόντοσ
6 ΦΥΛΛΟ ΔΕΔΟΜΕΝΩΝ ΠΡΟΪΟΝΤΟΣ Επωνυμία ή εμπορικό σήμα προμηθευτή( α γ Διεύθυνση προμηθευτή( α γ Αναγνωριστικό μοντέλου ( ):ES WM6F1002 α Γενικές παράμετροι προϊόντος: Παράμετρος Τιμή Παράμετρος Τιμή Ύψος Διαστάσεις σε cm ( α γ Ονομαστική χωρητικότητα ( ) (kg) Πλάτος... - Page 37 6 ΦΥΛΛΟ ΔΕΔΟΜΕΝΩΝ ΠΡΟΪΟΝΤΟΣ Η πραγματική κατανάλωση ενέργειας θα εξαρτάται από τη χρήση της συ- σκευής. Η πραγματική κατανάλωση νερού θα εξαρτηθεί από τον τρόπο χρήσης της συσκευής και τη σκληρότητα του νερού. Παράδοση των ανταλλακτικών εντός 15 εργάσιμων ημερών από την παρα- λαβή...
- Page 38 ΣΗΜΕΙΩΣΕΙΣ Εγγύηση Η εν λόγω συσκευή καλύπτεται από εγγύηση με τους ακόλου- θους όρους: Παρέχεται εγγύηση του κατασκευαστή διάρκειας ... ετών από την ημερομηνία αγοράς (πρέπει να προσκομιστεί απόδειξη αγοράς). Ισχύουν οι γενικοί όροι και οι προϋποθέσεις. Η συσκευή σας / σειριακός αριθμός Ημερομηνία...
- Page 39 4. Οι ζημιές που προκαλούνται κατά τη μεταφορά της συσκευής δεν καλύπτονται από την εγγύηση. 5. Όλα τα προιόντα Eskimo είναι κατασκευασμένα για συνήθη οικιακή χρήση. Η εγγύηση δεν καλύπτει βλάβες που προκύπτουν σε συσκευές που χρησιμοποιούνται στα πλαίσια επαγγελματικής χρήσης.
- Page 40 Congratulations to your new machine ! This user manual will help you discover all the benefits of your machine and use it the way you want. We strongly recommend that you read this manual carefully before using the washing machine for the first time.It contains important safety instructions and information relating to the installation, operation and maintenance.Proper handling contributes to efficient, environmentally friendly and safe use and minimises energy consumption during operation.
- Page 41 CONTENTS 1 SAFETY INSTRUCTIONS ....4 MAINTENANCE ........Safety Instructions ......4.1 Cleaning and Care ....... Cleaning the Cabinet......INSTALLATION ........Cleaning the Drum ......Product Description ...... Cleaning the Door Seal and Glass.. Accessories ........Cleaning the Inlet Filter ..... 2.2 Installation ......
-
Page 42: Safety Instructions
1 SAFETY INSTRUCTIONS INTENDED USE The product is intended only for home use and for textiles in household amounts suitable for washing. This appliance is for indoor use only and not intended for built in use. Only use according to these instructions. The appliance is not intended for commercial use. - Page 43 1 SAFETY INSTRUCTIONS Warning! ELECTRIC SHOCK HAZARD • If the supply cord is damaged, it must be replaced by the manufacturer, its service agent or similarly qualified persons in order to avoid a hazard. • If the machine is damaged, it must not be operated unless repaired by the manufacturer, its service agent or similarly qualified persons.
- Page 44 1 SAFETY INSTRUCTIONS INSTALLATION LOCATION AND SURROUNDING All washing and additional substances are to • be kept in a safe place out of the reach of children. • Do not install the machine on a carpet floor. • The obstruction of the openings by a carpet can damage the machine.
- Page 45 1 SAFETY INSTRUCTIONS INSTALLATION • Remove all packaging material and transport bolts before using the appliance. Otherwise, serious damage may result. • This appliance is equipped with a single inlet valve and can be connected to the cold water supply only. Mains plug must be accessible after installation.
- Page 46 1 SAFETY INSTRUCTIONS regulations. • Water and electrical connections must be carried out by a qualified technician in accordance with the manufacturer’s instructions and local safety regulations. Warning! • Don´t use multiple plugs or extension cords. • The appliance must not have an external switching device such as a timer or connected to a circuit that is regularly switched on and off.
- Page 47 1 SAFETY INSTRUCTIONS Do not remove the drain pump filter while there • is still water in the appliance. Big quantities of water can leak out, and there is a risk of scalding due to hot water. OPERATION AND MAINTENANCE •...
- Page 48 1 SAFETY INSTRUCTIONS • The door will unlock shortly after the end of a cycle. Please do not close the door with excessive • force. If it is found difficult to close the door, please check if the clothes are properly inserted and distributed.
- Page 49 For dumps and the environment. further information on Together, we are making an collection and disposal, please important contribution to contact your local authority, environmental protection. city council or your Model Washing Capacity ES WM6F1002...
-
Page 50: Installation
2 INSTALLATION 2.1 Product Description Service flap Control panel Door Drain hose Power supply cord Detergent dispenser Note! • The product picture is for illustration only, please refer to real product as reference. Accessories 4 x Cover 1 x Owner’s Acoustic sponge 1 x Supply hose (optional) -
Page 51: Installation
2 INSTALLATION 2.2 Installation Tools Needed If Installation By Yourself (not include) Installation area Warning! • Stability is important to prevent the product from wandering! • Make sure the machine is standing leveled and stable. • Make sure that the product does not stand onto the power cord. •... -
Page 52: Unpacking The Machine
2 INSTALLATION Unpacking the machine Warning! • Packaging material (e.g. Films, Styrofoam) can be dangerous for children. • There is a risk of suffocation ! Keep all packaging well away from children. 1. Remove the cardboard box and styrofoam packing. 2. -
Page 53: Levelling The Machine
2 INSTALLATION Levelling the machine Warning! • The lock nuts on all four feet must be screwed tightly against the housing. 1. Loosen the lock nut. 2. Turn the foot until it reaches the floor. 3. Adjust the legs and lock the nuts with a spanner. -
Page 54: Acoustic Sponge
2 INSTALLATION There are two ways to place the end of drain hose: Water trough 1.Put it into the water trough. 2.Connect it to the branch drain pipe of the trough. Acoustic Sponge Note! • Please make sure to assemble the acoustic sponges, which can effectively reduce the noise caused by the machine while working, in order to provide you with a more peaceful and quiet living environment. -
Page 55: Operation
3 OPERATION 3.1 Quick Start Caution! • Before washing, please make sure the washing machine is installed properly. • Your appliance was thoroughly checked before it left the factory. To remove any residual water and to neutralize potential odors, it’s recommended to clean your appliance before first use. - Page 56 3 OPERATION 2. Washing Select programme Select function or remain default settings Press Start/Pause to start the program 3. After Washing Buzzer beep.
-
Page 57: Before Each Washing
3 OPERATION 3.2 Before Each Washing • The ambient temperature of the machine should be 5 °C -40°C. If used under 0°C, the inlet valve and draining system may be damaged. If the machine is installed under freezing conditions, it should be transferred to normal ambient temperature to ensure the water supply hose and drain hose can unfreeze before use. -
Page 58: Detergent Dispenser
3 OPERATION 3.3 Detergent Dispenser Pre wash Ⅱ Main wash Ⅱ Softener Release button to pull out the dispenser Caution! • Detergent only need to be added in compartment I ”after “ selecting pre-wash function. • Do not put laundry beads into the detergent dispenser. Programme Programme Delicate 30 °C... -
Page 59: Detergent Recommendation
3 OPERATION Detergent Recommendation Recommended washing Washing Wash cycles Type of laundry detergent temp. and textile Heavy-duty detergent White laundry made 30 40 with bleaching agents Cotton,ECO 40-60 from boil-proof 60/90 and optical brighteners cotton or linen Colour detergent Coloured laundry Cold/20/ Cotton,ECO40-60, without bleaching agent... -
Page 60: Control Panel
3 OPERATION 3.4 Control Panel Turn the appliance on and off. Start/Pause Start or pause your programme. Option This allows you to select additional functions and will light when selected. Programmes Available according to the laundry type. -
Page 61: Programmes
3 OPERATION 3.5 Programmes Programmes are available according to the laundry type. Programmes Synthetic Wash synthetic articles, for example: shirts, coats, blending. While washing the knitting textiles, detergent quantity shall be reduced due to its loose string construction and easily forming bubbles. Cold Wash Cold water to wash clothes. - Page 62 3 OPERATION Model:ES WM6F1002 Programme Load(kg) Display Time 2:20 Synthetic 2:20 Synthetic ℃ 1:00 Cold Wash 1:01 Cold Wash 20℃ Cotton 30℃ 2:40 2:40 Cotton 40℃ 2:45 Cotton 60℃ 2:50 Cotton 90℃ ECO 40-60 3:18 Cotton Intensive 40℃ Cotton Intensive 60℃...
- Page 63 3 OPERATION ES WM6F1002 Cycle Cold Wash 20°C 1:01 0.207 65%/1000 70%/1000 2:45 1.280 Cotton 60°C Cold 2:20 Cold Synthetic 65%/1000 Cold 0:15 Cold 75%/800 Quick Wash 15' 3:48 65%/1000 Cotton Intensive 40°C – 3:18 0.862 62.9%/1000 ECO 40-60 –...
- Page 64 3 OPERATION 1) The highest temperature reached by the laundry in the wash cycle for at least 5 minutes. 2) Residual moisture after the wash cycle in water content percent and the spin speed at which this was achieved. 3) The ECO 40-60 programme is able to clean normally soiled cotton laundry declared to be washable at 40°C or 60°C, together in the same cycle.
- Page 65 3 OPERATION 3.6 Option Default Default spin Additional Cycle Temp.(℃) speed functions Synthetic Cold 1000 Pre Wash,Extra Rinse,No Spin Synthetic 40 ℃ 1000 Pre Wash,Extra Rinse,No Spin Cold Cold Wash 1000 Pre Wash,Extra Rinse,No Spin 1000 Pre Wash,Extra Rinse,No Spin Cold Wash 20℃...
- Page 66 3 OPERATION Prewash: The Prewash function can get an extra wash before main wash,it is suitable for washing the dust rises to surface of the clothes;You need to put detergent into the Case (I) when select it. Extra Rinse: The laundry will undergo extra rinse once after you select it. No Spin: It will not spin if you choose this function.
-
Page 67: Maintenance
4 MAINTENANCE 4.1 Cleaning and Care Warning! • Always unplug the appliance and close the water tap before cleaning and maintenance. Cleaning the Cabinet Proper maintenance on the washing machine can extend its working life. The surface can be cleaned with diluted non-abrasive neutral detergents when necessary. -
Page 68: Cleaning The Inlet Filter
4 MAINTENANCE Cleaning the Inlet Filter Note! • Diminishing water flow is a sign that the filter need to be cleaned. 1. Close the tap and 2. Clean the filter with remove the water a brush. supply hose from it. 3. -
Page 69: Cleaning The Detergent Dispenser
4 MAINTENANCE Cleaning the Detergent Dispenser 1. Press down the release [ ] on the softener cover and pull the dispenser drawer out of the recess. Clean the inside of the recess with a brush. 2. Lift the softener cover off the dispenser drawer and wash both items with water. -
Page 70: Cleaning The Drain Pump Filter
4 MAINTENANCE Cleaning the Drain Pump Filter Warning! • Make sure that the machine has finished the washing cycle and is empty. Switch it off and unplug it before cleaning the drain pump filter. • Be careful of hot water. Wait for water cooling down. Risk of scalding! •... -
Page 71: Trouble Shooting
4 MAINTENANCE 4.2 Trouble Shooting Whenever there is a problem with the appliance, check if you can solve it following the tables below. If the problem persists, please contact the customer service. Description Possible cause Solution Appliance does Close the door properly and Door is not closed properly. -
Page 72: Customer Service
4 MAINTENANCE 4.3 Customer service Spare part for your appliance are available for a minimum of 10 years following EU COMMISSION REGULATION 2019/2023 ANNEX II Ecodesign requirements. In case of questions, please contact our local customer service center. Warning! Risk of electric shock •... -
Page 73: Technical Specification
5 TECHNICAL SPECIFICATION Model ES WM6F1002 Power Supply 220-240V~,50Hz MAX.Current Standard Water Pressure 0.05MPa~1MPa Washing Capacity 5.0/6.0kg Dimension 595mm 850mm 435mm 890mm 156mm 440mm 400mm 900mm Weight 52kg Rated Power 2000W... -
Page 74: Product Fiche
6 PRODUCT FICHE ):ES WM6F1002 79.5 0.644... - Page 75 6 PRODUCT FICHE 1) The actual energy consumption will depend on how the appliance is used. 2) The actual water consumption will depend on how the appliance is used and on the hardness of the water. 3) Delivery of the spare parts within 15 working days after having received the order.
- Page 76 Η τεχνική υποστήριξη και το service των Συσκευών Eskimo έχει ανατεθεί στην εταιρεία: GENERAL SERVICE ΕΠΕ Λεάνδρου 22 Κολωνός, Αθήνα 10443 : 210 8830666, 210 5145030 service@general-service.gr (για σέρβις) : parts@general-service.gr (για ανταλλακτικά) : ���� www.general-service.gr F.G. EUROPE Α.Ε.
- Page 77 NOTES Warranty We provide a guarantee for this machine in accordance with the following conditions: You have a manufacturer’s warranty of years from the date of purchase (proof of purchase must be provided). Our General Terms and Conditions apply. Your device / serial number Purchase date: Place of purchase: Do you have any questions ?
- Page 78 Η τεχνική υποστήριξη και το service των Συσκευών Eskimo έχει ανατεθεί στην εταιρεία: GENERAL SERVICE ΕΠΕ Λεάνδρου 22 Κολωνός, Αθήνα 10443 Τηλ: 210 8830666, 210 5145030 Σέρβις: service@general-service.gr Ανταλλακτικά: parts@general-service.gr www.general-service.gr F.G. EUROPE Α.Ε. Λ. Βουλιαγμένης 128 166 74 Γλυφάδα, Αθήνα...
Need help?
Do you have a question about the ES WM6F1002 and is the answer not in the manual?
Questions and answers
how do I use the delayed start (3-6-9h) function on eskimo washing machine es wm6f1002
To use the delayed start function on the Eskimo washing machine ES WM6F1002, select the "Ends in" program. This function allows you to delay the end time of the cycle by 3, 6, or 9 hours, which includes both the washing and delay time. Choose the desired delay duration (3h, 6h, or 9h) during program selection.
This answer is automatically generated
@Mr. Anderson Sorry if I am being a little thick, but I don't see how I can select the delay and then the programme using the same dial. There is no indication that the delay has been selected and only the programme can be selected with the dial.