
Subscribe to Our Youtube Channel
Related Manuals for Klimasan Inova208

Summary of Contents for Klimasan Inova208
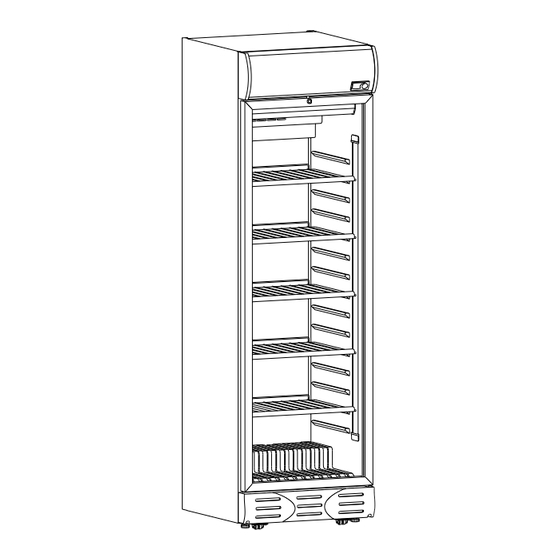
- Page 2 TECHNICAL FEATURES OF SINGLE DOOR VISI-COOLERS 1 - Door 8 - Thermostat sett ng knob 2 - Power compartment 9 - L ght ng sw tch 3 - Shelf 10 - Fan sw tch 4 - Adjustable he ght 11 - Inter or l ght ng 5 - Inter or vent lat on fan 12 - Thermometer 6 - Canopy...
- Page 5 3. TECHNICAL FEATURES OF SINGLE DOOR VISI-COOLERS External Operat ng Internal Max. Shelf D mens ons Temperature D mens ons Load (Net) TECHNICAL FEATURES WxDxH (mm) WxDxH (mm) °C 0/+10 350x285x517 410x427x592 S 56 SC 0/+10 337x303x450 435x488x740 0/+10 430x430x649 500x527,5x751 S 88 SC 0/+10...
- Page 6 Operat ng Internal External Max. Shelf Temperature D mens ons D mens ons Load (Net) TECHNICAL FEATURES WxDxH (mm) WxDxH (mm) °C Inova208 0/+10 511x514x1030 610x691x1250 Inova288 0/+10 415x518x1235 515x725x1758 Inova400 0/+10 490x469x1570 625x680x2055 Inova420 0/+10 480x503x1605 580x675x2112 Inova508 0/+10...
- Page 7 Thermostat adjustment s the most opt mum adjustment n products w th mechan cal thermostat n factory defaults. It s recommended not to be replaced as long as t s not troubled w th the nter product temperature. If you th nk that the product s not n des red temperature range you can make thermostat adjustment.
- Page 8 For Models W th Opt on-1 : There are shelves sh pped ns de the v s /cooler. F rst nsert the uppermost shelf n the uppermost hooks n the body Insert the others correspond ngly w th the same method. Ch ll ng process n the body takes place through the nternal a r c rculat on. Therefore do not place the shelves very close to one another.
- Page 9 For models w th metal sheet connectors Your cab net has been f xed w th 4 metal brackets on wooden pallet before sh pp ng . Please follow the nstruct ons below before plac ng on ts place. Detach by unbolt ng 3 screws and remove metal bracket f xed cab net and wooden pallet n front and back sect ons through a cutter dev ce.
- Page 10 SAFETY FEET : If you have a wheeled product, there are 2 safety feet on the front of your product. ATTENTION !!! Unless they are damaged and replaced by the same feet do not remove the safety feet under any circumstances ! Never change the safety feet while the cooler is running ..! Change the safety feet by tilting the product towards the back or right side of the product.
- Page 12 8. FOR CAREL ECOBOX and CAREL ENERGY SAVING CONTROLLED MODELS: Control un t flashes for a few seconds n order to check f all connect ons are made correctly when the cooler s plugged n. Th s s normal, then the d splay w ll nd cate current temperature. Set temperature has been adjusted to keep your beverages at opt mum temperature, please do not attempt to change the sett ngs.
- Page 14 B6114285_K00...
Need help?
Do you have a question about the Inova208 and is the answer not in the manual?
Questions and answers