Table of Contents
Advertisement
Available languages
Available languages
Quick Links
Advertisement
Table of Contents

Related Manuals for FIXTEC FMS21002

Summary of Contents for FIXTEC FMS21002
- Page 1 Compound Mitre Saw INGLETEADORA FMS21002 www.fixtectools.com...
-
Page 2: Electrical Safety
English General Power Tool Safety Warnings Read all safety warnings and all instructions. Failure to follow the warnings and instructions may result in electric shock, fire and/or serious injury. Save all warnings and instructions for future reference. The term “power tool” in the warnings refers to your mains-operated (corded) power tool or battery-operated (cordless) power tool. - Page 3 hearing protection used for appropriate conditions will reduce personal injuries. c) Prevent unintentional starting. Ensure the switch is in the off-position before connecting to power source and/or battery pack, picking up or carrying the tool. Carrying power tools with your finger on the switch or energizing power tools that have the switch on invites accidents.
- Page 4 a) Have your power tool serviced by a qualified repair person using only identical replacement parts. This will ensure that the safety of the power tool is maintained. Safety Warnings for Mitre Saws Never stand on the power tool. Serious injuries can occur when the ...
-
Page 5: Intended Use
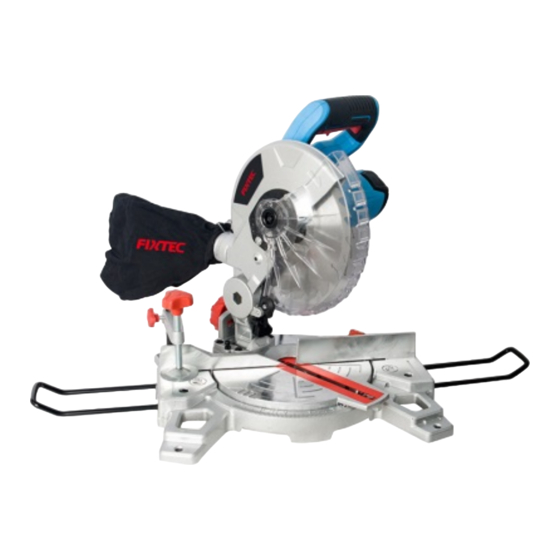
Never operate the machine without the insert plate. Replace a defective insert plate. Without flawless insert plates, injuries are possible from the saw blade. Check the cable regularly and have a damaged cable repaired only through an authorized customer service agent for power tools. Replace damaged extension cables. - Page 6 1 Operating handle 2 Upper fixed blade guard 3 Rotating blade guard 4 Guard retraction arm 5 Saw arm 6 Release knob 7 Blade bolt cover 8 Dust ba 9 Bevel lock 10 Bevel scale 11 Fence 12 Mitre table 13 Mitre scale 14 Table insert 15 Switch trigger...
-
Page 7: Bench Mounting
Assembly Before any work on the machine itself, pull the mains plug. Delivery Scope Before starting the operation of the machine for the first time, check if all parts listed below have been supplied: - 24 Teeth blade (fitted) - Dust bag - Work clamp - Blade socket wrench - Side support bar (x 2) -
Page 8: Dust Extraction
loosen the mitre table locks and rotate the mitre table to the desired position. The mitre table features positive click stops at 0°, 15°, 22.5°, 30° and 45° for quick setting of common mitre angles. Warning: Be sure to tighten the mitre table locks before making a cut. Failure to do so could result in the table moving during the cut and cause serious personal injury. -
Page 9: Setting The Table Square With The Blade
Setting the table square with the blade 1. Make sure that the electrical plug is removed from the power point. 2. Push the saw arm down to its lowest position and engage the release knob to hold the saw arm in the transport position. 3. - Page 10 10. Loosen the Phillips head screw holding the pointer of the mitre scale and adjust it so that it accurately indicates the zero position on the mitre scale. 11. Retighten the screw securing the mitre scale pointer. Change a Blade Danger! Never try to use a blade larger than the stated capacity of the saw.
-
Page 11: Cross Cut
position. 16. Replace the guard retraction arm and secure onto the rotating blade guard. 17. Check that the blade guard operates correctly and covers the blade as the saw arm is lowered. 18. Connect the saw to the power supply and run the blade to make certain that it is operating correctly. -
Page 12: Compound Mitre Cut
Warning: When making any adjustment to your work, ensure that the blade is stationary and keep your hands away from the area of the switch. If possible, always use a clamping device such as a ‘G" clamp to secure your workpiece. -
Page 13: Maintenance And Cleaning
hand. A compound mitre cut involves using a mitre angle and a bevel angle at the same time. It is used in making picture frames, to cut mouldings, making boxes with sloping sides and for roof framing. Always make a test cut on a piece of scrap wood before cutting into the good material. - Page 14 Before any work on the machine itself, pull the mains plug. Clean the ventilation slots of your power tool regularly with a soft brush. The motor fan draws dust into the housing, and a large accumulation of metal dust can lead to electrical hazards. In extreme conditions, always use dust extraction as far as possible.
-
Page 15: Exploding View
Exploding View... -
Page 16: Spare Part List
Spare Part List Part Description Part Description Part Description Rubber boot Washer Moving guard plate Bearing Moto housing Shoulder screw Armature locking pin cap Linkage Stator Socket head screw Rivet Fan baffle Locknut Socket head screw Washer Washer Linkage support Spring washer Bearing Pivot shaft... -
Page 17: Seguridad Eléctrica
Español ADVERTENCIAS GENERALES EN MATERIA DE SEGURIDAD Lea todas las instrucciones y advertencias en materia de seguridad. El incumplimiento de las consignas contenidas en las advertencias e instrucciones puede provocar descargas eléctricas, incendios y/o lesiones corporales graves. Conserve todas las advertencias e instrucciones para poderlas consultar en el futuro. - Page 18 Seguridad para las personas ▪ Esté atento. Concéntrense en el trabajo que esté realizando y utilice las herramientas eléctricas con sensatez. No utilice el aparato cuando esté cansado o bajo los efectos de narcóticos, alcohol o fármacos. Un momento de inatención mientras se utiliza una herramienta eléctrica puede provocar graves lesiones corporales.
- Page 19 funcionamiento de la herramienta. Si la herramienta estuviere dañada, hágala reparar antes de utilizarla. Muchos accidents se deben a falta de mantenimiento. ▪Mantenga las herramientas de corte limpias y afiladas. Unas herramientas de corte en buen estado y afiladas son más fáciles de manejar y se agarrotan menos.
- Page 20 ▪ NUNCA use guantes cuando trabaje; se recomienda utilizar guantes sólo para cambiar los accesorios de corte. ▪ Asegúrese que sus manos estén fuera de la línea de corte de la hoja de sierra. ▪ NUNCA se ponga en la línea de corte de la hoja de sierra ni deje que alguien se encuentre en esa posición.
- Page 21 toma de corriente. No exponga el cable a calor, aceite, agua o bordes afilados. ▪ Algunos tipos de polvo generados durante el trabajo con la sierra pueden contener sustancias químicas cancerígenas o que causen defectos en neonatos u otros daños de carácter genético. Entre estas sustancias se cuenta: ▪...
-
Page 22: Datos Técnicos
1 Manilla de operación 2 Protector de la hoja fija superior 3 Protector de la hoja giratoria 4 Brazo retráctil del protector 5 Brazo de ingleteadora 6 Perilla de liberación 7 Cubierta del perno de la hoja 8 Bolsa para el polvo 9 Seguro de bisel 10 Escala de bisel 11 Tope... - Page 23 La base de la sierra tiene orificios en cada esquina para facilitar el montaje en un banco de trabajo. 1. Instale la sierra en una banca horizontal y nivelada o en una mesa de trabajo usando pernos (no suministrados) y fije la sierra a la banca de trabajo usando 4 pernos.
-
Page 24: Encendido Y Apagado
bajada en la pieza de trabajo. Ensamble de la abrazadera El ensamble de la abrazadera puede ser fijado a la valla, en cualquier lado de la hoja de la sierra, para tenerla a mano. Cuando desarrolle un corte de bisel, la abra zadera de la pieza de trabajo debe ser colocada en el lado derecho de la valla. - Page 25 6. Suelte el seguro de bisel y regule el brazo de la sierra a 0° bisel (la hoja a 90° a la hoja de inglete). Apriete el seguro de bisel. 7. Coloque un conjunto de escuadra en contra de la mesa y de la parte plana de hoja.Nota.
- Page 26 ¡PELIGRO! Jamás intente usar un cuchillo más grande de la capacidad establecida de la herramienta. Esto podría hacer que le hoja entre en contacto con los protectores de hoja. Jamás use una cuchilla que sea demasiado gruesa, para permitir que la golilla exterior de la cuchilla se acople con las golillas planas en el eje.
-
Page 27: Corte De Bisel
disco giratorio. 17. Revise que el protector del disco opera correctamente y cobra la hoja una vez que el brazo de la sierra está abajo. 18. Conecte la ingleteadora al suministro eléctrico y corra la herramienta para cerciorarse de que opera correctamente Corte de bisel Un corte de bisel se hace cortando perpendi cularmente a las fibras de la pieza de trabajo,con el disco angulada a la valla y a la mesa de inglete. -
Page 28: Inspección General
completamente antes de quitar la pieza de trabajo. Mantención ADVERTENCIA. Siempre asegúrese de que la herramienta esté apagada y desconectada de la toma eléctrica antes de realizar procedimientos de ajuste y/o mantención. Mantención del cable eléctrico. Si el cable suministrado necesita ser reemplazado, esta tarea SOLO debe ser hecha por su servicio técnico autorizado, para así... - Page 29 واﻟﺘﻨﻈﯿﻒ اﻟﺼﯿﺎﻧﺔ اﻟﻜﮭﺮﺑﺎﺋﯿﺔ اﻟﻌﺪة ﻋﻠﻰ ﻋﻤﻞ أي إﺟﺮاء ﻗﺒﻞ اﻟﻜﮭﺮﺑﺎﺋﯿﺔ اﻟﺸﺒﻜﺔ ﻣﻘﺒﺲ ﻣﻦ اﻟﻘﺎﺑﺲ اﺳﺤﺐ اﻷﻏﺒﺮة اﻟﻤﺤﺮك ﻣﻨﻔﺎخ ﯾﺴﺤﺐ طﺮﯾﺔ ﻓﺮﺷﺎة ﺑﻮاﺳﻄﺔ ﻣﻨﺘﻈﻢ ﺑﺸﻜﻞ اﻟﻜﮭﺮﺑﺎﺋﯿﺔ ﺑﻌﺪﺗﻚ اﻟﺘﮭﻮﯾﺔ ﺷﻘﻮق ﻧﻈﻒ ﺑﺮاﺋﯿﺔ اﻟﻜﮫ اﻟﻤﺨﺎطﺮ اﻟﺸﺪﯾﺪ اﻟﻤﻌﺪﻧﯿﺔ اﻷﻏﺒﺮة ﺗﺮاﻛﻢ ﯾﺸﻜﻞ وﻗﺪ ،اﻟﮭﯿﻜﻞ داﺧﻞ إﻟﯽ...
- Page 30 . اﻣﺴﻚ ﻣﻘﺒﺾ اﻟﺘﺸﻐﯿﻞ ﺑﻘﻮة وﺿﻐﻂ ﻋﻠﻰ اﻟﺰﻧﺎد اﻟﺘﺒﺪﯾﻞ. ﯾﺴﻤﺢ ﻟﻠﺸﻔﺮة ﻟﻠﻮﺻﻮل إﻟﻰ اﻟﺴﺮﻋﺔ اﻟﻘﺼﻮى، اﺿﻐﻂ .ﻋﻠﻰ ﻗﻔﻞ ﺗﺤﺮﯾﺮ وﺑﺒﻂء ﯾﻘﻠﻞ ﻣﻦ ﺷﻔﺮة ﻓﻲ وﻣﻦ ﺧﻼل اﻟﺸﻐﻞ . اﻹﺻﺪار ﻋﻠﻰ اﻟﺰﻧﺎد اﻟﺘﺒﺪﯾﻞ وﯾﺴﻤﺢ ﻟﻠﺸﻔﺮة اﻟﻤﻨﺸﺎر ﻟﻮﻗﻒ اﻟﺪورﯾﺔ ﻗﺒﻞ رﻓﻊ اﻟﻨﺼﻞ ﻣﻦ اﻟﺸﻐﻞ. اﻻﻧﺘﻈﺎر ﺣﺘﻰ .ﺗﻮﻗﻒ...
- Page 31 ﻗﺺ ﻋﺒﺮ اﻟﺘﺒﺪﯾﻞ ﻣﻨﻄﻘﺔ ﻣﻦ ﺑﻌﯿﺪا ﯾﺪﯾﻚ ﻋﻠﻰ واﻟﺤﻔﺎظ ﺛﺎﺑﺘﺔ ﺷﻔﺮة أن ﻣﻦ ﺗﺄﻛﺪ ،ﻋﻤﻠﻚ ﻋﻠﻰ ﺗﻌﺪﯾﻞ أي إﺟﺮاء ﻋﻨﺪ ﺗﺤﺬﯾﺮ ﺑﻚ اﻟﺨﺎص اﻟﺸﻐﻞ ﻟﺘﺄﻣﯿﻦ اﻟﻤﺸﺒﻚ " " ﻣﺜﻞ ﻟﻘﻂ ﺟﮭﺎز اﺳﺘﺨﺪام وداﺋﻤﺎ ،ﻣﻤﻜﻨﺎ ذﻟﻚ ﻛﺎن إذا اﻟﻨﺼﻞ ﻣﻨﻄﻘﺔ ﻋﻦ ﺑﻌﯿﺪا...
- Page 32 وﺿﻊ ﻣﺮﺑﻊ ﺳﯿﺎج ﻣﻊ اﻟﺠﺪول .. ﺗﺄﻛﺪ ﻣﻦ أن ﺗﺘﻢ إزاﻟﺔ اﻟﺘﯿﺎر اﻟﻜﮭﺮﺑﺎﺋﻲ ﻣﻦ ﻧﻘﻄﺔ ﻗﻮة .. دﻓﻊ اﻟﻤﻨﺸﺎر اﻟﺬراع وﺻﻮﻻ إﻟﻰ أدﻧﻰ ﻣﻮﻗﻔﮭﺎ وﺗﺸﺎرك ﻣﻘﺒﺾ اﻹﻓﺮاج ﻋﻘﺪ اﻟﺬراع رأى ﻓﻲ ﻣﻮﻗﻒ اﻟﻨﻘﻞ .. ﻓﻚ أﻗﻔﺎل ﻣﯿﺘﺮي 0 º . ﺗﺪوﯾﺮ اﻟﺠﺪول ﺣﺘﻰ ﯾﺘﻢ وﺿﻊ اﻟﻤﺆﺷﺮ ﻓﻲ ..
- Page 33 .ﺧﻼل ﻗﻄﻊ وﯾﺴﺒﺐ إﺻﺎﺑﺔ ﺑﺪﻧﯿﺔ ﺑﺎﻟﻐﺔ اﻟﻤﻐﺰل ﻗﻔﻞ زر زر ﻗﻔﻞ اﻟﻤﻐﺰل ﯾﻤﻨﻊ اﻟﻨﺼﻞ ﻓﻲ اﻟﻤﻨﺸﺎر ﻣﻦ اﻟﺪورﯾﺔ. ﺧﻔﺾ واﻻﺳﺘﻤﺮار ﻋﻠﻰ زر ﻗﻔﻞ اﻟﻤﻐﺰل أﺛﻨﺎء ﺗﺜﺒﯿﺖ أو .ﺗﻐﯿﯿﺮ أو إزاﻟﺔ ﺷﻔﺮة :ﺗﺤﺬﯾﺮ .ﻻ اﻟﻀﻐﻂ ﻋﻠﻰ اﻟﺰر ﻗﻔﻞ اﻟﻤﻐﺰل ﺑﯿﻨﻤﺎ اﻟﻨﺼﻞ ﯾﺪور أو رأى ﻣﯿﺘﺮي ﻗﯿﺪ اﻻﺳﺘﺨﺪام اﻧﺨﻔﺎض...
- Page 34 ﺗﺴﻠﯿﻢ اﻟﻨﻄﺎق :ﻗﺒﻞ ﺑﺪء ﺗﺸﻐﯿﻞ اﻟﺠﮭﺎز ﻷول ﻣﺮة، ﻣﻌﺮﻓﺔ ﻣﺎ اذا ﻛﺎن ﻗﺪ ﺗﻢ ﺗﺰوﯾﺪ ﺟﻤﯿﻊ أﺟﺰاء اﻟﻤﺪرﺟﺔ أدﻧﺎه (اﻷﺳﻨﺎن )ﺗﺮﻛﯿﺐ - ﺷﻔﺮة - ﺣﻘﯿﺒﺔ اﻟﻐﺒﺎر - اﻟﻤﺸﺒﻚ اﻟﻌﻤﻞ - ﻣﺄﺧﺬ وﺟﻊ ﺑﻠﯿﺪ ×) - ﺷﺮﯾﻂ دﻋﻢ اﻟﺠﺎﻧﺐ ﻣﻠﻢ ﻣﻔﺎﺗﯿﺢ ﻋﺮاﻓﺔ اﻟﺘﺤﻘﻖ...
- Page 35 اﻟﻤﺼﻮرة اﻷﺟﺰاء اﻟﺘﺨﻄﯿﻄﯿﺔ اﻟﺮﺳﻮم ﺻﻔﺤﺔ ﻓﻲ اﻟﻤﻮﺟﻮدة ﺑﺮاﺋﯿﺔ اﻟﻜﮫ اﻟﻌﺪة رﺳﻮم إﻟﯽ اﻟﻤﺼﻮرة اﻷﺟﺰاء ﺗﺮﻗﯿﻢ ﯾﺴﺘﻨﺪ اﻟﻌﻠﻮي ﺣﺎرس ﺷﻔﺮة ﺛﺎﺑﺘﺔ ﻣﻘﺒﺾ اﻟﺘﺸﻐﯿﻞ اﻟﺬراع ﺗﺮاﺟﻊ اﻟﺤﺮس ﺣﺎرس ﺷﻔﺮة اﻟﺪورﯾﺔ ﻣﻘﺒﺾ اﻹﻓﺮاج ذراع اﻟﻤﻨﺸﺎر ﻏﺒﺎر ﺣﻘﯿﺒﺔ ﻏﻄﺎء اﻟﺘﺮﺑﺎس ﺷﻔﺮة ﻧﻄﺎق ﺷﻄﺒﺔ ﻗﻔﻞ ﺷﻄﺒﺔ اﻟﺠﺪول...
- Page 36 ﺗﺘﻌﺜﺮ أو ﺗﻨﺰﻟﻖ أن ﯾﺠﻮز اﻟﻤﺎدة وﺑﻘﺎﯾﺎ اﻟﺨﺸﺐ ﻧﺸﺎرة ﻣﻦ ﺧﺎﻟﯿﺔ اﻷرض إﺑﻘﺎء ﻋﻠﯽ ﺣﺎﻓﻆ ﺗﺴﻤﺢ ﻻ ﻟﺪرﺟﺔ اﻟﺼﻐﯿﺮة اﻟﺸﻐﻞ ﻗﻄﻊ ﺗﻌﺎﻟﺞ . ﻻ داﺋﻤﺎ ﺑﺈﺣﻜﺎم ﻣﻌﺎﻟﺠﺘﮭﺎ اﻟﻤﺮﻏﻮب اﻟﺸﻐﻞ ﻗﻄﻌﺔ اﻗﻤﻂ . إذ ﺑﻘﻤﻄﮭﺎ اﻟﻤﺴﻤﻮح اﻟﺤﺪ ﻋﻦ ﺳﯿﻘﻞ اﻟﺪوار...
- Page 37 ﻣﺘﻮﻗﻌﺔ اﻟﻐﯿﺮ اﻟﻤﻮاﻗﻒ ﻓﻲ أﻓﻀﻞ ﺑﺸﻜﻞ اﻟﺠﮭﺎز ﻋﻠﯽ واﻟﻘﻔﺎزات واﻟﺜﯿﺎب اﻟﺸﻌﺮ إﺑﻘﺎء ﻋﻠﯽ ﺣﺎﻓﻆ اﻟﺤﻠﯽ أو اﻟﻔﻀﻔﺎﺿﺔ اﻟﺜﯿﺎب ﺗﺮﺗﺪ . ﻻ ﻣﻨﺎﺳﺒﺔ ﺛﯿﺎب ارﺗﺪ . ﻗﺪ اﻟﻤﺘﺤﺮﻛﺔ اﻟﺠﮭﺎز أﺟﺰاء ﻋﻦ ﺑﻌﺪ ﻋﻠﯽ ﺑﺎﻷﺟﺰاء اﻟﻄﻮﯾﻞ واﻟﺸﻌﺮ واﻟﺤﻠﯽ اﻟﻔﻀﻔﺎﺿﺔ اﻟﺜﯿﺎب ﺗﺘﺸﺎﺑﻚ اﻟﻤﺘﺤﺮﻛﺔ...
- Page 38 اﻟﻜﮭﺮﺑﺎﺋﯿﺔ ﻟﻠﻌﺪد ﻋﺎﻣﺔ ﺗﺤﺬﯾﺮﯾﺔ ﻣﻼﺣﻈﺎت واﻟﺘﻌﻠﯿﻤﺎت اﻟﺘﺤﺬﯾﺮﯾﺔ اﻟﻤﻼﺣﻈﺎت ﺟﻤﯿﻊ اﻗﺮأ ،ﺑﺮاﺋﯿﺔ اﻟﻜﮫ اﻟﺼﺪﻣﺎت إﻟﯽ ﯾﺆدي ﻗﺪ واﻟﺘﻌﻠﯿﻤﺎت اﻟﺘﺤﺬﯾﺮﯾﺔ اﻟﻤﻼﺣﻈﺎت ﺗﻄﺒﯿﻖ ﻋﻨﺪ اﻷﺧﻄﺎء ارﺗﻜﺎب إن ﺧﻄﯿﺮة ﺑﺠﺮوح اﻹﺻﺎﺑﺔ أو / و اﻟﺤﺮاﺋﻖ ﻧﺸﻮب إﻟﯽ ﻟﻠﻤﺴﺘﻘﺒﻞ واﻟﺘﻌﻠﯿﻤﺎت اﻟﺘﺤﺬﯾﺮﯾﺔ اﻟﻤﻼﺣﻈﺎت ﺑﺠﻤﯿﻊ اﺣﺘﻔﻆ ﺑﺎﻟﺸﺒﻜﺔ اﻟﻤﻮﺻﻮﻟﺔ...
- Page 39 اﻟﻤﻨﺸﺎر ﻣﯿﺘﺮي ﻣﺠﻤﻊ FMS21002 www.fixtectools.com...
Need help?
Do you have a question about the FMS21002 and is the answer not in the manual?
Questions and answers