
Subscribe to Our Youtube Channel
Related Manuals for BHCnav NAVA Pro F70


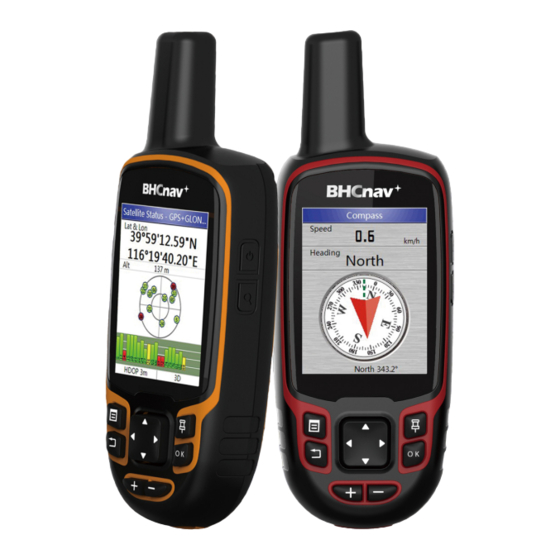
Summary of Contents for BHCnav NAVA Pro F70
- Page 2 Operation Steps: 1.Before operation, please inspect all the keys, as per picture 2.Then smear evenly silicone oil around the keys, and smearing area as per picture 2. Key around 3.Put the smeared keys into the fixed area on the upper Picture 1 Picture 2 casing, and correct the position, as per picture 3.
- Page 3 Operation Steps: 1.Before operation, please inspect the previous operation correction. 2.Prepare 1 pc qualified foam, as per picture 1. 3.Put the foam into the designated area on the upper casing, as per picture 1 with tweezers. And make sure them not fold,breakage,offset. 4.After assembly, inspect the quality.
- Page 4 Operation Steps: 1.Before operation, please inspect the previous operation correction. 2.Prepare 1 pc qualified lower casing and 1 set qualified +/- sheetmetal, as per picture 1. 3.Put the sheetmetals into the designated area on lower casing, as per picture 2. And make sure the sheetmetals not loose.
- Page 5 Operation Steps: 1.Before operation, please inspect the previous operation correction. 2.Prepare 1 pc qualified USD rubber plug, as per picture 1. 3.Put one end of rubber plug into the hole, as per picture 2, Picture 1 Picture 3 then rotate 90° counterclockwise, the rubber plug will be fixed, as per picture 2.
- Page 6 Operation Steps: 1.Before operation, please inspect the previous operation correction. 2.Prepare 3 kinds of qualified waterproof glue, as per picture 3.Put these 3 kinds of waterproof glue into the designated area, as per picture 2. And add glue on 2 kinds of waterproof glue that located position ③.
- Page 7 Operation Steps: 1.Before operation, please inspect the previous operation correction. 2.Prepare 1 pc qualified LCD screen and its holder, as per picture 1. 3.Tear off the back glue of LCD screen, then put the whole LCD screen on the holder, the top of LCD screen to top of holder, as per picture 2.
- Page 8 Operation Steps: 1.Before operation, please inspect the previous operation Picture 3 correction. 2.Prepare 1 pc assembled upper casing and qualified PCBA, as per picture 1. 3.Assembled PCBA into upper casing, before assemble, put Picture 1 图三 the quad helix antenna of PCBA into upper casing, pay attention to avoid to brokedown the antenna.
- Page 9 Picture 1 Picture 2 Operation Steps: 1.Before operation, please inspect the previous operation correction. 2.Prepare 1 pc qualified waterproof rubber circle, as per picture 1. 3.Put the waterproof rubber circle on the designated area of the upper casing, as per picture 2. 4.Assemble the lower casing and upper casing together, as per picture 3.
- Page 11 Operation Steps: 1.Before operation, please inspect the previous operation correction. 2.Prepare 1 pc qualified semi-finished product and waterproof rubber circle of battery compartment, as per picture 1. 3.Paste the waterproof rubber circle into the lower casing, and press the rubber circle to close to the battery compartment, as per picture 2.
- Page 12 Operation Steps: 1.Before operation, please inspect the previous operation correction. 2.Prepare 1 pc qualified battery cover, assemble the handle, as per picture 1. 3.Paste 1 pc foam on the battery cover, as per picture 2. 4.After assembly, inspect the quality. Picture 1 Picture 2 Remark: Make sure the handle of battery cover is working...
- Page 13 Finished Product Testing...
Need help?
Do you have a question about the NAVA Pro F70 and is the answer not in the manual?
Questions and answers