
Related Manuals for Potec PRK-7000


Summary of Contents for Potec PRK-7000
- Page 1 OPERATION MANUAL AUTO REF-KERATOMETER PRK-7000 Revision 1.2 www.potec.biz Before using the instrument, be sure to read this manual thoroughly.
-
Page 3: Important Notice
POTEC as repairable by service personnel. POTEC reserves the right to make changes in its products or product specifications at any time and without prior notice, and is not required to update this documentation to reflect such changes. -
Page 4: Safety Information
SAFETY INFORMATION Accessory equipment connected to the analog and digital interfaces must be certificated according to the respective IEC standards (e.g. IEC 60950-1 for data processing equipment and IEC 60601-1 for medical equipment). Furthermore all configurations shall comply with the system standard EN 60601-1:2006, Clause 16. Everybody who connects additional equipment to the signal input part or signal output part configures a medical system, and is therefore responsible that the system complies with the requirements of the system standard IEC 60601-1:2005, Clause 16. - Page 5 Symbols marked on the Instrument Symbol Description TYPE B Applied Part Alternating current Protective earth (ground) Refer to operating instructions Off (power: disconnect to the mains) On (power: connection to the mains) Do not place your hand or fingers between the stage and base. Also ensure that the examinee does not place his/her hand or fingers there either.
- Page 6 Only operate the instrument with the power supply indicated on the WARNING rating plate. Otherwise, it may result in fire or electric shock. Be sure to turn OFF the power switch before connecting or WARNING disconnecting the cables. Also, do not handle them with wet hands. Otherwise, you may get an electric shock that may result in death or serious injury.
- Page 7 Do not position the equipment to make it difficult to operate the CAUTION disconnection device. (Appliance coupler or separable plug) Do not placed the multiple socket-outlet for PRK-7000 system on the CAUTION floor in order to prevent liquid penetration and damage to the product.
- Page 8 PRK-7000 Operation Manual...
-
Page 9: Table Of Contents
PRK-7000 Operation Manual CONTENTS IMPORTANT NOTICE ......................II SAFETY INFORMATION ......................III FEATURES ........................1 NOTES FOR USING THE INSTRUMENT ................. 2 DESCRIPTION ........................3 Main Unit ..............................3 Operation Panel ............................5 PRACTICING THROUGH MODEL EYE ................6 MEASUREMENT ....................... 8 Continuous Keratometry and Refractometry [K/R Mode] ................. - Page 10 PRK-7000 Operation Manual SELF INSPECTION AND MAINTENANCE ..............36 Before Calling a Service Person ......................36 Replacement ............................38 Cleaning ..............................38 When Moving the Instrument ........................38 Service Information ..........................39 CLASSIFICATIONS AND SPECIFICATIONS ..............40 Classifications ............................40 Specifications ............................
-
Page 11: Features
Wide Dioptric Measurement Range Because the PRK-7000 covers a wide measurement range, from –25D to +22D, even an examinee with strong myopia can be measured. More Accurate Measurement You can measure more accurately because foggy method of the eye fixation target makes the examinee’s eye comfortable. -
Page 12: Notes For Using The Instrument
Don’t use organic solution such as alcohol, thinner, benzene, etc. to clean the surface of this instrument. It may damage the instrument. When moving this PRK-7000, fix the stage by using stage holding knob, always check if the power supply is off, and then lift the bottom of the unit with both hands. -
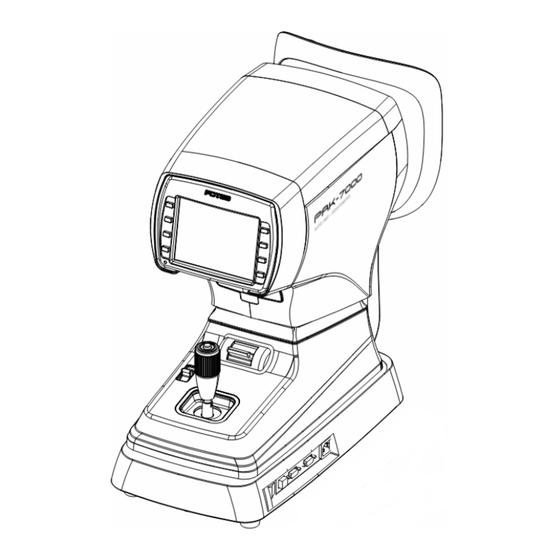
Page 13: Description
PRK-7000 Operation Manual 3 Description 3.1 Main Unit ① ① ① ② ② ② ③ ③ ③ ⑦ ⑦ ⑤ ⑤ ⑤ ⑧ ⑧ ⑧ ⑥ ⑥ ⑥ ④ ④ Name Function ① Measurement Head Unit that performs measurement. Align the height of the examinee’s eye with this mark by adjusting ②... - Page 14 Place the examinee’s chin on this rest If you want to connect the input / output signal ports and other devices that must meet IEC standards (IEC60950 IT equipment, IEC60601 medical equipment) If in doubt should contact POTEC or your authorized distributor.
-
Page 15: Operation Panel
PRK-7000 Operation Manual 3.2 Operation Panel CHINREST LEVER Touch Button (virtual button by monitor & touch screen) This Lever is for rasing/lowering the chin rest. Press “up” lever in CHINREST LEVER order to raise and “down” lever to lower the chin rest. -
Page 16: Practicing Through Model Eye
PRK-7000 Operation Manual 4 Practicing through Model Eye Practice measurement by using the accessory Test Model Eye before doing the actual measurement. Turn ON the power Turn ON the power switch of the instrument. Attach the model eye Remove the chin rest paper and align the holes on the base of the model eye with the holes on the chin rest. - Page 17 PRK-7000 Operation Manual Adjust the position and focus on the model eye Outer Alignment mark Mire image Inner Alignment mark Looking at the monitor, incline the operation lever toward the model eye until a bright dot appears near the Inner Alignment Mark. Place the Bright Dot in the center of Inner Alignment Mark.
-
Page 18: Measurement
PRK-7000 Operation Manual 5 Measurement Should any of the following occur, immediately turn OFF the power WARNING switch, unplug the power cable from the AC outlet, and contact the dealer or the agent who/where you purchase this instrument. When there is smoke, strange odor or abnormal sound. -
Page 19: Continuous Keratometry And Refractometry [K/R Mode]
PRK-7000 Operation Manual 5.1 Continuous Keratometry and Refractometry [K/R Mode] In the K/R mode, refractometry is automatically performed after keratometry. Enter K/R Mode Press MODE button until “K/R” is displayed on the right side of the display. Adjust height of examinee’s eye. - Page 20 PRK-7000 Operation Manual Perform alignment and Focusing Do not place your hand or fingers between the stage and base. Also ensure that the examinee does not place his/her hand or fingers there either. Otherwise, hand or fingers may be hurt.
- Page 21 PRK-7000 Operation Manual Measurement Press the Measuring button . Measurement will be continuously performed when the Measuring button is kept pressed. The newest measured results will be displayed on the monitor. In case of the continuous measurement, the result of previous measurement will be displayed.
- Page 22 PRK-7000 Operation Manual Repeated measurement Measurement could be repeatedly performed if necessary. The newest result will be displayed on the monitor whenever measured. Maximum of 10 newest data items for both right and left eyes will be stored in memory except error data. And those data can be showed in the DISPLAY mode window.
- Page 23 PRK-7000 Operation Manual Print Press the Print button. The selected data in the SETUP mode will be printed. (See page 31). Lift the printing paper from one side and give it a sharp tug to tear it off after printing is completed.
-
Page 24: Refractometry [Ref Mode]
PRK-7000 Operation Manual 5.2 Refractometry [REF Mode] Only refractometry can be performed in the REF mode. Enter REF Mode Press MODE button until “REF” is displayed on the right side of the display. Follow the same procedure (2) of the Continuous Keratometry and Refractometry [K/R Mode]. - Page 25 PRK-7000 Operation Manual If error occurs or the measurement value is instable during the REF ③ measurement, follow as the below instructions. Click the IOL button then REF Image is shown on the monitor. Make the six circles seen clearly by moving the operation lever.
-
Page 26: Keratometry [Ker Mode]
PRK-7000 Operation Manual 5.3 Keratometry [KER Mode] Only the radius of curvature of the cornea can be measured in KER Mode. NOTES: Don’t measure the base curve of contact lens in this mode. Measurement error will occur when it is measured in KER mode. - Page 27 PRK-7000 Operation Manual Follow the same procedure (5)~(7) of the Continuous Keratometry and Refractometry [K/R Mode]. < example of printout > Confidence of Result Level Quality (High) ↕ (Low)
-
Page 28: Contact Lens Base Curve Measurement [Clbc Mode]
PRK-7000 Operation Manual 5.4 Contact Lens Base Curve Measurement [CLBC mode] Base curve (posterior curve) of hard contact lens can he measured in the CLBC Mode. Enter CLBC Mode Press MODE button until “CLBC” is displayed on the right side of the display. -
Page 29: Peripheral Keratometry [K(P) Mode]
PRK-7000 Operation Manual 5.5 Peripheral Keratometry [K(P) Mode] In K(P) Mode, peripheral corneal curvatures can be measured by having the examinee look at the peripheral eye fixation lamps. Measuring the corneal periphery will help you examine irregular astigmatism, and also determine a better fitting for a contact lens. - Page 30 PRK-7000 Operation Manual of the scenery, and measure. If “ERR” is displayed as a result of measuring the center, peripheral eye fixation lamp will not light until the center is measured properly. Change to MANU Mode as required. [MANU Mode] You can enter MANU Mode by pressing the touch screen.
- Page 31 PRK-7000 Operation Manual < example of printout > Right Eye Left Eye Symbol 0’ 180’ 45’ 135’ 90’ 90’ 135’ 45’ 180’ 0’ 225’ 315’ 270’ 270’ 225’ 225’ r(m): Radius of curvature on measured meridian EQ: Quadrate of eccentricity on measured...
-
Page 32: Other Modes
PRK-7000 Operation Manual 6 Other Modes 6.1 Measuring Cornea Diameter [SIZE Mode] Diameter of cornea can be measured in SIZE Mode for prescribing contact lens. The size of pupil can also be measured to see how much it is dilated, and the size of contact lens can be measured without having the examinee remove it. - Page 33 PRK-7000 Operation Manual CORNEAL SIZE Measurement Press the measuring button to pause the window. If the frozen image is not clear, you can unfreeze the image by pressing the CAM button. To move the vertical bar by pressing the “>” button or “<” button.
- Page 34 PRK-7000 Operation Manual PUPIL SIZE Measurement Press the Mode button to select Pupil Size mode. Press the measuring button to pause the window. If the frozen image is not clear, you can unfreeze the image by pressing the CAM button.
-
Page 35: Observe Image Obtained By Retroillumination [Illum Mode]
PRK-7000 Operation Manual 6.2 Observe image obtained by Retroillumination [ILLUM Mode] By directing a light into the pupil, you can observe the condition of cataract or scratches on contact lens on the monitor in ILLUM Mode. Maximum of ten images for each eye can be displayed and stored in one display. - Page 36 PRK-7000 Operation Manual (2) Ready for Observation Ask the examinee to look at the red roof of the eye fixation target. See procedure (3) of the Continuous Keratometry and Refractometry [K/R Mode]. (3) Observation Adjust the amount of light of each light source so the image can be seen clearly.
- Page 37 PRK-7000 Operation Manual (4) Displaying of stored Image Press DISP button in observation display. Images stored in memory will be displayed. [Menu Display] Images of eye End of the Display Mode Serial number – Sub number Date of the selected image...
-
Page 38: Display Mode
PRK-7000 Operation Manual 6.3 DISPLAY Mode The stored data (maximum 10 data for each eye) in memory can be displayed in this mode. To enter DISPLAY Mode, press DISP button in the Measurement Mode. Press EXIT button in order to go out DISPLAY Mode. -
Page 39: Setup Mode
PRK-7000 Operation Manual 6.4 SETUP Mode Change all the settings about measurements, printouts etc. Press SETUP button in Measurement Mode. PAGE1 of SETUP Mode will be displayed. Press END button in order to return to Measurement Mode. Refractometry END Button... - Page 40 PRK-7000 Operation Manual Keratometry mm/D Form of displaying result of keratometry mm R1 ················· Radius of curvature on minimum meridian R2 ················· Radius of curvature on maximum meridian AX ················· Axis on maximum meridian K1 ················· Refractive power on minimum meridian K2 ·················...
- Page 41 PRK-7000 Operation Manual Serial Number, Time and date [Items] COUNT To select whether using the serial number or not. [NO.] Setting of the serial number Pressing DEC or INC button renders the serial number to be decreased or increased by “1”.
- Page 42 PRK-7000 Operation Manual Print Format [Items] R-PRT Result of Refractometry to be printed out ALL: Maximum of the 10 newest measurements and an average value for each eye. AVE : Average values only OFF: Not printed. K-PRT Result of Keratometry to be printed out ALL: Maximum of the 10 newest measurements and an average value for each eye.
- Page 43 PRK-7000 Operation Manual Customize Measuring Modes, AutoStart, etc. [Items] MODE Assigns order of Measurement Modes “REF, KER, K/R, CLBC, K(P)” and delete unnecessary modes. First mode that is displayed when power is turned ON. It cannot be set to “OFF”.
- Page 44 PRK-7000 Operation Manual Communication [Items] RS-232 data format PDR-7000, PAV-6000, PAV-6100, CANON-RK, RT-2100, RT-5100, VDR-2400, PC RS-232 data transfer speed 2400, 4800, 9600, 19200, 57600, 115200 (It is only possible to select the the ‘BPS’ in PC mode.) Messages for Internal Printer Enter a message to be printed out with the results of measurement using the internal printer in this window.
- Page 45 PRK-7000 Operation Manual [Deletion of Messages] If you press the DEL button, the character of blinking cursor will be deleted. If you press the button, the character in front of the blinking cursor will be deleted. Adjust Brightness Adjust the brightness of monitor.
-
Page 46: Self Inspection And Maintenance
PRK-7000 Operation Manual 7 Self Inspection and Maintenance 7.1 Before Calling a Service Person Warning messages will be displayed on the monitor if some problems occur. It might be operation errors or problems of the machine. In this case, refer the following instructions. - Page 47 PRK-7000 Operation Manual Instruct the examinee to open and close his or ERROR When the Mire Image is not clear because her eyes several times and measure again. the cornea is dry. Examinee has strong irregular astigmatism Impossible to measure or corneal disease.
-
Page 48: Replacement
PRK-7000 Operation Manual 7.2 Replacement 7.2.1 Printing Paper Replace the roll of printing paper as soon as possible if the red line appears in the paper. Press the printer button to open the printer cover. Remove the used paper. Install a roll of new paper into the printer housing and close the printer cover. -
Page 49: Service Information
Disposal of the instrument This instrument incorporates a lithium battery, which may pollute the environment if the instrument is abandoned. Please ask a professional waste disposal company to handle disposal, or contact POTEC representative or distributor before disposing of the instrument. -
Page 50: Classifications And Specifications
PRK-7000 Operation Manual 8 Classifications and Specifications 8.1 Classifications Classification of equipment: Class Ⅰ Applied part of equipment: TYPE B Applied Part(Chinrest & Headrest) Protection against electric shock: Class Ⅰ Protection against harmful ingress of water: Ordinary (IPX0) Method of sterilization: Not applicable... -
Page 51: Specifications
PRK-7000 Operation Manual 8.2 Specifications Refractometry Vertex Distance(VD) 0.0, 12.0, 13.5, 15.0 mm Sphere Power(SPH) -25.00 ~ +22.00 D (at the vertex distance of 12 mm) (Increments selectable between 0.12 and 0.25 D) Cylinder Power(CYL) 0.00 ~ ±10.00 D (Increments selectable between 0.12 and 0.25 D) Axis(AX) 1 ~ 180˚... -
Page 52: Components
PRK-7000 Operation Manual 9 Components PRK-7000 Main Unit ······················································································ 1 Operation Manual ························································································· 1 Power Supply Cable ····················································································· 1 Test Model Eye ····························································································· 1 Chin Rest Paper ·························································································· about 100 sheets Printing Paper ······························································································ 2 rolls Dust Cover ··································································································· 1...
Need help?
Do you have a question about the PRK-7000 and is the answer not in the manual?
Questions and answers