Advertisement
- 1 Before You Start
- 2 Hardware Setup
- 3 Install DSM on Synology NAS
- 4 System Maintenance
- 5 Troubleshooting
- 6 Safety instructions
- 7 Documents / Resources
Before You Start
Package contents
Contact your reseller if your package is missing any of the below contents:

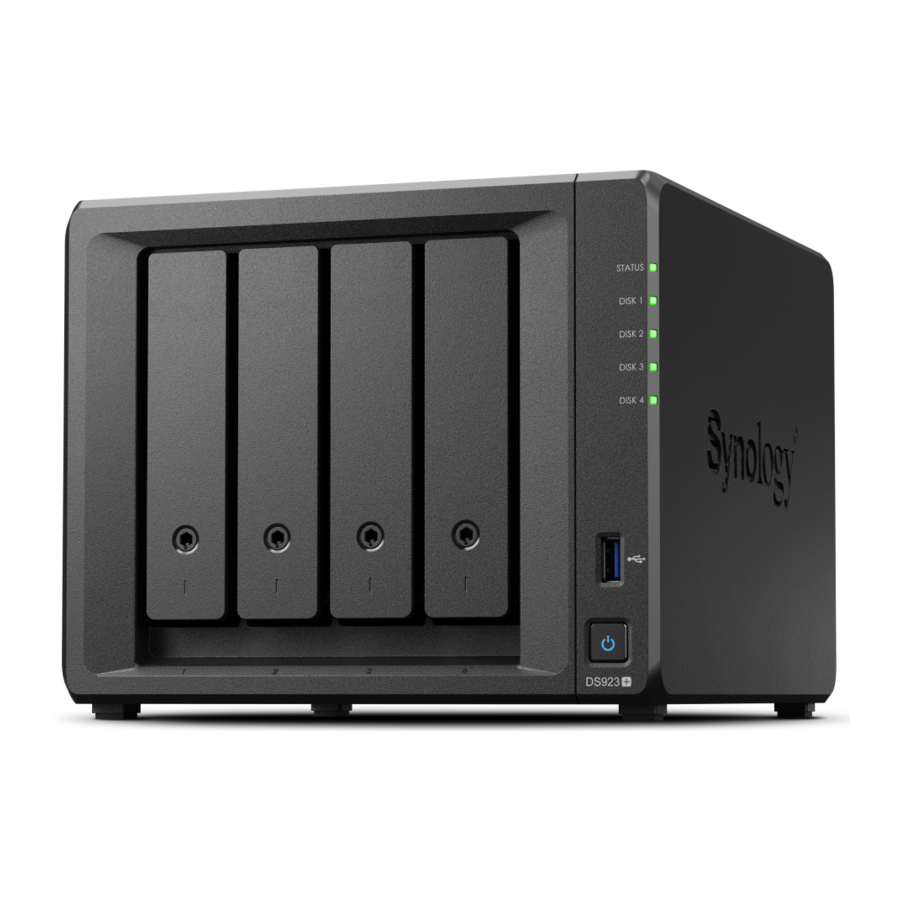
Synology DS923+ at a glance

| No. | Name | Description |
| 1 | STATUS Indicator | Displays the status of the system. For more information, see "System modes and LED indicators". |
| 2 | Drive Status Indicator | Displays the status of each drive. For more information, see "Other LED indicators". |
| 3 | Drive Tray Lock | Lock or unlock drive trays. |
| 4 | USB 3.2 Gen 1 Port | Connect external drives or other USB devices to the Synology NAS here. |
| 5 | Power Button |
|
| 6 | Drive Tray | Install drives (hard disk drives or solid state drives) here. |
| 7 | LAN Port | Connect network cable here. |
| 8 | RESET Button |
|
| 9 | eSATA Port | Connect Synology Expansion Unit1 to the Synology NAS here. |
| 10 | Power Port | Connect power cord here. |
| 11 | Network Upgrade Slot | Supports the addition of E10G22-T1-Mini network upgrade module. |
| 12 | USB 3.2 Gen 1 Port | Connect external drives or other USB devices to the Synology NAS here. |
| 13 | Fan | Disposes of excess heat and cools the system. If the fan malfunctions, the Synology NAS will emit a beeping sound. |
| 14 | Kensington Security Slot | Attach a Kensington security lock here. |
Notes:
- For more information about Synology Expansion Unit supported by your Synology NAS, please visit Synology Products Compatibility List.
System modes and LED indicators
System modes definitions
There are 7 system modes in Synology NAS. The System modes and their definitions are as below:
| System mode | Definition |
| Powering on | Synology NAS is powering on when you press the power button or restarting when you run operations in DSM. During the boot up process, the device also performs hardware initialization, such as hardware reset or BIOS initialization. |
| Shutting down | Synology NAS is shutting down as a result of pressing the power button or operation in DSM. |
| DSM not ready | DSM is not ready for use. This could either be:
|
| DSM is ready for use | DSM is fully functioning, and users can sign in. |
| Hibernation | Synology NAS has been idle for a while and is now in Hibernation mode. |
| Application | Certain packages/services (e.g., USB Copy and Find me service) while in operation will control the actions of the LED. After the operation is complete, the LED indicator will return to its normal state. |
| Powered off | Synology NAS is powered off. |
Identify System Modes
You can identify the system mode through the POWER and STATUS LED indicators. Please refer to the table below for more details.
| System Mode | POWER LED | STATUS LED | |
| Blue | Green | Orange | |
| Powering on | Blinking | Off | Off |
| Shutting down | Blinking | Static | Off/Static1 |
| DSM not ready | Static | Blinking | Off/Blinking1 |
| DSM is ready for use | Static | Static | Off/Static1 |
| Hibernation | Static | Off | Off/Static1 |
| Application | Static | Switching | |
| Powered off | Off | Off | Off |
Notes:
- If the STATUS LED remains static orange or continuously blinks orange, this indicates there are system errors such as fan failure, system overheating, or volume degrade. Please sign in to DSM for detailed information.
Transitions between System Modes
To better understand the transition between system modes, please refer to the examples below:
- Powered on with no DSM installed:
Powered off > Powering on > DSM not ready - Powered on with DSM installed:
Powered off > Powering on > DSM not ready > DSM is ready for use - Entering hibernation then waking up from hibernation:
DSM is ready for use > In hibernation > DSM is ready for use - Shutdown:
DSM is ready for use > Shutting down > Powered off - Power failure with UPS attached:
DSM is ready for use > DSM not ready (due to power failure, DSM enters safe mode) > Shutting down > Powered off > Powering on (power has recovered, DSM will reboot) > DSM not ready > DSM is ready for use
Other LED definitions
| LED Indicator | Color | Status | Description |
| Drive status | Green | Static | Drive ready and idle |
| Blinking | Accessing drive | ||
| Orange1 | Static | Locating drive | |
| Drive deactivated by user | |||
| Port disabled2 | |||
| Drive health status is Critical or Failing | |||
| Removing this drive will cause system damage; this is the only drive with DSM installed | |||
| Off | No internal Drive | ||
| Rear 1GbE LAN (on upper side of jack) | Green | Static | Network connected |
| Blinking | Network active | ||
| Off | No network | ||
| Rear 1GbE LAN (on lower side of jack) | Green | Static | 1 Gbps connected |
| Orange | 100 Mbps connected | ||
| Off | 10 Mbps connected/No network | ||
Notes:
- When the drive LED indicator is orange, we recommend you sign in to DSM and go to Storage Manager > HDD/SSD for more information.
- Please try to restart your Synology NAS or re-insert the drives, then run the HDD/SSD manufacturer's diagnostic tool to check the health status of the drives. If you can sign in to DSM, please run the built-in S.M.A.R.T. test to scan the drives. If the problem remains unresolved, please contact Synology Technical Support for help.
Hardware Specification
| Item | DS923+ |
| CPU | AMD Ryzen R1600 |
| RAM | DDR4 4 GB |
| Compatible Drive Type |
|
| External Port |
|
| LAN Port | 1GbE RJ45 x 2 |
| Size H x W x D (mm) | 166 x 199 x 223 |
| Weight (kg) | 2.24 |
| Agency Certification |
|
| HDD Hibernation | Yes |
| Scheduled Power On/Off | Yes |
| Wake on LAN | Yes |
| Environment Requirement |
|
Notes:
- Model specifications are subject to change without notice. Refer to Synology website for the latest information.
Spare Parts
Visit SpareParts if you need to replace system fans, disk trays, or power supply units.
| Model Name | Picture | Description |
| Disk Tray Type D9 |  | 3.5"/2.5" Drive Tray With Lock |
| FAN 92 92 25_1 |  | System Fan 92 92 25 mm |
| Adapter 100W_2 |  | Adapter 100W Level VI |
Optional Accessories
With Synology accessories, you can customize your Synology NAS to fit different business environments without worrying about compatibility and stability. Refer to Synology Products Compatibility List for more information.
Hardware Setup
Tools and Parts for Component Installation
Please prepare the tools and parts below before setting up your Synology NAS
- A screwdriver (only for 2.5" drives)
- At least one 3.5" or 2.5" SATA drive (see here for compatible models)

- If you install a drive that contains data, the system will format the drive and erase all existing data. Please back up any important data before installation.
Install drives
- To remove the drive tray, pull out the drive tray handle in the direction as shown in the image below.

- Load drives in the drive trays.
- For 3.5" drives: Remove the fastening panels from the sides of the drive tray. Place the drive in the drive tray. Then insert the fastening panels to secure the drive in place.

- For 2.5" drives: Remove the fastening panels from the sides of the drive tray and store them in a safe place. Place the drive in the area of the drive tray indicated in the image below. Turn the tray upside down and tighten the screws to secure the drive in place.

- For 3.5" drives: Remove the fastening panels from the sides of the drive tray. Place the drive in the drive tray. Then insert the fastening panels to secure the drive in place.
- Insert the loaded drive tray into the empty drive bay and push it back until you hear a click when the tray is locked into place.

Notes:- Make sure the tray is completely inserted. Otherwise, the drive might not function properly.
- Insert the hard drive tray key into the hard drive tray lock, turn the key clockwise (to the "I" position) to lock the hard drive tray handle, and then remove the key.

- Repeat the steps above to install all prepared drives.
- Drives are numbered as shown below.
![]()
Notes:- If you plan to create a RAID volume, we recommend installing drives of identical size to make the best use of drive capacity.


Add a Memory Module to Synology NAS
Optional Synology memory modules are designed to expand the memory of your Synology NAS. Follow the steps below to install, check, or remove a memory module on your Synology NAS.
The following table shows the memory configuration for best practice:
| Slot 1 | Slot 2 | Total Memory |
| 4 GB | - | 4 GB |
| 4 GB | 4 GB | 8 GB |
| 8 GB | 8 GB | 16 GB |
| 16 GB | 16 GB | 32 GB |
To remove the memory module
- Shut down your Synology NAS. Disconnect all cables from your Synology NAS to prevent possible damage.
- Remove the drive trays from the drive bays. The memory slots are located on the inner-right side of your Synology NAS. You will find a memory module that is pre-installed.

Notes:- When you remove the drive trays, sensitive internal components are exposed. Avoid touching anything other than the memory assembly when removing or adding memory.
- The memory slots are numbered as shown below.

- Push the levers on both sides of the memory module outward. The memory module will be released from its slot.
- Hold the memory module by its edges and remove it from the slot.

- Insert the drive trays back into the drive bays.
- Reconnect the cables removed in step 1, then press the power button to turn on your Synology NAS.


To install the memory module
- Follow step 1 to 2 of the "To remove the memory module" section to shut down your Synology NAS, disconnect the cables and remove the drive trays.
- Insert the new memory module into the empty slot:
- Align the small gap between the gold connectors of the memory module with the notch on the empty slot. Insert the memory module into the slot. Make sure that the module is properly inserted.
- Gently push down the memory module until you hear a click.

Notes:- Hold the memory module by its edges and avoid touching the gold connectors.
- Synology will not provide full product warranty or technical support if a non-Synology memory module is used for memory upgrade.
- Insert the drive trays back into the drive bays.
- Reconnect the cables removed in step 1, then press the power button to turn on your Synology NAS.

To make sure your Synology NAS recognizes the new memory capacity
- Install DiskStation Manager DSM. Please see "Install DSM on Synology NAS" for more information.
- Sign in to DSM as admin or a user belonging to the administrators group.
- Go to Control Panel > Info Center and check Total Physical Memory.
If your Synology NAS does not recognize the memory or does not start up successfully, please make sure that the memory module is installed correctly.
Add an M.2 NVMe SSD to Synology NAS
You can install up to two M.2 NVMe 2280 SSDs on your Synology NAS. Follow the steps below for SSD module installation and removal.
To install an M.2 NVMe SSD module
- Shut down your Synology NAS. Disconnect all cables from your Synology NAS to prevent possible damage.
- The SSD slots are located at the bottom of your Synology NAS.
- Remove the two covers protecting the modules. You will see two empty slots that are numbered as shown below.

Notes:- Hold the SSD module by its edge and avoid touching the gold connectors.
- Start from the slot 1. Insert your SSD module into the empty slot:
- Align the small gap between the gold connectors of the SSD module with the notch in the empty slot. Insert the module into the slot. Make sure that the module is properly inserted.
- Push the lever outward as shown below. While holding the lever, push down the SSD module, then release the lever to secure the SSD module. Replace the covers.

- If needed, repeat the steps above to install a second SSD module into the second slot.
- Reconnect the cables removed in step 1, then press the power button to turn on your Synology NAS.


To remove the M.2 NVMe SSD module
- Shut down your Synology NAS. Disconnect all cables from your Synology NAS to prevent possible damage.
- Push the lever outward. The module will pop up and be released from the slot.
- Hold the SSD module and remove it from the slot. Replace the covers.
- Reconnect the cables removed in step 1, then press the power button to turn on your Synology NAS.
Install Network Upgrade Module
Your Synology NAS has a Network Upgrade slot which allows you to install network upgrade module for LAN port expansion.
To install a network upgrade module
- Shut down your Synology NAS. Disconnect all cables from your Synology NAS to prevent possible damage.
- Remove the two screws on the PCIe expansion shield to remove the shield.

- Insert the network upgrade module and tighten the two screws to secure the newly inserted module.

Notes:- Confirm that the network upgrade module is fully inserted. Otherwise, the network upgrade module might not be able to function properly.


Start up Your Synology NAS
- Use the LAN cable to connect the Synology NAS to your switch, router, or hub.
- Connect one end of the AC power adapter to the power port of your Synology NAS. Connect one end of the AC power cord to the AC power adapter, and the other to the power outlet.

- Press the power button to turn on the Synology NAS.


Congratulations! Your Synology NAS is now online and detectable from a network computer.
Install DSM on Synology NAS
After hardware setup is completed, please install DiskStation Manager DSM – Synology's browser-based operating system – on your DS923+.
Install DSM with Web Assistant
Your DS923+ comes with a built-in tool called Web Assistant that helps you download the latest version of DSM from the Internet and install it on your DS923+. To use Web Assistant, please follow the steps below.
- Power on your Synology NAS.
- Open a web browser on a computer connected to the same network as your Synology NAS.
- Enter either of the following into the address bar of your browser:
- Web Assistant will be launched in your web browser. It will search for and find Synology NAS within the local network. The status of your Synology NAS should be Not Installed.
![]()
- Click Connect to start the setup process and follow the onscreen instructions.
Notes:- Your Synology NAS must be connected to the Internet to install DSM with Web Assistant.
- Recommended browsers: Chrome, Firefox, and Edge.
- Both the Synology NAS and the computer must be in the same local network.
- If you accidentally leave the installation process before it is finished, sign in to DSM as admin (default administrative account name) with the password left blank.

Learn More
Your DS923+ is now ready for action. For more information or online resources about your DS923+, please visit Synology's official website, which contains step-by-step tutorials and frequently asked questions.
System Maintenance
Replace the Malfunctioning Fan
If the cooling fan located on the back of the Synology NAS malfunctions, please follow the steps below to remove the malfunctioning fan and replace it with a new one.
- We recommend that you wear work gloves and operate with care to avoid injury during the process.
To remove the malfunctioning fan
- Shut down your Synology NAS. Disconnect all cables from your Synology NAS to prevent possible damage.
- Remove the drive trays and put them aside.

- Remove the two screws securing the back panel from the back of your Synology NAS.

- Push the case outwards, then slide it sideways to remove it from your Synology NAS.

Notes:- When you remove the case, sensitive internal components are exposed. Avoid touching anything other than the fan.
- Remove the screws securing the plastic fan supports, then set the plastic fan supports aside.

- Remove the two screws as well as the PCIe expansion shield beneath the fans at the back of your Synology NAS.

- Remove the four screws securing the other PCIe expansion shield in place, then the shield.

- Cut the cable tie and unplug the fan connectors.

- Remove the backplate screws.

- Remove the malfunctioning fan from your Synology NAS.


To install a new fan
- Fans are numbered as shown below. The fans must be installed in the direction specified in the picture below.

- Install the replacement fans.

- Install the backplate screws and connect the fan connectors in their corresponding slot as shown below.

Notes:- Make sure to connect the fan connectors to their corresponding ports. As illustrated above, connect fan 1 to port 1. Connecting a fan connector to the wrong port may lead to the system incorrectly displaying a fan number when a malfunction occurs.
- Re-install the two PCIe expansion shields and their screws.

- Re-install the plastic fan supports and their screws.

- Re-install the case:
- Place the case back over your Synology NAS.

- Make sure the rails are aligned properly together.

- Push the case inwards towards the fans.

- Place the case back over your Synology NAS.
- Re-install the screws securing the back panel.

- Insert the drive trays back into the drive bays.
![]()


Troubleshooting
- You should only perform troubleshooting and repairs as authorized or directed by the Synology Technical Support team.
Notes:
- This chapter describes possible issues that may occur. Not every issue will occur on your Synology NAS. Please refer to the corresponding sections for troubleshooting steps specific to the issue that has occurred.
Troubleshooting checklist
Before doing any troubleshooting or repair tasks, use the following checklist to find possible causes for hardware issues on your Synology NAS.
- Remove all USB drives before powering on the Synology NAS.
- Is the Synology NAS connected to a functional AC power outlet?
- Is the Synology NAS turned on?
- Is the POWER LED light on?
- Is the STATUS LED light on?
- Is the ALERT LED light blinking?
- Verify that all cables are not loose or incorrectly connected.
- If you have recently added non-hot swappable hardware components (e.g., memory modules, NIC, PCIe cards), remove the component and verify if the Synology NAS functions properly without it.
- Are you operating the latest version of DSM?
- If you are unable to connect to your Synology NAS through a network, change the network cable and try to connect again. For troubleshooting purposes ensure you are directly connecting to your Synology NAS without a router, switch, or hub.)
Common issues resolution
Unable to recognize hard drive(s)
- Confirm that you are using a hard drive listed in the Synology Products Compatibility List.
- Remove the hard drive from the Synology NAS and do a visual inspection:
- Confirm that the hard drive connector is not damaged or crooked.
![]()
- Confirm that the hard drive connector is not damaged or crooked.
- Replace the hard drive with a new one, then reboot the Synology NAS to see if the problem is caused by the removed drive.
- Remove the top cover and check that the power supply and connectors on the HDD backplane are properly plugged in.
Notes:- When the Synology NAS is powered on, do not touch any parts of the PCB with your hands or tools.
- If, after following the above troubleshooting steps and the issue is still unresolved, contact Synology Technical Support for further assistance.

Unable to connect to the network
- Restart the system and confirm that the network status and configuration are correct.
- Check whether the network cable is loose or damaged, and replace it with a working network cable.
- Connect the network cable to another port on the switch or hub.
- Connect the network cable directly to a PC to confirm whether the Synology NAS can be connected to normally.
- Check the interior and exterior of the network port for dust or damage.
![]()
- Check the interior of the network port for damaged or skewed pins.
![]()
- If, after following the above troubleshooting steps and the issue is still unresolved, contact Synology Technical Support for further assistance.


Unable to recognize external USB devices
- Do a visual inspection and check whether the USB port is rusted, which may cause a bad connection.
- Check that the external USB device is compatible with your Synology NAS.
- Do a visual inspection and check whether there is foreign matter inside the port.
- Check that the power supply for the external USB device is plugged in and provides power.
- Swap the inoperative USB device with one that has been confirmed to work properly.
- If, after following the above troubleshooting steps and the issue is still unresolved, contact Synology Technical Support for further assistance.
Unable to recognize Expansion Unit
- Check that the expansion unit is compatible with your Synology NAS.
- Do a visual inspection and check whether the expansion port is rusted, which may cause a bad connection.
- Do a visual inspection and check whether there is a foreign matter inside the expansion port or broken.
- Check that the connecting expansion cable is properly positioned and securely connected to the expansion unit devices.
![]()
![]()
- Check that the power supply for the expansion unit is plugged in and providing power.
- Replace the expansion cable with a cable that has been confirmed to work properly.
- If, after following the above troubleshooting steps and the issue is still unresolved, contact Synology Technical Support for further assistance.


Unable to recognize PCIe Network Interface Card or unable to connect
Please refer to "Install Network Upgrade Module" and verify that your network upgrade module is correctly installed.
Unable to recognize internal M.2 SSD
Please refer to "Add an M.2 NVMe SSD to Synology NAS" and verify that your M.2 NVMe SSD is correctly installed.
Alert LED is blinking continuously
When the Alert LED flashes continuously, and DSM shows "The temperature of the Synology NAS is too high. If the overheating issue persists, your Synology NAS may shut down to avoid hardware malfunctions" or "Fan on the Synology NAS has stopped working" messages, please refer to "Replace System Fan" and verify that your fan is correctly installed and functional.
Unable to power on after installing RAM
Please refer to "Add a Memory Module to Synology NAS" and verify that your memory module is correctly installed.
Unable to finish powering on (power LED is blinking continuously)
- Statically discharge yourself.
- Make sure your Synology NAS is powered off.
- Remove all attached external devices USB, eSATA, Ethernet, etc.), installed drives, and any additional installed RAM 3rd party RAM is not supported).
- Power up the Synology system and wait 10 minutes before proceeding to the next step.
- Check the status of the power button LED light. For more information on LED definitions, please see "System modes and LED indicators".
- If the power LED continues to blink or remains powered off, unfortunately, that means the Synology NAS has experienced a hardware failure. Please follow the instructions in "Unable to finish powering on with no drives installed".
- If the power LED is static, please follow the instructions in this tutorial to troubleshoot drive issues.
Notes:
- If the power LED turns static, the ALERT light will likely be blinking orange, and the Synology NAS will start beeping — this is normal and expected behavior. Once you finish testing all of the drives, it should stop doing this unless one or more of your drives are faulty.
- Being able to ping the unit doesn't mean anything of note other than that the LAN ports are functional. To properly do the above testing, ensure that the power LED goes static and does not continue blinking.
Unable to finish powering on with no drives installed
- Finish all steps in the section "Unable to finish powering on (power LED is blinking continuously)".
- Follow the steps below and do an internal check:
- Unplug the power cord(s).
- Remove any installed extended memory, M.2 SSD, and PCIe card. Please follow the instructions in "Add a Memory Module to Synology NAS", "Add an M.2 NVMe SSD to Synology NAS", and "Install Network Upgrade Module".
- Confirm that motherboard is properly installed and is Synology-manufactured.
- Clean up and reinstall the memory modules. Make sure that memory slots and memory modules are free of dust, dirt, and other foreign matter.
- If there is dust and dirt buildup inside the Synology NAS, clean it before trying the power-on process.
- If, after following the above troubleshooting steps and the issue is still unresolved, contact Synology Technical Support for further assistance.
No power after pressing the power button
Do the following basic environmental check:
- Confirm that the power cord(s) is functioning normally and that it is not damaged.
- Confirm that the power cord(s) is properly plugged at both the power socket and the Synology NAS.
- Confirm that the AC power supply meets the voltage requirements 110V - 220V. If a UPS is connected to the Synology NAS, disconnect it temporarily, and use AC power instead.
- Remove all external I/O devices (such as external hard disks/USB/LAN/eSATA. Retain only the power supply and confirm that the Synology NAS can power on properly.
If the Synology NAS is still unable to power on after doing the environmental check, follow the steps below and do an internal check of your Synology NAS.
- Remove the power cord(s) and remove the top cover.
- Confirm that the LED cables are properly plugged in.
- Confirm that PSU connectors are properly plugged in.
- Remove any installed extended memory, M.2 SSD, and PCIe card. Please follow the instructions in "Add a Memory Module to Synology NAS", "Add an M.2 NVMe SSD to Synology NAS", and "Install Network Upgrade Module".
- Check that there is no dust buildup on internal components; if there are, it needs to be cleaned.
- Reconnect the power cord(s) and try to power on the Synology NAS again.
- If, after following the above troubleshooting steps and the issue remains unresolved, contact Synology Technical Support for further assistance.
Unable to power on after connecting UPS
- Check that the power cord(s) for the UPS and the Synology NAS is properly plugged in.
- Check that the power provided by the UPS is stable.
- Connect the power cord(s) of the Synology NAS directly to the AC power outlet and confirm that it can power on.
- Confirm that the UPS system is compatible with the Synology NAS.
- If, after following the above troubleshooting steps and the issue is still unresolved, contact Synology Technical Support for further assistance.
Before you contact Synology Technical Support
Before you contact Synology Technical Support, follow the below instructions to try to solve the issue:
- Use the troubleshooting information in this manual.
- Follow the instructions in the "Troubleshooting checklist".
- Check for the updated information, new device drivers, and hints and tips on the Synology Knowledge Center.
If possible, be at your product when you contact Synology Technical Support and have the following information available:
- Product Model Name
- Serial numbers of your Synology products
- Description of the problem
- Exact wording of any error messages
- Hardware and software configuration information
Contacting Synology Technical Support
During the warranty period, you can get help and information through the Synology Technical Support. Trained service personnel are available to assist you in determining a hardware problem and deciding what action is necessary to fix the problem.
The warranty does not cover the following:
- Replacement or use of parts not manufactured for or by Synology or non-warranted Synology parts
- Identification of software problem sources
- Installation and maintenance of application programs
If it is determined that replacement services are necessary, please contact the local reseller or distributor where you purchased the product for further assistance. Synology does not provide direct replacement services outside North America.)
Getting information, help, and service
Synology publishes a wide range of supporting documentation.
In Knowledge Base, you will find useful Help and FAQ articles, as well as video tutorials, breaking up processes into handy steps.
Also, you can find User's Guides, Solution Guides, brochures, and White Papers. Experienced users and administrators will find answers and guidance in Developer Guides.
Got a problem and unable to find the solution in our official documentation? Search hundreds of answers by users and support staff in Synology Community or reach Synology Technical Support through the web form, email, or telephone.
Safety instructions


Documents / Resources
References
Download manual
Here you can download full pdf version of manual, it may contain additional safety instructions, warranty information, FCC rules, etc.
Advertisement


Need help?
Do you have a question about the DS923+ and is the answer not in the manual?
Questions and answers