Advertisement
- 1 Product description
- 2 Packing contents
- 3 Controls and Functions
- 4 Tower Speaker Assembly Drawing
- 5 Placement Instructions
- 6 System Connection Instructions
- 7 Digital Inputs and Analog Inputs Connection Instructions
- 8 Pairing Operation Guide
- 9 Operation Instructions
-
10
Trouble Shooting
- 10.1 NO OUTPUT
- 10.2 NO SOUND FROM FRONT LEFT SPEAKER
- 10.3 NO SOUND FROM FRONT RIGHT SPEAKER
- 10.4 NO SOUND FROM CENTER SPEAKER
- 10.5 NO SOUND FROM REAR SPEAKER
- 10.6 CAN NOT GET REAL SURROUND SOUND EFFECT
- 10.7 THE REAR SPEAKER CAN NOT PAIR WITH SUBWOOFER AUTOMATICALLY AFTER POWER ON
- 10.8 CAN NOT ENJOY REAL SURROUND SOUND CAN ENJOY
- 11 Specifications
- 12 Important Safety Instructions
- 13 Documents / Resources
Product description
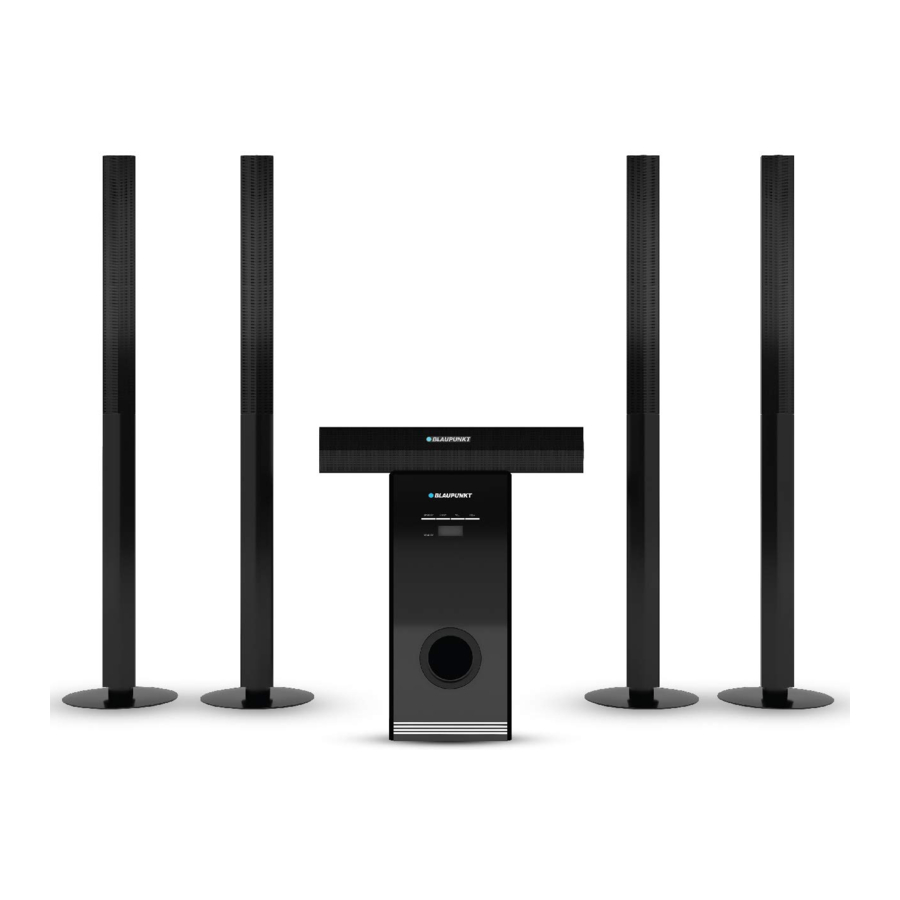
The product is a 5.1 channel home theater system with high performance / high power / acoustic field location accuracy.
Model Name: Blaupunkt SBW500 (SKU-TV LS 275-5)
With PCM decoding and real surround sound effect. Modern design / Easy to install / Remote control operation.
Packing contents
- Subwoofer x 1 pc
- Center speaker x 1 pc
- Tower speaker x 4 pcs (8 separate pieces)
- Classic base stand x 1 pc
- Remote control x 3 pcs
- Speaker cable x 1 pc
- Instruction manual x 1 pc
- Warranty card x 1 pc
Controls and Functions
Subwoofer Front Panel

- STANDBY: Power Standby button.
INPUT: Audio input source selection button.
VOL-: Volume Downwards Adjustment button. VOL+: Volume Upwards Adjustment button. - STANDBY: Subwoofer Standby Status indicator. Display Screen
Subwoofer Rear Panel

- Stereo 1 input
- Stereo 2 input
- Coaxial 2 input
- AC Power cord
- Coaxial 1 input
- Optical input
- Front left speaker output
- Front right speaker output
- Center speaker output
- Power On/Off switch
Remote Control

- STANDBY: Power Standby
- COAXIAL 1: coaxial 1 select button
- OPT: Optical input button
- ST1 Input button
- 2.1CH: 2.1 channel play mode button
- NORMAL: by-pass sound play mode
- VOL+: Main volume upwards adjustment
- SW-: SW volume downwards adjustment
- FR+: Front speaker volume upwards adjustment
- FR-: Front speaker volume downwards adjustment
- CEN+: center speaker volume upwards adjustment
- CEN-: center speaker volume downwards adjustment
- MUTE: mute function button for sound (silence)
- COA 2: coaxial 2 select button
- ST2 Input button
- 5.1CH: 5.1mode button.
- EQ: EQ model select button includes 6 effects (only available on 2.1 mode)
Classic / Jazz / Rock / Pop / Ballad / Dance - SW+: SW volume upwards adjustment
- RST: reset sound settings
- VOL-: Main volume downwards adjustment
- Rear+: rear speaker volume upwards adjustment.
- Rear-: rear speaker volume downwards adjustment.
- Before using the remote control, please insert the correct type of batteries into the battery compartment.
- The remote control uses 2 x 1.5V/AAA batteries.
- Please insert the batteries as indicated below.
- Remove the battery compartment cover.
![]()
- Insert 2 batteries as per the polarities marked inside the battery compartment.

- Close the battery cover.
![]()
- Remove the battery compartment cover.
- If the remote control does not work, please check the batteries or replace them with new batteries before consulting technical personnel.


Tower Speaker Assembly Drawing
The tower speakers are detachable. Please follow up below drawing for assembly.

Placement Instructions
After finishing the assembly of tower speaker, please place the speaker system according to below drawing. Please kindly note that the distance between both tower speakers shall be over 2.5m in order to get better surround sound effect in 5.1 mode.

System Connection Instructions
Please use the speaker cable to connect the front tower speakers and center speaker with subwoofer according below drawing.
Please make sure that the "Grey" color speaker cable is connected with "Red" color terminal in "+" polarity, and that the "Black" color speaker cable is connected with "Black" color terminal in "-" polarity on the rear panel of subwoofer.

Digital Inputs and Analog Inputs Connection Instructions
Connecting Subwoofer / DVD Player / TV Analog audio connect to:
Digital inputs

Analogue inputs

Pairing Operation Guide
Pairing rear speakers
The speaker system has been already paired in the production line. Once you turn on the subwoofer and then turn on the rear speakers the system will pair them automatically.
If the communication between the subwoofer and speakers is not established automatically (synchronisation failure or presence of several WiFi devices in the some area), there is no sound from rear speaker. Please try and follow up below procedure for manual pairing.
- Turn off the subwoofer and rear speakers.

- Plug on AC power supply for subwoofer and rear speakers. Switch on the subwoofer and press the "standby" button to power on the subwoofer. Switch on the rear left and right speakers within 20 seconds after power on the subwoofer.
![]()
- After 30 seconds, the LED light on rear speaker will in blue color: the system has finished the pairing. You can start enjoy the music.

- After succeeded manual pairing, the system can memory the pairing, and can pair them automatically within 10~15 seconds the next time that you switch on.


- Please make sure that you turn on the both rear speakers within 20 seconds after power on subwoofer during the manual pairing procedure, otherwise, the pairing will fail.
- If the subwoofer can not access to the sound bar pairing, or there is no output from the subwoofer due to frequency from other WiFi devices please try to switch off the sound bar and the subwoofer, and switch on again according to above procedure. Or you can move it to other place for playing.
- The LED light on speaker will show blue color after the speakers have paired successfully with the subwoofer.
- The LED light on speakers will flash in blue and purple during the pairing process.
- This product has been paired on the production line.
Operation Instructions
Switch On/Off the Product
- Before turning on the system, please connect it according to the System Connection Instruction.
- Connect AC power for subwoofer and rear left/right speakers.
![]()
Power source must be consistent with this product. - Press on the power switch button on the Rear Panel of the subwoofer to switch on the system, press it once again to switch off the unit.
- Press on the power switch button on the rear panel of rear tower speakers to switch on.

VOLUME
- Press the Volume + button on the front panel of the subwoofer or VOL + button on the remote control to adjust property the sound volume.
- Press the Volume - button on the front panel of the subwoofer or VOL - button on the remote control to adjust property the sound volume.
SUBWOOFER SPEAKER
- Press SW + button on the remote controller to increase the subwoofer output.
- Press SW - button on the remote controller to decrease the subwoofer output.
FRONT SPEAKER
- Press FRONT + button on the remote control to increase the Front Speaker output.
- Press FRONT - button on the remote control to decrease the Front Speaker output.
CENTER SPEAKER
- Press CEN+ button on the remote control to increase the Center Speaker output.
- Press CEN- button on the remote control to decrease the Center Speaker output.
REAR SPEAKER
- Press Rear + button on the remote control to increase the rear Speaker output.
- Press Rear - button on the remote control to decrease the rear Speaker output.
2.1 CH PLAY MODE DECODER (PCM AND EQ SOUND EFFECT)
The speaker system supports PCM decode signal from DVD player or TV. You can enjoy PCM sound effect from digital or analogue inputs. Before start playing the music, please check and make sure that the digital output on audio setup menu of your DVD player or TV is on "PCM" position. Some TV or DVD player on the market do not have PCM output setting. In this case please follow the instruction manual of your DVD player or TV.
On 2.1 ch output mode, you can press "EQ" button on remote controller for different sound effects: Classic / Jazz / Rock / Pop / Ballad / Dance.
5.1 CH PLAY MODE AND REAL SURROUND SOUND EFFECT
On digital and analogue input mode, you can press "5.1ch" button to switch to 5.1ch output. But the real surround sound effect is only possible to have via digital inputs (coaxial or optical). Before start playing the music and enjoying real surround sound effect, you need to check and make sure that the digital output on audio setup menu of your DVD player or TV is on original source output position (like Dolby, AC-3, DTS etc., depending on DVD player and TV). For details please follow the instruction manual of your DVD player or TV. Please kindly note that they also have 5.1ch output on analogue input mode (ST1 and ST2). But there will not exist real surround sound effect output, because there is only stereo signal input, not digital.
Adjust all output settings including VOLUME, SW, FRONT, CEN, REAR (if necessary) now to enjoy the wonderful and tremendous Home Theater effects.
MUTE
- Press the MUTE button on the remote controller once to keep the performance silent.
- MUTE on the front panel will then indicate "UOO".
- Press it again to resume the performance.
RESET
Press the RESET button on the remote control and it will reset all settings including SW Speaker output, Front Speaker output, CENTER Speaker output, Rear Speaker output to factory default settings.
Trouble Shooting
NO OUTPUT
- Check whether the system is connected correctly.
- Check whether the Volume is set at minimum. Adjust it accordingly.
- Check whether the Audio Input is in PLAY mode.
- Check whether the volume on TV or DVD player is set property.
NO SOUND FROM FRONT LEFT SPEAKER
- Check whether the system is connected correctly with the Front Left speaker.
- Check whether the system is connected correctly with the audio source.
NO SOUND FROM FRONT RIGHT SPEAKER
- Check whether the system is connected correctly with the Front Right speaker.
- Check whether the system is connected correctly with the audio source.
NO SOUND FROM CENTER SPEAKER
- Check whether the system is connected correctly with the Center speaker.
- Check whether the system is connected correctly with the audio source.
- Check whether 2.1CH is selected as audio output.
NO SOUND FROM REAR SPEAKER
- Check whether the system is connected correctly with the Rear speaker.
- Check whether the system is connected correctly with the audio source.
- Check whether 2.1CH is selected as audio output.
- Check whether 5.1CH is selected as audio output.
CAN NOT GET REAL SURROUND SOUND EFFECT
- Check whether the system is on 5.1 play mode.
- Check whether the input mode is on digital input coaxial and optical.
THE REAR SPEAKER CAN NOT PAIR WITH SUBWOOFER AUTOMATICALLY AFTER POWER ON
- Please follow up the manual pairing for operation again.
- Please contact local service center for support.
CAN NOT ENJOY REAL SURROUND SOUND CAN ENJOY
- Please check whether the DVD/TV output signal setting is on "AC-3" and "Dolby" mode.
- Please check whether the input audio signal is from coaxial or optical.
Specifications
- Power Supply: AC 230V/50Hz
- Input Sensitivity (Subwoofer): 550 mV ± 50 mV
- Input Sensitivity (Satellite): 700 mV ± 50 mV
- Front Speaker Impedance: 4 Ohm
- Center Speaker Impedance: 8 Ohm
- Suboofer Speaker Impedance: 4 Ohm
- Rear Speaker Impedance: 4 Ohm
- S/N (A Weight): 76 dB
- Subwoofer Power Output: 80 Watt
- Front Speaker Power Output: 20 Watt x 2
- Center Speaker Power Output: 40 Watt
- Rear Speaker Power Output: 20 Watt x 2
- THD (1kHz, 1W): 0.5%
- Frequency Response: 40 Hz ~ 20 kHz± 5 dB
- L/R Separation (1kHz): 30 dB
- L/R Balance (Stereo): ± 2 dB
- Power consumption in standby mode: < 1 Watt
- Power consumption in on mode: 200 Watt
Important Safety Instructions

RISK OF ELECTRIC SHOCK
DO NOT OPEN
To reduce the risk of electric shock, do not dismantle the product and do not expose the apparatus to rain or moisture. No user-serviceable parts inside. Refer servicing to qualified personnel only.
Explanation of Graphical Symbols
 The lightning flash within an equilateral triangle is intended to alert you to the presence of uninsulated dangerous voltage within the product's enclosure that may be of sufficient magnitude to constitute an electric shock to a person or persons.
 The exclamation point within an equilateral triangle is intended to alert you to the presence of important operating and maintenance (servicing) instructions in the literature accompanying the product.
To achieve the utmost in enjoyment and performance, and in order to become familiar with its features, please read this manual carefully before attempting to operate this product. This will assure you years of trouble free performance and listening pleasure.
Important Notes
- Safety and operating instruction manual should be retained for future reference.
- The apparatus should not be exposed to dripping or splashing or placed in a humid atmosphere such as a bathroom.
- Do not install the product in the following areas:
- Places exposed to direct sunlight or close to radiators.
- On top of other stereo equipment that radiate too much heat.
- Blocking ventilation or in a dusty area.
- Areas where there is constant vibration.
- Humid or moist places.
- Do not place near candles or other naked flames.
- Operate the product only as instructed in this manual.
- Before turning on the power for the first time, make sure the power adaptor is properly connected.
For safety reasons, do not remove any covers or attempt to gain access to the inside of the product. Refer any servicing to qualified personnel.
Do not attempt to remove any screws, or open the casing of the unit; there are no user serviceable parts inside. Refer all servicing to qualified service personnel.
Safety Instructions
- Read Instructions - All the safety and operating instructions must be read before the product is operated.
- Retain Instructions - The safety and operating instructions should be kept with the product for future reference.
- Heed warnings - All warnings on the product and in the operating instructions should be adhered to.
- Follow instructions - All operating and users' instructions should be followed.
- Installation - Install in accordance with the manufacturer's instructions.
- Power sources - This product should be operated only from the type of power source indicated by the marking adjacent to the power cord entry. If you are not sure of the type of power supply to your home, consult your product dealer or local power company.
- Grounding or polarization - the product is not required to be grounded. Ensure that the plug is fully inserted into the wall outlet or extension cord receptacle to prevent blade or pin exposure. Some versions of the product are equipped with a power cord fitted with a polarized alternating line plug (a plug having one blade wider than the other). This plug will fit onto the power outlet only one way. This is a safety feature. If you are unable to insert the plug fully into the outlet, try reversing the plug. If the plug should still fail to fit, contact your electrician to replace your obsolete outlet. Do not defeat the safety purpose of the polarized plug. When using an extension power-supply cord or a power-supply cord other than that supplied with the appliance, it should be fitted with the appropriate molded plugs and carry safety approval appropriate to the country of use.
- Power cord protection - Power-supply cords should be routed so that they are not likely to be walked on, kinked or pinched by items placed on or against them, paying particular attention to cords from plugs, receptacles and the point where they exit from the product.
- Overloading - Do not overload wall outlets, extension cords, or multiple sockets, as this can result in a risk of fire or electric shock.
- Ventilation - The product must be properly ventilated. Do not place the product on a bed, sofa, or other similar surface. Do not cover the product with any items such as tablecloths, newspapers, etc.
- Heat - The product should be situated away from heat sources such as radiators, heat registers, stoves, or other products, including amplifiers that produce heat. No naked flame sources, such as lighted candles, should be placed on the apparatus.
- Water and moisture - To reduce the risk of fire or electric shock, do not expose the product to train, dripping, splashing or excessive moisture such as in a sauna or bathroom. Do not use this product near water, for example, near a bathtub, washbowl, kitchen sink, laundry tub, in a wet basement or near a swimming pool (or similar).
- Object and Liquid Entry - Never push objects of any kind into this product through openings, as they may touch dangerous voltage points or short-circuit parts that could result in a fire or electric shock. Never spill liquid of any kind on the product. Do not place any object containing liquid on top of the product.
- Cleaning - Unplug the product from the wall outlet before cleaning. Dust in the woofer may be cleaned with a dry cloth. If you wish to use an aerosol cleaning spray, do not spray directly on the cabinet; spray onto the cloth. Be careful not to damage the drive units.
- Attachments - Do not use attachments not recommended by the product manufacturer, as they may cause hazards.
- Accessories - Do not place this product on an unstable cart, stand, tripod, bracket or table. The product may fall, causing serious injury to a child or adult, and serious damage to the product. Use only with a cart, stand, tripod, bracket or table recommended by the manufacturer or sold with the product. Any mounting of the product should follow the manufacturer's instructions and should use a mounting accessory recommended by the manufacturer.
- Moving the product - A product and cart combination should be moved with care. Quick stops, excessive force and uneven surfaces may cause the product and cart combination to overturn.
- Unused periods - The power cord of the appliance should be unplugged from the outlet during lightning storms or when the apparatus is left unused for a long period of time.
- Servicing - Do not attempt to service this product yourself, as opening or removing covers may expose you to dangerous voltage or other hazards. Refer all servicing to qualified service personnel.
- Please remove the power plug form the main power source or wall power source when not in use. When plugged in to a power source, the system is in standby mode, so the power is not entirely cut off.
- Replacement parts - When replacement parts are required, ensure that the service technician has used replacement parts specified by the manufacturer or have the same characteristics as the original part. Unauthorized substitutions may result in fire, electric shock or other hazards.
- Mains fuses - For continued protection against fire hazard, use fuses only of the correct type and rating. The correct fuse specification for each voltage range is marked on the product.
- Do not turn up the volume while listening to a section with very low level inputs or no audio signals. If you do, the speaker may be damaged when a peak level section is suddenly played.
- The only means of completely disconnecting the product from the power supply is by removing the power cord from the wall outlet or the product. The wall outlet or the power cord entry to the product must remain freely accessible at all times while the product is in use.
- Try to install the product near a wall socket or extension cord and shall be easily accessible.
- The highest environmental temperature suitable for this product is 35°C.
- ESD hints - If the product maybe reset or not reset to operation of control due to electrostatic discharge, just switch off and reconnect again, or move the product to another location.
- Battery
- The batteries must not be exposed to excessive heat such as sunshine, fire or the like.
- The batteries should be drawn to the environmental aspects of battery disposal.
- Battery usage CAUTION-to prevent battery leakage which may result in body injuries, property damage, or damage to the apparatus:
- Install all batteries correctly, + and – as marked on the apparatus.
- Do not mix batteries (old and new or carbon and alkaline, etc.)
- Remove batteries when the unit is not used for a long time.
ERP 2- (Energy Related Products Directive) note:
This product with eco-design complies with the stage 2 requirements of Commission Regulation (EC) NO. 1275/2008 implementing Directive 2009/125/EC regarding to standby and off mode electric power consumption of electronic household and office equipment. After 15 minutes without any audio input, the system will automatically switch into standby mode. Follow up the instruction manual to resume the operation.
This device is equipped with an energy saving mode: if no signal is given during 15 minutes the device will switch automatically into standby mode in order to save energy (ERP 2 standard). Please note that low volume setting in the audio source may be recognized as "no audio signal": this will affect the capability of signal detection from the device and can also originate an automatic switch into standby mode. If this happens please reactivate the audio signal transmission or increase the volume setting on the audio source player (DVD player, TV, etc.), in order to resume playback. Please contact the local service center if the problem remains.

This appliance is not intended for use by persons (including children) with reduced physical sensory or mental capabilities, or lack of experience and knowledge, unless they have been given supervision or instruction concerning use of the appliance by a person responsible for their safety. Children should be supervised to ensure that they do not play with the appliance.
![]()
To prevent possible hearing damage, do not listen at high volume levels for long time periods respectively a sudden high volume level.- Never use the device unsupervised! Switch off the device whenever you are not using it, even if this only for a short while.
- The appliance is not intended to be operated by means of an external timer or separate remote control system.
- If the supply cord is damaged, it must be replaced by the manufacturer, its service agent or similarly qualified persons in order to avoid a hazard.
- Before operating this system, check the voltage of this system to see if it is identical to the voltage of your local power supply.
- The unit should not be impeded by covering the ventilation opening with items such as newspaper, table-cloths, curtains etc. Make sure that there are at least 20 cm of space above and at least 5 cm of space on each side of the unit.
- The apparatus must not be exposed to dripping or splashing and that objects filled with liquids, such as vases, must not be placed on the apparatus.
- To prevent fire or shock hazard, do not expose this equipment to hot places, rain, moisture or dust.
- Do not locate this unit near any water sources e.g. taps, bathtubs, washing machines or swimming pools. Ensure that you place the unit on a dry, stable surface.
- Do not place this unit close to a strong magnetic field.
- Do not place the unit on a amplifier or receiver.
- Do not place this unit in a damp area as the moisture will affect the life of electric components.
- If the system is brought directly from a cold to a warm location, or is placed in a very damp room, moisture may condense on the lens inside the player. If this occurs, the system will not operate properly. Please leave the system turned on for about an hour until the moisture evaporates.
- Do not attempt to clean the unit with chemical solvents as this might damage the finish. Wipe with a clean, dry or slightly damp cloth.
- When removing the power plug from the wall outlet, always pull directly on the plug, never pull on the cord.
- Depending on the electromagnetic waves used by a television broadcast, if a TV is turned on near this unit while it is also on, lines might appear on the TV screen. Neither this unit nor the TV is malfunctioning. If you see such lines, keep this unit well away from the TV set.
- The mains plug is used as the disconnect device, the disconnect device must remain readily operable.

Documents / ResourcesDownload manual
Here you can download full pdf version of manual, it may contain additional safety instructions, warranty information, FCC rules, etc.
Advertisement


Need help?
Do you have a question about the SBW500 and is the answer not in the manual?
Questions and answers