Advertisement
Advertisement
Table of Contents

Related Manuals for Murrplastik mp-PM A3

Summary of Contents for Murrplastik mp-PM A3
- Page 1 ACS Labelling systems mp-PM A3 Operating instructions V1.0 As of: March 2016...
- Page 2 Index Introduction ..................3 Items supplied ................. 4 Produkt overview ................5 Starting up the mp-PM A3 ............... 6 Operation ..................7 Control keys ..............8 Inserting the plotter pen into the pen station ......... 9 Placing the base plates (GPx, GPU A4 resp. A3) ......10 Windows driver installation ............
- Page 3 1 Introduction Thank you for purchasing the mp-PM A3, a flexible plotter that helps you label marking elements quickly and easily. Product description Rugged construction in stylish aluminium Labelling area 422 mm x 305 mm for ten aluminium base plates GPx,...
-
Page 4: Items Supplied
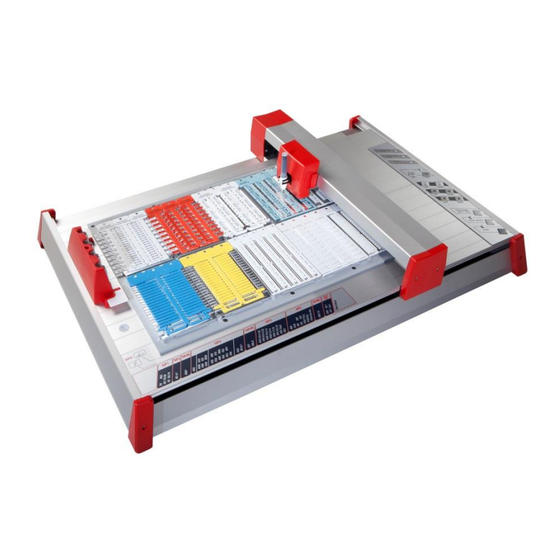
Please retain the packaging in case you need to return the device. Purchased parts packages mp-PM A3 System (Item 86622070) 1. Plotter mp-PM A3 incl. base plate 2. USB data cable 3. Power supply 100-240 V Euro adapter attached 4. Mains adapter USA and UK 5. - Page 5 3 Produkt overview Bildbeschriftung Working area with base plate for carrier GPx, GPU A4 or GPU A3 Pen station Ink flow test plate (2x) Sealed storage holder in pen station (4x) Clip adapter for plotter pen Pen unit Power supply USB port Control panel Writing arm...
- Page 6 Please ensure that the connections on the right-hand side of the device are accessible at all times. Position the mp-PM A3 firmly on the work surface where it is to be used, ensuring it is level.
-
Page 7: Operation
5 Operation Once you have installed the mp-PM A3 and connected the power supply and USB data cable you can switch on the plotter. Important: Before switching the device on, please ensure that there are no objects on the writing/plotting area which might prevent the writing arm from moving freely. - Page 8 PC. Clear buffer If the mp-PM A3 contains data the yellow light will come on. You can delete this data by pressing the 'Clear buffer' key. To do this the system must be in stop mode (red light on).
- Page 9 6 Inserting the plotter pen into the pen station Before using the mp-PM A3 insert the plotter pen with the desired tip into the pen station. To insert plotter pens into the pen station, press the 'Pen station open / close' key. When the pen station has been...
- Page 10 7 Placing the base plates (GPx, GPU A4 resp. A3) There are eight pin stops on the plotting area where the grey base plate is loaded. On this base plate the aluminium base plates GPx snap into place by catching the position holes with their corresponding pins on the back.
-
Page 11: Windows Driver Installation
8 Windows driver installation The mp-PM A3 driver is released for 32 and 64 bit Windows 7 up to Windows 10 operating systems. Please note This driver's installation description is exemplary for freshly installed Windows systems on which still no Murrplastik driver was installed before. - Page 12 Execute the driver's exe-file with double-click. Admit the driver's files extraction and the driver's installation and confirm the Windows User Account Control query with [Yes]. Click [Next]. Accept the license agreement and click [Next].
- Page 13 Enter your user information and click [Next]. Apply the suggested path or change it inside the C: drive individually (e.g. C:\Program Files (x86)\ ACS Gold Studio) and click [Next]. Apply the suggested Start Menu Folder or rename it as requested and click [Next].
- Page 14 Select the driver to be installed, in this case the MVPS G3 drivers family, belonging mp-PM A3 as well, and click [Next]. The first installation step, driver's files extraction will start by clicking the [Install] button. Finish the first installation step by...
- Page 15 Start the second installation step by clicking [Next]. Set a check at 'Always trust software…' and click [Install]. Finish the second installation wizard by clicking [Finish]. Confirm [OK].
- Page 16 Start the third installation step with [Next]. Confirm the Windows Security query with 'Install this driver software anyway'. Finish the third installation wizard by clicking [Finish].
- Page 17 [Next]. Complete the device driver installation with [Finish]. Now the mp-PM A3 printer was defined as Windows standard printer (green hook). Nevertheless, this is not necessary. To define the previous printer as Windows standard printer again, click on the previous printer with right mouse key and choose [Set as default printer].
- Page 18 Paper size (working area) and velocity (plotting feed) must be set in Windows. 9.1 Orientation and paper size In the Devices and Printers window click on the mp-PM A3 with right mouse key and choose 'Printing preferences' in the context menu.
- Page 19 Check whether paper size 'MVPS G3' is chosen and confirm with [OK]. Close the Printing Preferences window by clicking [OK].
- Page 20 9.2 Velocity (plotting feed) In the Devices and Printers window click on the mp-PM A3 with right mouse key and choose 'Printer properties' in the context menu. Click on the 'Device Settings' tab and open 'Pen Settings' - 'Pen Set 1 '.
- Page 21 Open the 'Black', 'Red', 'Green' 'Blue' colour by clicking the respective '+'. Change the Black Velocity value from '10.0' into '1.0'.
- Page 22 Proceed in the equal manner like with colour 'Black' velocity, with colours 'Red', 'Green' 'Blue' velocity as well. Close the Properties window by clicking [OK]. 10 Settings in the ACS software The new device and its corresponding calibration point (offset) are added/entered in the ACS software.
- Page 23 10.1 Tags output If the mp-PM A3 plotter is not preselected already in the upper drop- down menu of the Tags output section (red frame), open this drop-down menu and choose the corresponding mp-PM A3 plotter. Click [Add] to take...
- Page 24 Enter the calibration point values X = 12.5 Y = 261.8 Please note These values are default values and can be vary slightly by device. Check your settings once again, set a check at 'As default' and close the window by clicking on [Done].. 10.2 Sheet labels output - Duomatt Start the ACS software,...
- Page 25 If the mp-PM A3 plotter is not preselected already in the upper drop- down menu of the Sheet Labels output section (red frame), open this drop-down menu and choose the corresponding mp-PM A3 plotter. Click [Add] to take over the device into the 'List of output devices'.
- Page 26 Check your settings once again, set a check at 'As default' and close the window by clicking on [Done]. 10.3 Sheet labels output - Labels (ELW/ELG etc.) Start the ACS software, do not open a project and click [Settings] - [Output Device Setup].
- Page 27 Open the 'Calibration Point' drop-down menu and choose the second entry from above '0.0'. Thereby the coordinate names changes from X / Y into X1 / Y1. Please note In comparison to Duomatt the sheet labels calibration points are referenced with X1 and Y1 always.
- Page 28 Close the Output Setup window by clicking [Done]. Please note Picture shows settings with GPU A4 base plate. Please note Picture shows settings with GPU A3 base plate.
-
Page 29: Cleaning And Product Care
11 Cleaning and product care Protect the mp-PM A3 from dust and other dirt. When not in use, cover the plotter. Wipe the device occasionally after use with a dry, lint-free cloth or a mild cleaning agent. Important: Under no circumstances use harsh cleaning products to clean the plotter. -
Page 30: Troubleshooting
12 Troubleshooting If your mp-PM A3 plotter is not functioning correctly, please check the following: Device fails to Check whether the mains plug and switch on. connecting plug are plugged in correctly. Plotter does not Is the interface cable connected... -
Page 31: Technical Information
13 Technical information mp-PM A3 plotter specification Type of plotter: Flatbed plotter Maximum plotting area: 422 mm x 305 mm Plotting speed with pen: Max. 40 mm/s Plotter pen: Special plotter pens with HP fixing Port: USB Level 2.0 Control language:... -
Page 32: Safety Instructions
14 Safety instructions Keep the operating instructions in a safe place. This device complies with all recognised technical standards and all relevant safety regulations. The mains power supply used must correspond with that specified on the name plate. ...
Need help?
Do you have a question about the mp-PM A3 and is the answer not in the manual?
Questions and answers