Table of Contents
Advertisement
Quick Links
Advertisement
Table of Contents

Related Manuals for Raddy RF919


Summary of Contents for Raddy RF919
- Page 1 Extended Manual for RF919 V2.1, April 16 , 2024 © 2024 page 1 of 63...
-
Page 2: Table Of Contents
Extended Manual for RF919 v2.1 Thank you for purchasing a RF919. Before use, please read this extended manual carefully and keep it for later reference. Table of Contents Table of Contents ....................2 About ..................... 5 Product overview ..................7 Product features .................. - Page 3 Extended Manual for RF919 v2.1 The secondary screen ..................... 24 Functions ....................25 Power on / Power off ....................25 7.1.1 Turn the radio on/off .................. 25 7.1.2 Set the sleep timer ..................25 Adjust the volume ....................25 Listen to the radio ....................25 7.3.1...
- Page 4 Extended Manual for RF919 v2.1 11.3.1 TF card playback ..................47 11.3.2 PC mode ....................... 47 11.3.3 Bluetooth audio mode ................48 Use of the lock button ................48 Set current date and time ..............49 Set alarm time ..................50 14.1...
-
Page 5: About
We believe that preparing for whatever comes next is as important as enjoying the outdoors. Be prepared, get Raddy, and HAVE FUN! Please feel free to contact us by email via support@iraddy.com and we'll do our best to solve your concerns. - Page 6 Extended Manual for RF919 v2.1 Disclaimer This document is based on the version of the manual that comes with the radio but with lots of enhancements and corrections. It does describe all those details, that are required to know in order to get the most out of your RF919.
-
Page 7: Product Overview
Extended Manual for RF919 v2.1 1 Product overview Our aim in new product R&D has always been continuous innovation and meeting the needs of users. We hope you like our meticulously crafted RF919 radio which will bring even more happiness to people who like to listen to radio stations all over the world. -
Page 8: Product Features
2 Product features • The RF919 can receive wireless signals of LW, MW, SW, CB, FM, AIR, VHF, WB and UHF. It supports several kinds of demodulation (FM, STEREO, AM, LSB, USB), Bandwidth (BW) settings according to the used frequency band,... - Page 9 Extended Manual for RF919 v2.1 • The radio is independent of national boundary limitations. o FM has three frequency start points to choose from: ▪ FM1: 87.5-108 MHz ▪ FM2: 76.0-108 MHz ▪ FM3: 64.0-108 MHz o AM comes with two frequency start points to choose from: ▪...
-
Page 10: What Is In The Box
3 What is in the box? Thank you for choosing the RF919. We recommend that you first check the delivery contents listed in the following table and keep the packaging for later storage. If something is missing or damaged, please contact your dealer immediately. -
Page 11: Get Started
Extended Manual for RF919 v2.1 4 Get started This chapter is limited to just two pages and intended for those customers that want to get started hearing some FM radio stations using their RF919 without having to read the complete manual first. - Page 12 ] to select one of the stored radio stations. Use [ ] and [ ] to align the volume as required. Now listen to your new RF919. Whilst doing so, read the remaining pages of this manual. Long press [ ] to turn off the radio. ©...
-
Page 13: Buttons And Their Functions
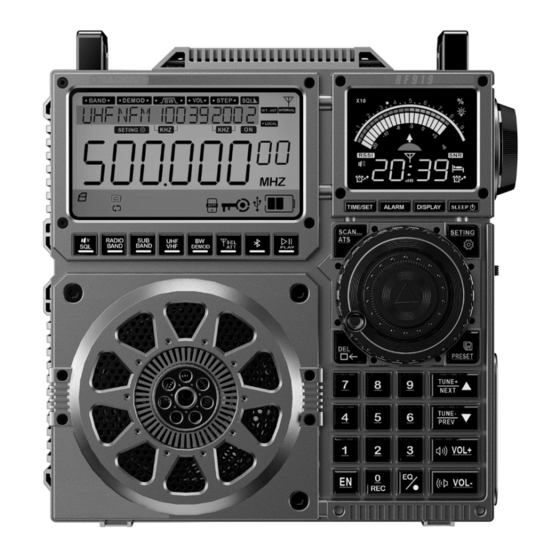
RF919 v2.1 5 Buttons and their functions RF919 is equipped with three antenna sockets for connecting external antennas, two screens, two tuning wheels, several switches and keys. This chapter gives a brief explanation of all those elements. Buttons below the primary display... -
Page 14: Buttons Below The Secondary Display
Extended Manual for RF919 v2.1 Button Function In LW, MW, SW, CB, VHF, WB and UHF mode with neither manual tuning of built-in antenna nor externa antenna selected, short press [ ] to switch between “ ” and “ ” mode. -
Page 15: Buttons Surrounding The Tuning Knob
Extended Manual for RF919 v2.1 Button Function • In time/Bluetooth/TF card playback mode, short press [DISPLAY] to see the alarm time 1 on the secondary screen. On second short press of [DISPLAY], alarm time 2 will be shown on the... -
Page 16: Buttons Besides The Numerical Keypad
Extended Manual for RF919 v2.1 Button Function • Short press [ ] to switch between temperature display and display according to working mode. • When the radio is turned on, long press [ ] to enter the menu for reception settings. See chapter 7.3.10 “Reception settings” on page 31. -
Page 17: Buttons And Sockets On The Right Side Of The Radio
Extended Manual for RF919 v2.1 Button Function • In receive mode, short press [ ] to progressively decrease the min step value of frequency at all bands. Long press [ for 2 seconds to search channels down automatically. • In TF card mode, short press [... -
Page 18: Switch And Socket On The Back Side Of The Radio
RF919 v2.1 Switch and socket on the back side of the radio RF919 comes with a built-in rod antenna. Alternatively, an external antenna can be connected to the radio, replacing the internal rod antenna. 5.6.1 External antenna connected to the 3.5mm TRS An external antenna can be connected to the 3.5mm TRS socket marked... -
Page 19: Manual Mw Tuning
Buttons and sockets on the top side of the radio On the top of the RF919 two more sockets for connection of external antennas are located. 5.7.1 WT antenna connected to SMA-m socket The male SMA-socket “... -
Page 20: The Primary And Secondary Screen
Extended Manual for RF919 v2.1 6 The primary and secondary screen The primary screen The primary screen displays most of the operating conditions and parameters. The visualized information is depending on the currently selected operating mode. Icons on primary screen... - Page 21 Extended Manual for RF919 v2.1 Icon Parameter Use of loop antenna (magnetic rod loop antenna) Rod antenna (including the external antenna) Use of SMA socket input Built-in antenna (including rod antenna/magnetic rod) receiving Automatic antenna mode External antenna connected to one of the three sockets activated (including WalkyTalky (WT) and the two 3.5mm...
- Page 22 Extended Manual for RF919 v2.1 Icon Parameter TF card is inserted Indicator for the primary screen to be steady on Indicator for the secondary screen to be steady on Repeat tracks in current folder Play random track Repeat all tracks Repeat current track Bluetooth &...
-
Page 23: Messages On Primary Screen
Extended Manual for RF919 v2.1 Messages on primary screen Message Meaning Weather band alarm of North American countries • Set backlight time of primary screen A-LCD SETTING • Set backlight color of primary screen Set backlight time of secondary screen... -
Page 24: The Secondary Screen
Extended Manual for RF919 v2.1 The secondary screen Signal to Noise ratio Received Signal Strength Indication Sleep active Status Alarm 2 Status Alarm 1 Most of the working parameters are displayed on the primary screen. However, some parameters are visualized on the secondary screen. Those are:... -
Page 25: Functions
Extended Manual for RF919 v2.1 7 Functions Power on / Power off 7.1.1 Turn the radio on/off Short press any key to activate the time display. Short press [ ] to turn on the radio. You will hear a short Morse-code (“CQ”) as confirmation. When the radio is working, long press [ ] for 2 seconds to turn it off. -
Page 26: Supported Frequency Bands
Extended Manual for RF919 v2.1 7.3.1 Supported frequency bands RF919 does support reception of the following frequency bands. Short press [ ] or [ ] to select a frequency band. Button Band Frequency Remarks FM Radio band 64-108 MHz Stereo and Wide FM (WFM) demodulation Short Wave band 2.3-30.0 MHz... -
Page 27: Mw Frequency Starting Point And Corresponding Stepping Value
Extended Manual for RF919 v2.1 7.3.3 MW frequency starting point and corresponding stepping value In MW mode, short press [ ] to show the MW frequency starting point. This may be either „520 kHz“ or „522 kHz“ and is shown on the primary screen. -
Page 28: Search And Store Active Radio Stations Using The Scan-Key
Extended Manual for RF919 v2.1 7.3.4.3 Search and store active radio stations using the SCAN-key In receive mode, long press [ ] for 2 seconds to search for active radio stations and store their frequencies automatically as channels in the huge memory of the radio. -
Page 29: Select Meter Waves
800.0 MHz, 999.0 MHz (8 meter waves) 7.3.6 Store channels manually When the RF919 is working, select the target frequency as described in chapter 7.3.4 “Search for active stations” on page 27. Long press [ ] for 2 seconds. “CH***” flashes on the primary screen, •... -
Page 30: Delete Channels
Extended Manual for RF919 v2.1 To exit this mode, short press the [PRESET] key and the main screen LCD • “PRESET” label disappears to indicate that the mode for recalling previously stored channels is no longer active. 7.3.8 Delete channels To delete a channel that is no longer needed, select that channel as described in chapter 7.3.7 “Recall previously stored channels”... -
Page 31: Reception Settings
7.3.10 Reception settings RF919 is highly customizable to your specific needs regarding the internal routing of the signal received from the connected antenna. It is possible to either manually tune the antenna signal by routing it via the manual switch on the backside of the radio or by routing it via several RF channel selections. -
Page 32: Fm Reception Settings
Extended Manual for RF919 v2.1 7.3.10.1 FM reception settings As the FM band is above 30 MHz, only the relevant reception settings are available. Setting parameter Options within sub-menu ANT-DEFAULT Default settings for antenna signal ANT-KEEP-PASS Keep current antenna signal routing... -
Page 33: Sw (Am) And Cb Reception Settings
Extended Manual for RF919 v2.1 7.3.10.2 SW (AM) and CB reception settings As the SW band and CB band both are below 30 MHz, only the relevant reception settings are available. Setting parameter Options within sub-menu DEFAULT Default settings for antenna signal... -
Page 34: Sw (Ssb), Vhf And Uhf Reception Settings
Extended Manual for RF919 v2.1 7.3.10.3 SW (SSB), VHF and UHF reception settings Setting parameter Options within sub-menu ANT-10dB antenna attenuation 10dB ATT-GAIN ANT-20dB antenna attenuation 20dB SQL-LEVEL 00-01-02-03-04-05-06- 07-08-09 LEVEL SQL- 9 squelch levels with “00” squelch being turned off... -
Page 35: Air Reception Settings
Extended Manual for RF919 v2.1 7.3.10.4 AIR reception settings Setting parameter Options within sub-menu DEFAULT Default settings for antenna signal ANT- ANT-KEEP-PASS Keep current antenna signal routing ANT-HPF HighPassFilter ANT-CHANNEL ANT-LNA1 LNA1 channel ANT-LNA1-GAIN-L LNA1 antenna channel low gain ANT-LNA1-GAIN... -
Page 36: Select Bandwidth
7.3.12 SW Demodulation types In SW receive mode, the RF919 supports three demodulation types: AM (Amplitude Modulation), LSB (Lower Side Band) and USB (Upper Side Band). • In SW receive mode, with normal AM demodulation being active, long press ] for 2 seconds “AM” flashes on the primary screen. Now, within 2 seconds, short press [ ] and “USB”... -
Page 37: Demodulation Types Of Other Bands
Extended Manual for RF919 v2.1 7.3.13 Demodulation types of other bands In receive mode, long press [ ], then “ ” flashes on the primary screen. Short press [ ] to select the demodulation type. For SW demodulation types, please see the previous chapter 7.3.12 “SW Demodulation types”... -
Page 38: Use Of Tf Card
8 Use of TF card RF919 allows to play back audio files stored on a TF card in MP3, WMA, WAV, APE or FLAC format. Up to 65,535 files may be stored on a single TF card and TF cards with up to 256 GB are supported. Besides playback of tracks, the radio also supports recording of received radio stations is MP3-format with 160 kBit/s. -
Page 39: Record On Tf Card
Extended Manual for RF919 v2.1 Record on TF card RF919 is able to record a received audio stream MP3-encoded with 160 kBit/s on a inserted TF card. When the radio is working, insert a TF card. Start: Long press [ to start recording the current audio sound. -
Page 40: Equalizer Setting
Extended Manual for RF919 v2.1 9 Equalizer setting In normal working mode, short press [ ] to select an equalizer setting. Working mode EQ-NORMAL ▅ ▅ ▅ ▅ ▅ ▅ ▅ ▅ ▅ ▅ ▅ EQ-POP ▅ ▅ ▅ ▅... -
Page 41: Bluetooth Mode
“ ” starts flashing to indicate that the radio is waiting for a Bluetooth connection. Turn on Bluetooth on your mobile device and connect it to the RF919. After successful connection, “ ” is always displayed and “ ”... -
Page 42: Control Via App
Extended Manual for RF919 v2.1 11 Control via APP Your RF919 may be remotely operated using the APP. However, the appropriate APP needs to be installed first. Step Action Details Turn on the radio Download the APP QR codes also to be found on the... -
Page 43: The App Interface
Extended Manual for RF919 v2.1 If you To disconnect the APP, long press [ ] to turn off the radio and display the clock. Then long press [ ] for 2 seconds to exit the APP after the APP connection symbol [ ] disappears on the primary screen. You can also exit the APP in the system menu. -
Page 44: The App Symbols And Controls
Extended Manual for RF919 v2.1 11.2 The APP symbols and controls Icon Meaning Bandwidth setting of currently selected band Signal-to-noise ratio Received Signal Strength Intensity In the SW, CB, AIR, VHF and UHF band mode, press [ ] to modify the squelch settings. - Page 45 Bluetooth play mode Note: If you need to play music in Bluetooth mode, please open the mobile phone Bluetooth connection, select "RF919" in the search list, to playback after successful connection. Specify frequency: Short press [ ], now enter...
- Page 46 ] again to unlock them. Press [ ] to connect the APP with the RF919 via Bluetooth. The color of the button [ will turn orange as soon as the connection to the radio has been established. Short press [...
-
Page 47: Operating Modes
Extended Manual for RF919 v2.1 11.3 Operating modes Short press on [ ] to turn off normal receiving mode and select one of the other operating modes. The most choices are available whenever the radio is connected via USB to a PC. To get back to receiving mode, short press [... -
Page 48: Bluetooth Audio Mode
], [ ] and [ ] on the radio to control the audio playback. 12 Use of the lock button The slider switch on the right side of the RF919 has three positions: Position Function UN-LOCK Radio is not locked/unlock. -
Page 49: Set Current Date And Time
Extended Manual for RF919 v2.1 13 Set current date and time In time display mode, long press [TIME/SET] for 2 seconds to set the current time/date as follows: Step Action On the time display state. Long press the [TIME/SET] button... -
Page 50: Set Alarm Time
Extended Manual for RF919 v2.1 14 Set alarm time After setting the current time as described in the previous chapter 13 “Set current date and time” on page 49, long press the [Alarm] key for 2 seconds to set the... -
Page 51: Turn Off The Alarm Time
Extended Manual for RF919 v2.1 14.1 Turn off the alarm time Select "1 OFF" or "2 OFF" as described at the beginning of the chapter. After selecting “OFF”, the alarm clock symbol of the secondary screen will disappear. Note: If scheduled power on “... -
Page 52: System Settings
Extended Manual for RF919 v2.1 15 System settings In time mode, long press [ ] to set functions. After entering the main menu there are the following options: • Rotate the big tuning knob [ ] clockwise or anti-clockwise to select the sub menu •... - Page 53 Extended Manual for RF919 v2.1 Main menu Sub-menu options Set the light on time in working state TIME SET 05-S/06-S/07-S/08- S..3 0-S/FULL Rotate the tuning knob [ ] to select the C-KEY SETTING time. ”FULL” means the backlight of the keys is always on.
-
Page 54: Usb Type-C Charging
18 AUX input When the RF919 is turned on, connect the output of your external device (such as mobile phone or computer) via a 3.5mm TRS jack to the “ ” - input on the right side of the RF919. -
Page 55: Use Of Antennas
When listening to SW, CB, FM, AIR, VHF, WB or UHF, pull out the extendable rod antenna of the RF919 and align its length for best reception. Try different directions and find a position with the best receiving effect. Tip: Shorten the extendable rod antenna if the received signal is distorted by very strong radio interference, resulting in crosstalk. -
Page 56: Built-In Magnetic Antenna
When in radio receive mode, short press [DISPLAY] to turn the signal-to-noise ratio (SNR) and Received Signal Strength Indicator (RSSI) on the secondary screen on or off. 20.2.1 External antenna sockets RF919 has a total of three external antenna connectors. The following table provides their details: Connector purpose Where to find # in picture 3.5 mm TRS... -
Page 57: Frequencies Of Some Stations
Extended Manual for RF919 v2.1 21 Frequencies of some stations 21.1 Shortwave stations Country Frequency (kHz) Modulation 2310, 2325, 2485, 4835, 4910, 5025, 5995, 6020, 6080, 7240, 9475, 9560, 9580, 9590, 9660, 9710, AUSTRALIA 11650, 11880, 12080, 13630, 13670, 15160,... -
Page 58: Gmrs/Frs Frequencies
Extended Manual for RF919 v2.1 21.2 GMRS/FRS frequencies The Family Radio Service (FRS) has been available in the US since 1996 (later also in Canada and Mexico due to its popularity). In Europe, it is comparable to Freenet, PMR radio (PMR446) or SRD radio (formerly LPD). -
Page 59: Cleaning And Maintenance
22 Cleaning and maintenance To clean the RF919 use a dry cotton cloth and the brush that comes with the radio to remove any dust from the radio. In case it is required to exchange the two 18650 style rechargeable battery cells use the supplied screwdriver to open the battery compartment and exchange the batteries. -
Page 60: Common Problems And How To Solve Them
Is the radio PC programmable for Unlike amateur handheld radios, the managing the 1600 channels? RF919 does not support PC programming. © 2024 page 60 of 63... -
Page 61: Technical Specifications
Extended Manual for RF919 v2.1 25 Technical specifications 25.1 General specifications Parameter Value Speaker 3 inch, 3Ω, 20W Number of channels stored 1,600 Bluetooth version V5.1 Bluetooth receiving distance ≤ 20m Min operating voltage 3.5V Batteries 2 * 3.7V LiIon 2500mAh each External input voltage 5V DC @ 1…3A... -
Page 62: Certification
Extended Manual for RF919 v2.1 26 Certification RF919 is: FCC Part 15 Subpart C certified with FCC ID: 2APU9-HRD-C919 • CE approved and verified to Radio Equipment Directive 2014/53 EU • Conformant to ETSI EN 303 345-1 V1.1.1:2019-06 (“Broadcast Sound •... -
Page 63: Where To Find Support Material
27 Where to find support material Please kindly note that all the files related to the RF919 can be found in the Download area of our official website by following these steps: https://iraddy.com → Download → click on the appropriate radio model...
Need help?
Do you have a question about the RF919 and is the answer not in the manual?
Questions and answers