Table of Contents
Advertisement
Quick Links
H4056
GOSMART IP OUTDOOR CAMERA IP-600 EYE
Table of Contents
Safety instructions and warnings ........................................................................................... 2
Contents of the package ........................................................................................................ 3
Technical Specifications .......................................................................................................... 3
Description of the device ....................................................................................................... 4
Installation and assembly ....................................................................................................... 5
Icons and indicator lights ........................................................................................................ 9
Controls and functions ......................................................................................................... 11
Troubleshooting FAQ ........................................................................................................... 12
1
Advertisement
Table of Contents

Related Manuals for GoSmart H4056


Summary of Contents for GoSmart H4056
-
Page 1: Table Of Contents
H4056 GOSMART IP OUTDOOR CAMERA IP-600 EYE Table of Contents Safety instructions and warnings ................... 2 Contents of the package ......................3 Technical Specifications ......................3 Description of the device ....................... 4 Installation and assembly ....................... 5 Icons and indicator lights ......................9 Controls and functions ...................... -
Page 2: Safety Instructions And Warnings
Before using the device, read the instructions for use. Observe the safety instructions in this manual. EMOS spol. s r.o. declares that the product H4056 complies with the essential requirements and other relevant provisions of the directives. The equipment can be operated freely in the EU. -
Page 3: Contents Of The Package
Storage: SD card (max. 64 Gb), Cloud storage Degree of protection: IP55 Maximum number of users: 10 APP: EMOS GoSmart for Android and iOS Connectivity: 2.4 GHz WI-FI (IEEE802.11b/g/n) Notice The camera only supports 2.4GHz Wi-Fi (does not support 5GHz). -
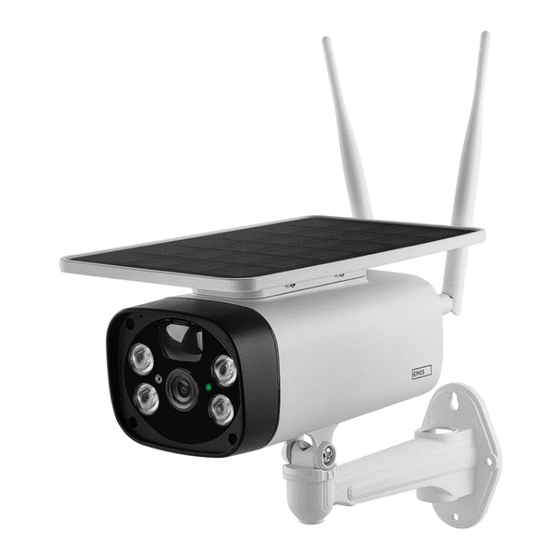
Page 4: Description Of The Device
Description of the device 1 - Antennas 2 - Solar panel 3 - PIR sensor 4 - LED illuminator 5 - light sensor 6 - IR illuminator 7 - Status LED • LED flashes red: waiting for network configuration. • The LED flashes green quickly: the device is connecting to the network. -
Page 5: Installation And Assembly
Installation and assembly Installing the camera on the wall 1. Insert the batteries into the camera and let it charge until it is 100% charged. 2. Then switch the camera on with the ON/OFF button. - Page 6 Mount the camera mount in a place with plenty of sunlight. For safety reasons, we recommend installing the camera at a height of at least 3 meters. Once the camera is fully charged, screw the cover back onto the underside of the camera and then attach the entire camera to the pre-installed mount.
- Page 7 QR code to download the app. EMOS GoSmart mobile app Open the EMOS GoSmart app and confirm the privacy policy and click I agree. Select the registration option. Enter the name of a valid email address and choose a password.
- Page 8 Insert the batteries into the camera and turn it on. We recommend that you always reset the camera. A flashing red LED indicates that the camera is ready for pairing. Enter the name and password of your Wi-Fi network. This information remains encrypted and is used to allow the camera to communicate with your mobile device remotely.
-
Page 9: Icons And Indicator Lights
Icons and indicator lights Description of controls in the application Advanced settings (described in more detail in the following section) Video quality switching (HD/SD) Signal quality and speed Mute Zoom in Full screen mode Take pictures using the app and save them to your mobile album Speak Take a video using the app and save it to your mobile album Expand menu... - Page 10 Creation of scenes is possible directly in the main menu of the application in the section "Scenes". For example, the H4056 could be automated to turn on private mode between 6pm and 7am so the camera does not follow you when you are at home.
-
Page 11: Controls And Functions
Controls and functions Recording to SD card One of the basic functions of the home security system is the SD card recording function. The camera supports SD cards with a maximum size of 64 GB in FAT32 format. However, 32 GB or 16 GB SD cards will also suffice. -
Page 12: Troubleshooting Faq
Troubleshooting FAQ I can't get the devices to pair. What can I do? • Make sure you are using a 2.4GHz Wi-Fi network and have a strong enough signal • Allow the app all permissions in the settings • Make sure you are using the latest version of the mobile operating system and the latest version of the app They can hear me outside, but I can't hear the sound outside / I can hear the sound outside, but they can't hear •...
Need help?
Do you have a question about the H4056 and is the answer not in the manual?
Questions and answers