
Related Manuals for Yamorc YD9100

Summary of Contents for Yamorc YD9100
- Page 1 Designed by Karst Drenth Made in Germany Assembled in NL...
- Page 2 Description ……………………………..………………………………………………. 3 Technical data …….…………………………………………………………………… 3 Important notes ...……………………………………………………………………. 4 Connecting the YD9100 to a module of the YD8xxx series and what must be observed………………………..………………………………….. 5 YD9100 - Start configuration of the connected module………..….. 5 YD8044 Configuration options……………...………………………………….. 6 YD8008 Configuration options………………………..………………………..
-
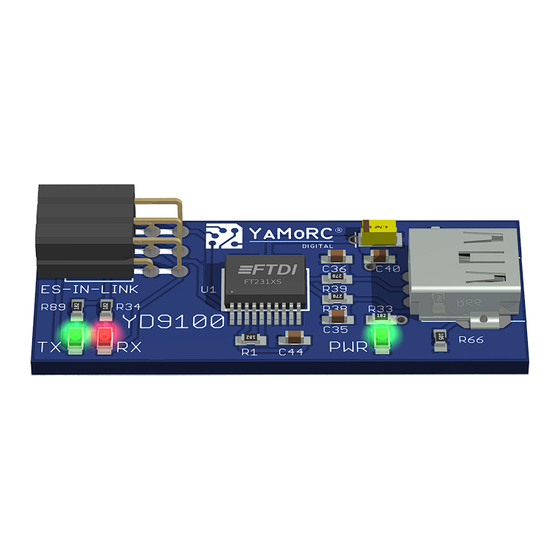
Page 3: Hardware Overview
YD9100 Description The YD9100 is a USB configuration module that can be used to configure all other modules that have ES-PGM-LINK or an ES-OUT-LINK interface. The YD9100 provides a USB interface via virtual COM port. With the help of the PC-based configuration software, the basic configuration of the connected modules can be easily changed and adapted. -
Page 4: Important Notes
Therefore, install the YD9100 in a place with sufficient ventilation to be able to dissipate the waste heat. The YD9100 is designed for dry indoor use only. Therefore, do not operate the YD9100 in environments with large fluctuations in temperature and hu- midity or outdoors. - Page 5 To test the settings, a separate voltage source AC or DC can be connected to "Power AC/DC" of the switching decoder. To prevent ground loops via USB, the YD9100 should always be connected alone to the PC or laptop via USB. ...
- Page 6 YD9100 YD8044 Configuration options After the desired module has been selected from the drop-down list by double-clicking, the module can be configured individually. The individual configura- tion menus are called up by clicking on the desired buttons. Configuration menus open...
- Page 7 YD9100 YD8008 Configuration options After the desired module has been selected from the drop-down list by double-clicking, the module can be configured individually. The individual configura- tion menus are called up by clicking on the desired buttons. Configuration menus open...
- Page 8 YD9100 YD8116 Configuration options After the desired module has been selected from the drop-down list by double-clicking, the module can be configured individually. The individual configura- tion menus are called up by clicking on the desired buttons. Konfigurationsmenüs aufrufen Pulse duration for each output...
- Page 9 YD9100 Configuration menus open Show log window Select language Select basic address Here you can select whether the YD8xxx is operated on a Multimouse control unit or on a control unit that operates ac- cording to RCN-213 (factory setting). Select the decoding mode of the YD8116.
-
Page 10: Configuration Of The Outputs
YD9100 Selection of a ready-made initial definition Configuration of the outputs Internal device ID of the selected definition First DCC accessory address of the selected output definition. If the selected e.g. signal occupies several DCC accessory addresses, the number of addresses is displayed here. - Page 11 YD9100 17) Create and save a screenshot Configuration of the outputs 18) Copying and cutting the current definition to the clipboard 19) Copy the current definition to the clipboard 20) Paste a copied definition from the clipboard 21) Export the current unit definition...
- Page 12 YD9100 What is DCCext and why is it beneficial to use it? A short look! The YD8116 can be controlled either via "normal" DCC turnout addresses or via the relatively new DCCext format. Shortly summarized the distinction: With multiple term signals, switching via "normal" DCC addresses can become complicated. Different DCC switching commands must be executed in a cer- tain time and sequence.
- Page 13 YD9100 YD7403 Booster configuration options Once the desired module has been selected from the selection list by double-clicking, the module can be configured individually. The individual configura- tion menus are called up by clicking on the desired buttons. Call up configuration menus Track output configuration (e.g.
- Page 14 YD9100 YD7403 control On/OFF Turnout Address* The YD7403 switches the track output on or off with the accessory address entered here. Track Polarity Turnour Address* The YD7403 changes the polarity of the track output with the accessory address entered here.
- Page 15 YD9100 YD7403 Configuring events Track Current The difference at which an event is triggered is defined here. You can also select whether the delta should be calculated in absolute mA or relative %. Track Voltage The difference at which an event is triggered is defined here.
- Page 16 The YD9100 is connected to the desired module using the enclosed YD6901 adapter. Alternatively, for longer distances between the modules, the YD9100 can between the modules, the YD9100 can be connected to the module to be configured using a YD6902ES-EXT adapter and a standard RJ45 cable.
- Page 17 Select the module by clicking on it and start the configuration software by double-clicking or with the green tick. (If the module is not recognized by the YD9100, the view can be updated by clicking on the blue arrow). After the configuration interface of the module has been started, open the menu for the firmware update by clicking on "ES-PGM Link".
-
Page 18: Warranty
Content of the guarantee/exclusions: The warranty includes, at YaMoRC's discretion, the free repair or free replacement of the defective part, which can be proven to be due to design, manufacturing, material or transport faults. For this purpose, you must send the decoder to us properly stamped. Further claims are excluded.
Need help?
Do you have a question about the YD9100 and is the answer not in the manual?
Questions and answers