Advertisement
Quick Links
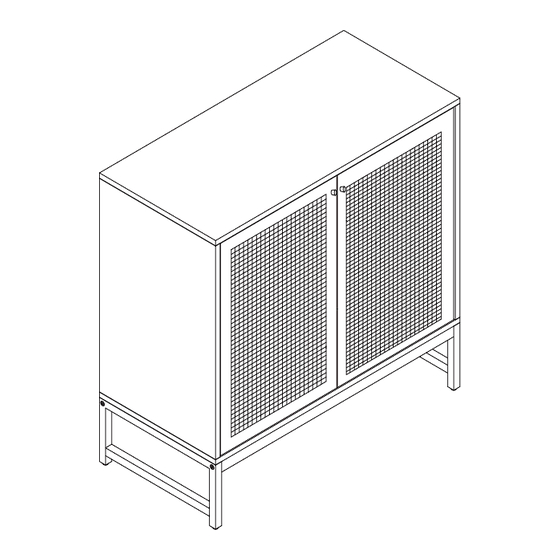
2 - DOOR ACCENT CABINET
Review all assembly and care information before using this product. Save this manual for future reference.
WARNING:
Manufacturer and seller expressly disclaim any and all liability from personal injury, property damage
or loss, whether direct or indirect, or incidental, resulting from the incorrect attachment, improper use,
inadequate maintenance, or neglect of this product.
M208001
Purchase Date:
Thank you for choosing Sunnydaze Decor. We stand behind our brand and the quality of the items we sell.
Replacement parts or products will be sent at our discretion within the 1-year warranty period. Proof of purchase, with
the date of purchase as well as photos of the merchandise defect, must be provided. Photos are used to determine
the cause of defects and for future quality control. Register your warranty at
If you have any questions, comments or concerns, feel free to contact us by phone at 833-982-1977, by email:
customerservice@sunnydazedecor.com, or via our contact us page at
Assemble components on a soft, clean surface to avoid damaging the finish.
/
/
Order/Customer Reference Number:
03/2024
https://tiny.cc/SunnydazeWarranty
https://tiny.cc/SunnydazeContact
Inspect packaging to ensure all
parts are accounted for before
disposing of packing materials.
Save the packing slip.
Page 1 / 10
Advertisement

Subscribe to Our Youtube Channel
Related Manuals for Sunnydaze Decor JAH-1551


Summary of Contents for Sunnydaze Decor JAH-1551
- Page 1 Order/Customer Reference Number: Thank you for choosing Sunnydaze Decor. We stand behind our brand and the quality of the items we sell. Replacement parts or products will be sent at our discretion within the 1-year warranty period. Proof of purchase, with the date of purchase as well as photos of the merchandise defect, must be provided.
- Page 2 INTRODUCTION Read the manual carefully to ensure you fully understand all use, care, assembly, and safety information. Assemble on a soft, flat, clean, and Read this manual carefully and dry surface. follow the assembly instructions in the order listed. Pay close Use a soft, protective barrier when attention to assembly diagrams.
- Page 3 COMPONENTS Inspect packaging to ensure all parts are accounted for before disposing of packing materials. Save the packing slip. Part Name Qty. Top Panel Left Side Panel Right Side Panel Bottom Panel Shelf Backing Board Door (L/R) Leg Panel Support Bar Divider Hardware Qty.
- Page 4 IMPORTANT INSTALLATION INFORMATION For the stability of the unit, it is important that furniture connectors are installed correctly. See drawings and tips below for proper installation. Wood Dowel Cam Screw Cam Lock Install wood dowels by gently tapping Use a screwdriver to tighten the cam Align the cam lock opening (arrow) them into the designated hole using a screw until the shoulder is flush with...
- Page 5 STEP 3 6: 2 10: 1 Install two Backing Boards (6) and one Divider (10) into the grooves in the backs of the panels, as shown. STEP 4 E: 4 J: 4 IMPORTANT: The magnetic latches must be facing the inside/front of the cabinet.
- Page 6 STEP 5 8: 2 9: 2 K: 4 L: 4 Secure two Leg Panels (8) to two Support Bars (9) using four M6x35mm Bolts (L). Install four Feet (K) into the bottom of the leg panels. STEP 6 M: 10 Align the assembled bottom frame with Bottom Panel (4) and secure using ten M4x30mm Flat Screws (M).
- Page 7 STEP 7 7: 2 C: 4 G: 2 H: 2 Q: 4 Install two Cabinet Door Damper Pins (I) into the back of Door (7). Then, install two Door Catches (C) to the front of the door, as shown. Install one Knob (K) to the door using one M4x20mm Bolt (G).
- Page 8 STEP 9 5: 1 F: 4 Install four Shelf Support Pegs (F) on the inside of the side panels, ensuring they are in the same mounting holes. Hold Shelf (5) at an angle and place it on top of the shelf pegs. STEP 10 C: 6 N: 6...
- Page 9 STEP 11 O: 1 Identify all components from Anti-Tip Kit (O): (2) mounting tabs (2) M3x14mm flat screws (2) drywall anchors (2) M3x33mm flat screws (1) zip tie Use a 2mm drill bit to drill small pilot holes on the back of the furniture top.
- Page 10 SAFETY STATEMENTS & WARNINGS • For residential use only. Not for commercial or industrial use. • For indoor use only. • Ensure fittings are tight before use. Periodically check fittings to ensure they are tight. • Only use this unit on a flat, level surface. •...
Need help?
Do you have a question about the JAH-1551 and is the answer not in the manual?
Questions and answers