Advertisement
Quick Links
Avoid using sharp objects such as a knife to cut open packing as you
may accidentally damage the item.
ITEM
DESCRIPTION
HW1
Dowel : 8x30mm
HW2
Dowel : 8x50mm
HW3
Screw : 4,0x25mm
HW4
Screw : 4,0x30mm
HW5
Screw : 4,0x35mm
Screw : 7,0x50mm
HW6
HW7
Screw : 7,0x50mm
HW8
Allen Key
A
Right side leg
B
Center leg right side
C
Center leg left side
D
Left side leg
E
Narrow back rest panel
F
Corner back rest panel
G
Wide back rest panel
H
Wide seat
Narrow seat
I
Corner top
J
Corner seat
K
Wide cross rail
L
Narrow cross rail
M
Cleats support
N
Wide top rail
O
Narrow top rail
P
Back supports
Q
Table top
R
S
Table legs
Table Crossbar
T
Table top supports
U
Bench seat
V
Bench legs
W
Bench Crossbar
X
Bench top supports
Y
ASSEMBLY INSTRUCTIONS
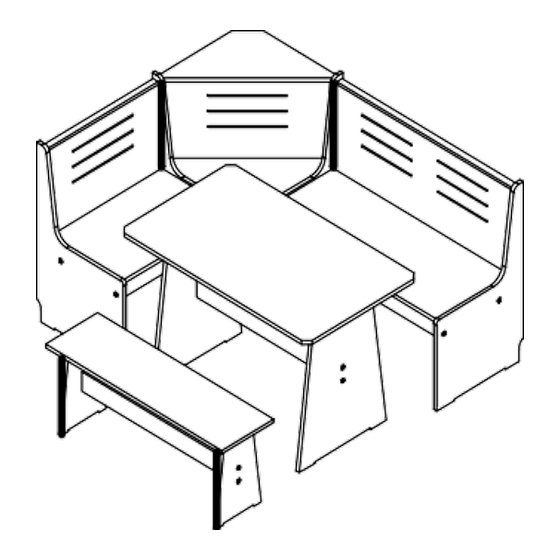
Chapman Solid Wood Corner Dining Set
PARTS LIST
SKETCH
1-11
QUANTITY
32x
8x
6x
35x
44x
4x
16x
1x
1x
1x
1x
1x
1x
1x
1x
1x
1x
1x
1x
2x
2x
4x
1x
1x
2x
1x
2x
1x
2x
1x
2x
1x
2x
Advertisement

Related Manuals for DH Dwell Chapman


Summary of Contents for DH Dwell Chapman
- Page 1 ASSEMBLY INSTRUCTIONS Chapman Solid Wood Corner Dining Set Avoid using sharp objects such as a knife to cut open packing as you may accidentally damage the item. PARTS LIST ITEM DESCRIPTION SKETCH QUANTITY Dowel : 8x30mm Dowel : 8x50mm Screw : 4,0x25mm Screw : 4,0x30mm Screw : 4,0x35mm Screw : 7,0x50mm...
- Page 2 ASSEMBLY INSTRUCTIONS Chapman Solid Wood Corner Dining Set Avoid using sharp objects such as a knife to cut open packing as you may accidentally damage the item. ASSEMBLY INSTRUCTIONS Do not fully tighten bolts until assembly is complete. STEP 1: Insert dowels into the indicated parts. 2-11...
- Page 3 STEP 2: Attach cleats support by inserting screws in the pre-marked positions. STEP 3: Attach sides and to the back panel and cross rails using screws. 3-11...
- Page 4 STEP 4: Attach the backrest. STEP 5: Attach sides and to the back panel and cross rails using screws. 4-11...
- Page 5 STEP 6: Attach the backrest. STEP 7: Attach the corner seat using screws. 5-11...
- Page 6 STEP 8: Attach the Top rails and put on corner back using screws. STEP 9: Attach the corner top and corner seat using the screws.. 6-11...
- Page 7 STEP 10: Attach the back supports. 20cm STEP 11: Insert the seats into the corner bench. 7-11...
- Page 8 STEP 12: Attach the seats using screws. STEP 13: Attach the table legs to the table crossbar. 8-11...
- Page 9 STEP 14: Attach the table top supports using screw. STEP 15: Attach the table top using screws. 9-11...
- Page 10 STEP 16: Attach the bench Sides to the bench crossbar using screws. STEP 17: Attach the bench top supports using screws. 10-11...
- Page 11 STEP 18: Attach the bench top top using screws. 11-11...
Need help?
Do you have a question about the Dwell Chapman and is the answer not in the manual?
Questions and answers