Table of Contents
Advertisement
Available languages
Available languages
Quick Links
I N S T R U K C J A O B S Ł U G I
K L I M A T Y Z A T O R P R Z E N O Ś N Y M I S T W I - F I
T E L . ( + 4 8 ) 7 9 7 4 5 1 1 1 1
Instrukcja w języku polskim dostępna na stronie 3.
English language manual on page 29.
Das Handbuch in deutscher Sprache ist auf unserer Website verfügbar.
Пос бник українською мовою є на нашому сайт .
Příručka je k dispozici v polštině.
Śledź nas na naszych social mediach
B I U R O @ M I S S I O N A I R . P L
S E R W I S @ M I S S I O N A I R . P L
W W W . M I S S I O N A I R . P L
Advertisement
Chapters
Table of Contents

Related Manuals for Mission Air MIST WIFI

Summary of Contents for Mission Air MIST WIFI
- Page 1 I N S T R U K C J A O B S Ł U G I K L I M A T Y Z A T O R P R Z E N O Ś N Y M I S T W I - F I Instrukcja w języku polskim dostępna na stronie 3.
- Page 2 Dziękujemy wybranie naszej oferty zakup klimatyzatora MIST WIFI! Misja marki Mission Air® jest jasna - tworzyć nowoczesne i ekologiczne rozwiązania, które zapewnią Państwu wygodę i komfort poprzez dostarczanie zeroemisyjnych produktów zakresie elektrycznego ogrzewania i klimatyzacji. Jako odpowiedzialna firma dążymy do minimalizowania negatywnego wpływu na środowisko naturalne, poprzez projektowanie i produkcję...
-
Page 3: Table Of Contents
Prosimy o zachowanie niniejszej broszury w celu zapewnienia gwarancji na produkt i wykorzystania w przyszłości DZIĘKUJEMY ZA ZAKUP KLIMATYZATORA PRZENOŚNEGO MISSION AIR®! Śledź nas na naszych social mediach Das Handbuch in deutscher Sprache ist auf unserer Website verfügbar. -
Page 4: Istotne Instrukcje Bezpieczeństwa
I S T O T N E I N S T R U K C J E B E Z P I E C Z E Ń S T W A OSTRZEŻENIE Nie stosuj środków przyspieszających proces rozmrażania lub czyszczenia innych niż... - Page 5 I S T O T N E I N S T R U K C J E B E Z P I E C Z E Ń S T W A 13.Okresowo czyść filtr powietrza, aby zapewnić jak najbardziej wydajne chłodzenie.
-
Page 6: Transport, Znakowanie I Przechowywanie Urządzenia
T R A N S P O R T , Z N A K O W A N I E I P R Z E C H O W Y W A N I E U R Z Ą D Z E N I A Transport urządzeń... -
Page 7: Opis Produktu
W przeciwnym razie nagrzane powietrze pozostanie w pomieszczeniu, a cały proces nie będzie wydajny. Klimatyzator MIST od Mission Air® to unikat wśród klimatyzatorów dostępnych na rynku! Został zaprojektowany i skonstruowany w sposób, który... - Page 8 I N S T R U K C J A ROZPAKUJ URZĄDZENIE Przed rozpakowaniem umieść urządzenie we właściwej pozycji pionowej. Przetnij taśmy zabezpieczające opakowanie. Przesuń karton ruchem do góry, aby zdjąć go z podstawy. Chwyć uchwyty do przenoszenia znajdujące się po obu stronach urządzenia i ostrożnie podnoś...
-
Page 9: Instrukcja
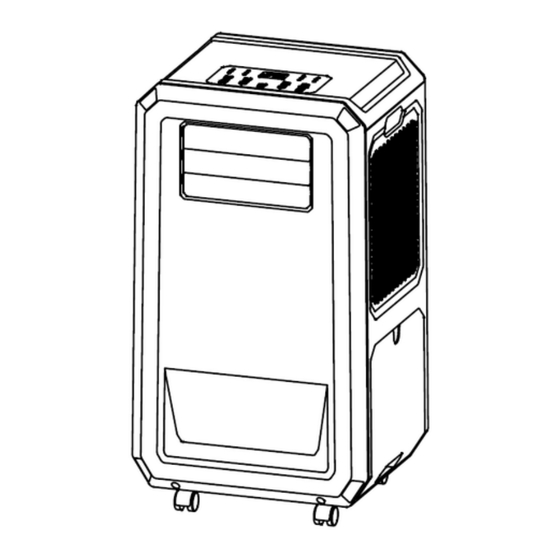
I N S T R U K C J A NAZWY CZĘŚCI Panel sterowania Wylot chłodnego powietrza Obudowa przednia Kółka Obudowa górna Wlot gorącego powietrza Obudowa prawa Zbiornik na wodę Miejsce pilota do sterowania Obudowa tylna Wylot gorącego powietrza Wlot zimnego powietrza Obudowa lewa missionair T E L . -
Page 10: Opis Funkcji
O P I S F U N K C J I PANEL STEROWANIA I OPIS FUNKCJI 1.PRZYCISK ZASILANIA Naciśnij, aby włączyć lub wyłączyć jednostkę. 2.FUNKCJA Naciśnij ten przycisk, aby wybrać chłodzenie, osuszanie lub wentylację. 3.PRZYCISK REGULACJI TEMPERATURY (GÓRA) Podczas funkcji chłodzenia: Ten przycisk powoduje zwiększenie ustawionej temperatury o 1℃... - Page 11 O P I S F U N K C J I 5. WYŚWIETLACZ L.E.D. Wyświetlacz wskazuje aktualnie ustawioną temperaturę, wilgotność lub ustawienie Timera. Po zmianie ustawionej temperatury lub Timera wyświetlane jest nowe ustawienie, a następnie wyświetlacz powraca do aktualnej ustawionej temperatury. Wyświetlacz służy również...
- Page 12 O P I S F U N K C J I 8. FUNKCJA SWING Przycisk ten aktuwuje lub dezaktywuje funkcję SWING, która polega na ruchu góra-dół łopatek kierujących strumień powietrza. 9. WiFi Naciśnij i przytrzymaj przycisk SLEEP przez 3 sekundy na wyłączonym urządzeniu, aby przejść...
- Page 13 O P I S F U N K C J I FUNKCJA ZDALNEGO STEROWANIA POWER - Przełącznik On/Off FUNC - Przełącznik funkcji „TRYB” TIMER - Programowanie godzinowe AUTO - Automatyczna prędkość wentylatora HI - Wysoka prędkość wentylatora LOW - Niska prędkość wentylatora SLEEP - Przełącznik trybu nocnego TEMP.
- Page 14 O P I S F U N K C J I UWAGA Przed uruchomieniem urządzenia należy wyjąć zbiornik na wodę i upewnić się czy przewód wodny (1) jest właściwie zainstalowany do otworu odpływowego. Upewnij się, że przewód wodny jest skierowany pionowo w dół. Przed montażem zbiornika na wodę...
-
Page 15: Konserwacja I Instalacja
K O N S E R W A C J A I I N S T A L A C J A KONSERWACJA PRZED CZYSZCZENIEM KONIECZNIE ODŁĄCZ PRZEWÓD ZASILAJĄCY. Ramkę filtra i filtr po obu stronach urządzenia można wyjąć, delikatnie naciskając ramkę - Filtr należy myć chłodną wodą (o temperaturze poniżej 40°C) co dwa tygodnie, a następnie wkładać... - Page 16 P O M O C ROZWIĄZYWANIE PROBLEMÓW 1. Informacje o serwisowaniu Kontrole na miejscu - przed rozpoczęciem prac przy układach zawierających palne czynniki chłodnicze konieczne jest przeprowadzenie kontroli bezpieczeństwa, aby zminimalizować ryzyko zapłonu. W przypadku naprawy układu chłodniczego, przed przystąpieniem do prac przy układzie należy zastosować się do następujących środków ostrożności.
- Page 17 P O M O C Kontrole urządzeń chłodniczych - w przypadku wymiany elementów elektrycznych, należy zastosować elementy odpowiednie do celu i zgodne ze specyfikacją. Zawsze należy przestrzegać wytycznych producenta dotyczących konserwacji i serwisowania. W razie wątpliwości skonsultuj się z działem technicznym producenta w celu uzyskania pomocy.
- Page 18 P O M O C 2. Naprawy uszczelnionych elementów Podczas napraw uszczelnionych elementów, wszystkie źródła zasilania elektrycznego powinny być odłączone od urządzenia, na którym wykonywane są prace przed jakimkolwiek zdjęciem uszczelnionych pokryw itp. Jeżeli jest absolutnie konieczne, aby sprzęt był zasilany prądem podczas serwisowania, wówczas w najbardziej krytycznym punkcie należy umieścić...
- Page 19 P O M O C 3. Naprawa elementów iskrobezpiecznych Nie stosuj żadnych stałych obciążeń indukcyjnych lub pojemnościowych do obwodu bez upewnienia się, że nie spowoduje to przekroczenie dopuszczalnego napięcia i prądu dozwolonego dla używanego urządzenia. Elementy iskrobezpieczne to jedyne typy elementów, nad którymi można pracować pod napięciem w atmosferze palnej.
- Page 20 P O M O C Płyny do wykrywania nieszczelności nadają się do stosowania z większością czynników chłodniczych, jednak należy unikać stosowania detergentów zawierających chlor, ponieważ chlor może reagować z czynnikiem chłodniczym i powodować korozję rur miedzianych. W przypadku podejrzenia wycieku należy usunąć/zgasić wszystkie otwarte płomienie. W przypadku wykrycia wycieku czynnika chłodniczego wymagającego lutowania, cały czynnik chłodniczy należy odzyskać...
- Page 21 P O M O C 8. Procedury ładowania Oprócz konwencjonalnych procedur ładowania należy przestrzegać następujących wymagań: Upewnij się, że podczas korzystania ze sprzętu do ładowania nie dochodzi do zanieczyszczenia różnych czynników chłodniczych. Przewody giętkie lub inne przewody powinny być jak najkrótsze, aby zminimalizować ilość zawartego w nich czynnika chłodniczego.
- Page 22 P O M O C Odpompuj czynnik chłodniczy z układu, jeśli to możliwe. Jeśli uzyskanie próżni nie jest możliwe, zastosuj kolektor, aby można było usunąć czynnik chłodniczy z różnych części systemu. Upewnij się, że butla jest umieszczona na wadze przed odzyskiwaniem. Uruchom maszynę...
-
Page 23: Rozwiązywanie Problemów I Specyfikacja
Opróżnij zbiornik. Sprawdź zamocowanie Zbiornik na wodę jest pełny lub zbiornika. Sprawdź czy wylot wody nie jest podłączenie zbiornika lub wtyczki zablokowany. jest nieprawidłowe SPECYFIKACJA Model Mission Air MIST Źródło zasilania 220~240V-50Hz Moc znamionowa(EN60335) 360W Chłodzenie Wydajność chłodnicza 900W Wydajność osuszania 25 litrów/dzień... - Page 24 R O Z W I Ą Z Y W A N I E P R O B L E M Ó W I S P E C Y F I K A C J A DOPUSZCZALNE NADMIERNE CIŚNIENIE ROBOCZE Ssanie 0,6MPa Rozładowanie 2,5MPa...
-
Page 25: Połączenie Wi-Fi
P O Ł Ą C Z E N I E W I - F I Postępuj zgodnie z poniższymi wskazówkami, aby połączyć swój smartfon lub tablet z klimatyzatorem za pomocą sieci WiFi. Uwaga! Poniższe wskazówki mają charakter informacyjny i są aktualne w momencie ich opracowywania. - Page 26 P O Ł Ą C Z E N I E W I - F I WiFi DOM Haslo-1234 5. Na wyłączonym klimatyzatorze 4. Wybierz odpowiednią sieć WiFi i 6. Potwierdź w aplikacji miganie przytrzymaj przez ok 3s przycisk podaj hasło dostępu do niej. ikonki WiFi na panelu SLEEP, aż...
-
Page 27: Warunki Gwarancji
W A R U N K I G W A R A N C J I Producent zapewnia 24 miesięczny okres gwarancyjny produktu, na którym wydana jest niniejsza karta gwarancyjna. Niniejszą gwarancją objęte są ukryte wady materiałowe, lub konstrukcyjne urządzenia uniemożliwiające jego użytkowanie zgodnie z przeznaczeniem. - Page 28 Thank you for choosing our offer and purchasing a MIST WIFI air conditioner! The Mission Air® brand's mission is clear - to create modern and environmentally friendly solutions for your comfort and convenience by providing zero-emission electric heating and air conditioning products.
- Page 29 Attention! Do not install or use the portable air conditioner before carefully reading this manual. Please retain this booklet for product warranty and future use. THANK YOU FOR PURCHASING MISSION AIR PORTABLE AIR CONDITIONER®! Follow us on our social media Das Handbuch in deutscher Sprache ist auf unserer Website verfügbar.
-
Page 30: Important Safety Instructions
I M P O R T A N T S A F E T Y I N S T R U C T I O N S WARNING Do not use agents to speed up the defrosting or cleaning process other than those recommended by the manufacturer. - Page 31 I M P O R T A N T S A F E T Y I N S T R U C T I O N S 13. Periodically clean the air filter to ensure the most efficient cooling. 14. If the unit is switched off, wait at least 3.5 minutes before restarted to prevent damage to the compressor.
-
Page 32: Transport, Labelling And Storage Of The Appliance
T R A N S P O R T , L A B E L L I N G A N D S T O R A G E O F T H E A P P L I A N C E Transport of equipment containing flammable refrigerants. -
Page 33: Product Description
Otherwise, the heated air will remain in the room and the whole process will not be efficient. The MIST air conditioner from Mission Air® is unique among air conditioners on the market! It has been designed and constructed in a way that allows it to be used effectively without the need for an outlet pipe. - Page 34 I N S T R U C T I O N S UNPACK THE DEVICE Place the unit in the correct upright position before unpacking. Cut the tape securing the packaging. Slide the carton in an upward motion to remove it from the base.
-
Page 35: Instructions
I N S T R U C T I O N S PART NAMES Control panel Cool air outlet Front casing Wheels Upper casing Hot air intake Right-hand housing Water tank Remote control location Rear casing Hot air outlet Cold air intake Left-hand housing missionair T E L . -
Page 36: Description Of The Functions
D E S C R I P T I O N O F T H E F U N C T I O N S CONTROL PANEL AND DESCRIPTION OF FUNCTIONS 1.POWER BUTTON Press to switch the unit on or off. 2.FUNCTION Press this button to select cooling, dehumidification or ventilation. - Page 37 D E S C R I P T I O N O F T H E F U N C T I O N S 5. L.E.D. DISPLAY The display indicates the currently set temperature or Timer setting. When the temperature or Timer setting is changed, the new setting is displayed and then the display returns to the current set temperature.
- Page 38 O P I S F U N K C J I 8. SWING This button activates or deactivates the SWING function, which involves the up- down movement of the blades directing the air flow. 9. WiFi Press and hold the SLEEP button for 3 seconds on the switched-off device to enter WIFI configuration mode.
- Page 39 D E S C R I P T I O N O F T H E F U N C T I O N S REMOTE CONTROL FUNCTION POWER - On/Off switch FUNC - "MODE" function switch TIMER - Hourly programming AUTO - Automatic fan speed HI - High fan speed LOW - Low fan speed...
- Page 40 D E S C R I P T I O N O F T H E F U N C T I O N S NOTE Before starting the appliance, remove the water tank and make sure that the water line (1) is properly installed into the drain hole.
-
Page 41: Maintenance And Installation
M A I N T E N A N C E A N D I N S T A L L A T I O N CONSERVATION BEFORE CLEANING, BE SURE TO UNPLUG THE POWER CORD. The filter frame and filter on both sides of the unit can be removed by gently pressing the frame - The filter should be washed with cool water (less than 40°C) every fortnight, then put back in after it dries naturally. - Page 42 H E L P PROBLEM SOLVING 1. Information on servicing Site inspections - before working on systems containing flammable refrigerants, safety checks must be carried out to minimise the risk of ignition. If a refrigeration system is being repaired, the following precautions should be followed before working on the system.
- Page 43 H E L P Refrigeration equipment checks - when replacing electrical components, use components suitable for the purpose and in accordance with the specifications. Always follow the manufacturer's maintenance and servicing guidelines. If in doubt, consult the manufacturer's technical department for assistance. In the case of installations using flammable refrigerants, the following controls apply the following controls: That the fill size is compatible with the size of the room in which the refrigerant containing parts are installed;...
- Page 44 H E L P 2. Repairs to sealed components When repairing sealed components, all sources of electrical power should be disconnected from the equipment being worked on prior to any removal of sealed covers etc. If it is absolutely necessary for the equipment to be energised during servicing, then a permanently operating leak detector should be placed at the most critical point to warn of a potentially dangerous situation.
- Page 45 H E L P 3. Repair of intrinsically safe components Do not apply any permanent inductive or capacitive loads to the circuit without ensuring that this will not cause the voltage and current permitted for the equipment being used to be exceeded.
- Page 46 H E L P Leak detection fluids are suitable for use with most refrigerants, but the use of chlorine- containing detergents should be avoided, as chlorine can react with the refrigerant and cause corrosion of copper pipes. If a leak is suspected, all open flames should be removed/extinguished. If a refrigerant leak requiring brazing is detected, all refrigerant should be recovered from the system or isolated (using isolation valves) in a part of the system away from the leak site.
- Page 47 H E L P 8. Charging procedures In addition to conventional charging procedures, the following requirements must be observed: Ensure that there is no contamination of the various refrigerants when using charging equipment. Hoses or other lines should be kept as short as possible to minimise the amount of refrigerant contained.
- Page 48 H E L P Pump the refrigerant out of the system if possible. If obtaining a vacuum is not possible, use a manifold so that refrigerant can be removed from various parts of the system. Make sure the cylinder is placed on the scale before recovery. Start the recovery machine and operate according to the manufacturer's instructions.
-
Page 49: Problem Solving And Specification
Empty the tank. Check the fixing of the tank. connection of the tank or plug is Check that the water outlet is not blocked. incorrect SPECIFICATION Model Mission Air MIST Power source 220~240V-50Hz Rated power (EN60335) 360W Cooling Cooling capacity... - Page 50 P R O B L E M S O L V I N G A N D S P E C I F I C A T I O N PERMISSIBLE EXCESS OPERATING PRESSURE Sucking 0,6MPa Discharge 2,5MPa Maximum permissible pressure 4,0MPa Dimensions (mm) 270Wx325Dx580H...
-
Page 51: Wi-Fi Connection
W I - F I C O N N E C T I O N Follow the steps below to connect your smartphone or tablet to the air conditioner via WiFi. Attention! The following guidance is for information purposes and is current at the time of development. - Page 52 W I - F I C O N N E C T I O N WiFi DOM Haslo-1234 5. On the switched-off air 4. Select the appropriate WiFi 6. Confirm in the app that the WiFi conditioner, hold down the SLEEP network and enter the password icon on the air conditioner panel button for about 3s until the WiFi...
-
Page 53: Warranty Conditions
W A R R A N T Y C O N D I T I O N S The manufacturer provides a 24-month warranty period for the product for which this warranty card is issued. This warranty covers latent defects in material, or design of the device that prevent its use as intended. The maximum warranty claim is equal to one times the purchase value of the device qualified by the Guarantor for replacement. -
Page 54: Karta Gwarancyjna
LACK OF THIS DOCUMENT WILL RESULT IN LOSS OF WARRANTY NA URZĄDZENIE ELEKTRYCZNE FOR AN ELECTRIC DEVICE KLIMATYZATOR PRZENOŚNY NAZWA URZĄDZENIA PORTABLE AIR CONDITIONER DEVICE NAME SYMBOL URZĄDZENIA MISSION AIR® MIST DEVICE SYMBOL NUMER FABRYCZNY SERIAL NUMBER NABYWCA PURCHASER NAZWA FIRMY COMPANY NAME...
Need help?
Do you have a question about the MIST WIFI and is the answer not in the manual?
Questions and answers