Advertisement
- 1 Introduction
- 2 Product Features
- 3 Controls and Functions
- 4 Power Sources
- 5 Using the Cell Phone Charger
-
6
Operation Guide
- 6.1 Turning the Unit ON and OFF
- 6.2 Adjusting the Volume
- 6.3 Tuning the AM/FM Radio
- 6.4 About NOAA
- 6.5 Selecting a Weather Channel
- 6.6 Activating Weather Alert Mode
- 6.7 Setting the Clock
- 6.8 Setting the Alarm Clock
- 6.9 Activating/Deactivating the Alarm Clock
- 6.10 Using the Thermometer and Freeze Alert
- 6.11 Using the Earphone Jack
- 7 Limited Warranty
- 8 Service and Technical Support
- 9 Documents / Resources
Introduction
Congratulations on your purchase of the Midland ER102 AM/FM/NOAA Weather Alert 'Emergency' Crank Radio - the radio perfect for daily use or during severe weather situations. This unit allows you to listen to AM/FM radio as well as weather broadcasts 24 hours a day. Also, with the NOAA weather alert feature, it will automatically alert you when severe weather is approaching. This unit is unique because it can be powered by a variety of sources:
- AC adapter (included),
- Rechargeable Ni-MH battery (included) that can be charged by the dynamo crank, or
- Alkaline batteries (not included).
The ER102 also is packaged with cell phone adapter and connector accessories so you can recharge your cell phone when away from a power source.
The ER102 is a quality piece of electronic equipment, skillfully constructed with the finest components. This radio is designed for reliable and trouble-free performance for years to come. Enjoy!
Product Features
- AM/FM Radio
- 7 NOAA Weather Channels
- NOAA Weather Alert
- Built-in power generator recharges the internal rechargeable Ni-MH battery and cell phone batteries
- 3 LED Flashlight
- 2 Alert Types: ALERT or VISUAL FLASH
- Clock with Alarm Clock
- Thermometer with Freeze Alert
- Large, Bright Backlit LCD
- DC Jack
- Earphone jack – 3.5mm stereo earphone socket
- Phone charger output jack 3.5mm
- Rotatable telescopic antenna
- Front Firing Speaker
- Safety Siren
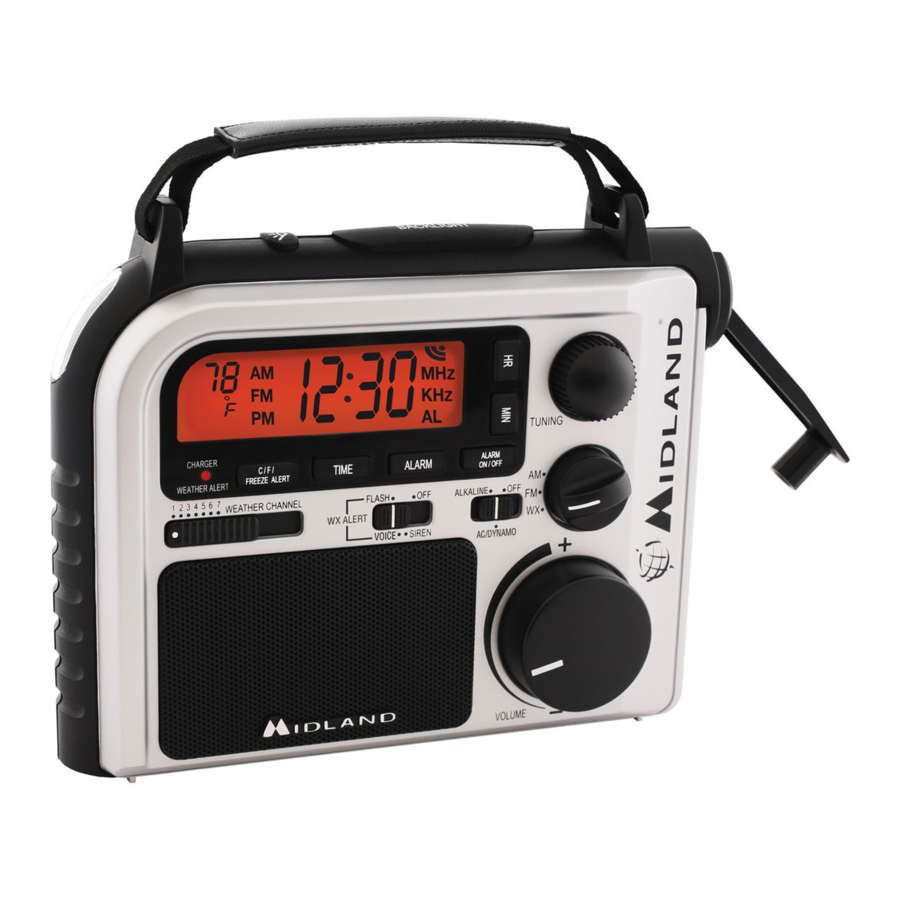
Controls and Functions

Power Sources
The ER102 can be powered by the following methods:
- Built in Rechargeable Battery Pack: The included rechargeable battery pack is located in the battery compartment and is charged by cranking the dynamo rapidly or by the AC adapter. It is specified as 3.6 VDC, 650 mAh, nickel metal-hydride (Ni-MH).
- Only use our Ni-MH battery pack.
- Do not attempt to charge alkaline batteries or any battery packs other than the ones indicated in this manual. This could cause leakage and damage to the radio.
- AC Adapter: It is suggested that before the radio is used, the internal rechargeable battery pack be charged with the AC adapter for a minimum of 12 hours. This way, the radio will have maximum performance time. To charge with the AC adapter, ensure the power source switch is in the "AC/Dynamo" positon. Then, insert the adapter in an electrical outlet and the plug into the jack on the backside of the radio labeled DC IN6V. The red LED light below the LCD will be lit to indicate the unit is charging.
For recharging after use with a depleted battery pack, it will take about 12 hours to recharge if using the AC adapter. - Dynamo Power: Turning the dynamo crank charges the built-in Ni-MH battery pack.
It can be charged with the ER102 power source switch turned to the "AC/Dynamo" position. While charging, the red LED charging light will be on (located on the front of the unit below the LCD). Play time depends on a variety of factors, such as rapidity of cranking, length of time cranked and the audio volume at which the radio is played.- Switch the power selector to the "AC/Dynamo" position.
- Turn the dynamo-crank vigorously either clockwise or counterclockwisefor a comfortable period of time.
- To turn the radio on, switch the AM/FM/WX dial to desired function. Then ensure the volume is at an audible level.
- Alkaline Battery Operation: The ER102 is designed to operate on three AA batteries (not included). Install the batteries by removing the battery compartment cover and matching the polarity. To play the ER102 on its AA batteries, turn the radio on by setting the power source switch to the "Alkaline" position.
Note: When an AC adapter is in use, please slide the switch to AC/Dynamo. However, for long term storage, we recommend removing the AA batteries to prevent leakage.
Using the Cell Phone Charger
Because cell phone batteries vary among different brands of phones, we cannot specify charging rates or usage time exactly. There are two cellphone charging methods:
- Dynamo:
Slide the power selector switch to the "OFF" position.
Attach the cell phone to the cell phone connector wire. Then, choose the proper adapter plug for your brand of cell phone and snap onto the other end of the wire. Rotate the dynamo crank either clockwise or counter-clockwise at about 2 turns per second. - AC Adapter:
Slide the power selector switch to the "OFF" position.
Attach the cell phone to the cell phone connector wire. Then, choose the proper adapter plug for your brand of cell phone and snap onto the other end of the wire.
Plug in the AC adaptor into the proper jack on the backside of the unit.
Your cell phone will then begin charging.
Operation Guide
Turning the Unit ON and OFF
To turn the ER102 ON, position the power selector switch to your power of choice (Alkaline or AC/Dynamo).
To turn it OFF, position the power selector switch to the OFF position.
Adjusting the Volume
To adjust the volume, use the VOLUME control knob to adjust the audio to the desired volume level.
Tuning the AM/FM Radio
Set the function selector knob to either AM or FM position.
Tune to the desired station with the TUNING knob. For best FM reception, fully extend the telescopic antenna and rotate until reception is clear.
Note: Ensure the volume is at an audible level so you will be able to hear the AM/FM broadcast.
About NOAA
The National Weather Service operates a system of weather and hazard alert broadcasts covering a large area of the United States. Currently, only a few areas are not covered. Typical broadcasts are within reception distance of 25-50 miles of the weather station. Your ER102 weather radio can receive broadcasts from up to 50 miles from the weather station depending on your location and conditions of weather, terrain, etc... If you find reception is not good in your area, try different locations in your home or office to find a spot of improved reception. Placement near a window usually improves reception. If a weather broadcast cannot be heard on any of the 7 channels, contact you local NWS office and verify the closest station is on air. The web site is http://www.nws.noaa.gov/nwr/.
Selecting a Weather Channel
- The ER102 has 7 NOAA weather channels to choose from.
- Use the 7 position WX Channel slide switch to find the strongest weather channel in yourarea (usually only one of the channels).
Note: In strong reception areas, the antenna does not need to be fully extended. Only in low reception areas is this necessary.
Activating Weather Alert Mode
The ER102 has 2 different weather alert types to choose from: Alert or Flash.
- Move the slide switch labeled WX ALERT to one of the following 3 positions:
- OFF: Turns the weather alert feature OFF.
- ALERT: This alert type will sound an audible siren noise for 8 seconds then returns to the broadcast mode currenty in use. To hear the NWS alert broadcast when the radio receives an alert message, you must switch the band to WX.
- FLASH: This alert type will flash the LED flashlight and sound an audible siren noise when an alert message is received. This is perfect for the hearing impaired.
Note: The SIREN mode is a safety feature only. This sounds an audible tone when selected.
Setting the Clock
- Press and hold down the TIME button.
- While holding the button, use the HR button to adjust the hours. The radio will auto-matically switch from AM to PM as you scroll through. Release the HR button when desired hour is found.
- While still holding the TIME button, use the MIN button to adjust the minutes. Releasingthe button when finished will store the clock settings into the memory.
Setting the Alarm Clock
- Press and hold down the ALARM button.
- While holding the button, use the HR button to adjust the hours. The radio will automat-ically switch from AM to PM as you scroll through. Release the HR button when desired hour is found.
- While still holding the ALARM button, use the MIN button to adjust the minutes.
Releasing the button when finished will store the alarm clock settings into the memory.
Activating/Deactivating the Alarm Clock
- To activate the alarm clock, press the ALARM ON/OFF button. An Alarm indicator will be displayed on the LCD in the upper right hand corner when the alarm is activated.
- To deactivate the alarm clock, press the ALARM ON/OFF button. The Alarm indicator will disappear, signaling the alarm has been deactivated.
Using the Thermometer and Freeze Alert
- The Temperature will automatically be displayed on the LCD when the unit is powered on.
- To adjust the temperature reading from Celcius to Fahrenheit, press the C/F/FREEZE ALERT button to switch between Celsius and Fahrenheit readouts.
- When the temperature dips below freezing, the radio will emit a continuous beeping to let you know this. Press the C/F/FREEZE ALERT button to turn the beep off.
Using the Earphone Jack
Plug in a set of earphones (not included) of your choice that have a 1/8 inch mono or stereo plug. When using earphones the built-in speaker will be switched off automatically.
Note: Stereo earphones will work and sound will be heard from both sides, although the sound is not stereo.
Limited Warranty
Performance of any obligation under this warranty may be obtained by returning the warranted product, prepaid freight, along with proof of purchase to:
Midland Radio Corporation
Warranty Service Department
5900 Parretta Drive
Kansas City, MO 64120
Tel: (816) 241-8500
E-mail: mail@midlandradio.com
URL: www.midlandradio.com
Service and Technical Support
* If you have a problem which you believe requires service, please call first and speak with a service technician. Many problems can be remedied over the phone without returning the unit for service.
For Technical Support Contact:
Midland Radio Corporation
5900 Parretta Drive
Kansas City, Missouri 64120
Phone: (816) 241-8500
Fax: (816) 241-5713
E-mail: mail@midlandradio.com
Website: www.midlandradio.com
If after talking with technical support you still feel your unit needs to be returned for service, follow the below instructions:
- Pack the unit in its original box and packing. Then pack the original box in asuitable shipping carton. Caution: Improper packing may result in damage during shipment.
- Include the following:
- full description of any problems
- money order for $7.50 to cover shipping and handling (this may not berequired in some states)
- daytime telephone number, name & address
- For warranty service include a photocopy of the bill of sale from an authorizeddealer or other proof of purchase showing the date of sale.
- You do not need to return accessory items (AC/DC Adapter, batteries, Owners Guide) unless they might be directly related to the problem.
- A flat rate of $45.00 will apply to repairs not covered by warranty or unitsthat are over one year old. Send only cashier's check, money order or Master Card or Visa card number.
Send to:
Midland Radio Corporation
5900 Parretta Drive
Kansas City, Missouri 64120
Call 816.241.8500
visit us at http://www.midlandradio.com

CHECK OUT THE OTHER GREAT MIDLAND PRODUCTS AT
www.midlandradio.com
Note: Features & Specifications are subject to change without notice. MIDLAND is not responsible for unintentional errors or omissions on its packaging.
Documents / Resources
References

Download manual
Here you can download full pdf version of manual, it may contain additional safety instructions, warranty information, FCC rules, etc.
Advertisement


Need help?
Do you have a question about the ER102 and is the answer not in the manual?
Questions and answers