Advertisement
- 1 Objects the package contains
- 2 Product appearance & button introduction
- 3 Product appearance introduction
- 4 Pre-use setting
- 5 Time setting
- 6 Alarm setting (take alarm 1 as example)
- 7 Alarm switch
- 8 Alarm mode selection
- 9 How to SNOOZE or TURN OFF alarm
- 10 RGB color changing mode
- 11 Screen brightness adjustment
- 12 Countdown to sleep
- 13 FM radio adjustment
- 14 Replace the battery
- 15 Trouble Shooting
- 16 Documents / Resources
Objects the package contains
This product is packed in a color box, which contains:

1x RGB color changing clock
1x 5V 2A adapter
1x Type-C data line
1x instruction manual
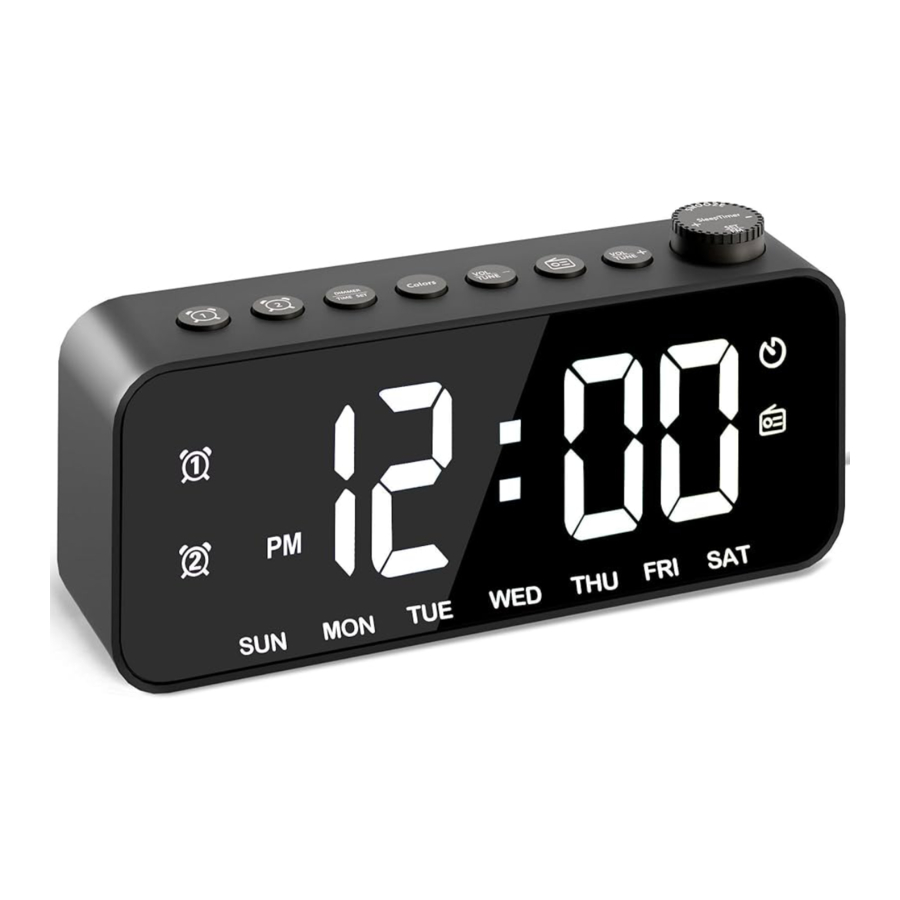
Product appearance & button introduction

- Alarm 1 switch / setting
- Alarm 2 switch / setting
- Screen brightness
- Time display font color adjustment / time setting switch
- Volume down / next
- Radio switch / automatic channel on the radio channel search
- Volume up / previous channel on the radio
- Snooze / Sleeping companion countdown / Increase or decrease of the setting value / radio FM
Product appearance introduction

- Alarm 1 mode switch
- Alarm 2 mode switch
- Type-C 5V power input
- USB output
- Type-C output
Pre-use setting
Power on for the first time
- Remove the protective film from mirror surface. Connect Type-c power plug to the input port of alarm clock. And then connect the USB plug to the adapter. At last plug the adapter into 100V-240V home socket. As shown in the following figure:


Install the battery
- The alarm clock comes with a pre-installed CR2032 battery, and just pull down the insulation sticker. As shown in following figure:


Time setting
When powered on for the first time, the time shows AM 12:00
 | TIME SET BUTTON |  | SNOOZE BUTTON |

- Long press TIME SET button for 2s to enter time setting
- In time setting mode, the number will blink, rotate SNOOZE button to set "hour". Then click TIME SET button to confirm, and enter "minute" setting, rotate SNOOZE button to set current minute.
- Press TIME SET button to enter 12/24-hour setting
- Rotate SNOOZE button to set 12/24 hours.
- Press TIME SET button to enter week setting
- Rotate SNOOZE button to set "week". When the setting is completed, click TIME SET button to confirm and exit.
- Press TIME SET button to confirm and exit time setting.
Alarm setting (take alarm 1 as example)
 |  |  |
| ALARM 1 BUTTON | ALARM 2 BUTTON | SNOOZE BUTTON |

Note: the setting of alarm clock 2 is the same as taht of alarm clock 1.
- Long Press ALARM 1 BUTTON for 2s to enter alarm 1 setting
- In alarm setting mode, the number will blink. Rotate SNOOZE BUTTON to adjust the hour of alarm. Then press ALARM 1 BUTTON to confirm and enter minute setting. Rotate the SNOOZE BUTTON to adjust "minute".
- Press ALARM 1 BUTTON to confirm and enter alarm sound selection
- Press ALARM 1 BUTTON to confirm and enter alarm sound selection. Rotate SNOOZE BUTTON to select alarm sound, which will display S01-S08 (01-08 is the sound levels, corresponding to different wake up sound).
- Press ALARM 1 BUTTON to confirm and enter volume adjustment
- Press ALARM 1 BUTTON to confirm and enter volume adjustment. Rotate SNOOZE BUTTON to adjust the volume, which will display V01-V16 (a total of 16 levels)
- Press ALARM 1 BUTTON to confirm and exit alarm setting.
Alarm switch
Alarm switch
- In time display state, press ALARM 1 BUTTON / ALARM 2 BUTTON, it will switch on/off the alarm.
![]()

User prompt
- Alarm 1 and alarm 2 operate in exactly the same way.
Alarm mode selection
When the alarm is on, select the switch on the back of the clock to choose from "daily alarm", "weekday alarm" or "weekend alarm".

How to SNOOZE or TURN OFF alarm
After the alarm clock is turned on, the alarm clock will ring at the preset time: when it comes to the setting time of the alarm, it will start to ring and wake you up. When the alarm goes off, you can do the following:
- Snooze
- Press SNOOZE BUTTON when the alarm goes off, which will enter "Snooze Mode".
And the screen will show a flickering sleepy icon. Alarm will go off again after 9 minutes.
Note: it's unlimited times that you can enter snooze mode.
![]()

- Stop today's alarm.
- When the alarm goes off / or in snooze mode, click the button of the corresponding alarm to stop today's alarm and it will go off on the next day.
![]()

- When no action taken
- If the alarm goes off for 20 mins without any operation, today's alarm will be stopped automatically, and it will go off on the next day.
RGB color changing mode
- RGB color changing
- In the time display state, press COLORS BUTTON to change the display font color (white, red, green, blue, gradient, magic color, left and right graduality, up and down graduality)
![]()

Screen brightness adjustment
- Screen brightness adjustment
- Press DIMMER BUTTON and the screen brightness changes from bright to dark (level 4, level 3, level 2, level 1, OFF). Note: level 1 is brighter in bright color mode while it's is darker in monochrome mode(also can be seen in darker environment).
![]()

Countdown to sleep
- Sleeping companion switch
- In the time display state, click SNOOZE BUTTON to start "countdown". The countdown time will blink in 5s, rotate SNOOZE BUTTON to adjust the countdown time (10~120, 180, 240MIN).
![]()

- Countdown companion sleep
- When the countdown is turned on, the radio will be turned on automatically. And it will be turned off synchronously after the countdown is over.
- Check the length of sleeping companion.
- After the countdown companion sleep function is turned on, click SNOOZE BUTTON to check the remaining companion sleep time.
![]()

FM radio adjustment
 |  |  |  |
| RADIO BUTTON | VOLUME DOWN | VOLUME UP | SNOOZE BUTTON |
- FM switch
- In time display state, press RADIO BUTTON to turn on/off FM radio.
- Automatically search the FM radio channel
- After FM radio is turned on, long press RADIO BUTTON for 2s to enter the FM automatic search mode(search range from 76.0MHZ to 108.0MHZ).
- FM radio channel adjustment
- After FM radio is turned on, long press the VOLUME DOWN BUTTON / VOLUME UP BUTTON for 2s to turn to a up / down radio channel.
- FM radio volume adjustment
- When FM radio is on, click the VOLUME DOWN BUTTON / VOLUME UP BUTTON to adjust the current radio volume.
- Frequency adjustment of FM radio
- After FM radio is turned on, rotate SNOOZE BUTTON to adjust 0.1MHZ from current channel.
Replace the battery
Unscrew the battery cover with a screwdriver, remove the battery cover. Then put the battery into the battery box, install the battery cover, and tighten the screw.

Trouble Shooting
Can't charge cell phone
- Please check the port on the back of the alarm clock. Because power cord which connected to output port can also power the clock, but it may cause unknown errors.


The alarm clock no longer displays anything
- Please click DIMMER BUTTON to confirm whether it has been adjusted to the lowest brightness before.
![]()

What is the line behind the alarm clock? Can I unplug it?
- It's a receiving antenna. It's used to receive radio signal. Please do not damage the antenna, which will damage the radio function of the alarm clock.


How to turn off the radio function when using the sleep timer function or turning on the radio by mistake?
- Please click RADIO BUTTON to turn off the radio.
![]()

Missing accessories or any other problems, please contact us:
ThreeDucksDirect@outlook.com
Documents / ResourcesDownload manual
Here you can download full pdf version of manual, it may contain additional safety instructions, warranty information, FCC rules, etc.
Advertisement


Need help?
Do you have a question about the CH07 and is the answer not in the manual?
Questions and answers