Table of Contents
Advertisement
Quick Links
Advertisement
Table of Contents

Related Manuals for TiTLEY Scientific Ranger

Summary of Contents for TiTLEY Scientific Ranger
- Page 1 ttRanger User Manual Version 1.1...
- Page 2 AUTHORS AND ACKNOWLEDGMENTS This manual was written by Julie Broken-Brow. I greatly appreciate the time, comments and assistance Ranger and this manual. The testing and troubleshooting have improved the new recorder and increased the clarity of the manual. DOCUMENT HISTORY...
-
Page 3: Table Of Contents
CONTENTS FEATURES OF THE RANGER ..............................6 GETTING TO KNOW THE RANGER ............................. 6 MICROPHONES ..................................8 POWER REQUIREMENTS ..............................9 DATA STORAGE REQUIREMENTS ..........................10 USB CONNECTION ................................11 USING THE RANGER ................................. 12 STEP-BY-STEP GUIDE ................................. 12 TURNING THE RECORDER ON/OFF & SLEEP ......................14 USING THE DASHBOARD .............................. - Page 4 IMPORT A SCHEDULE FROM AN SD CARD ......................34 EXPORT A SCHEDULE TO AN SD CARD ........................34 EDIT/COPY/DELETE A SCHEDULE ..........................35 TESTING YOUR RANGER ..............................35 FLASHING STATUS ICONS OR CHECK LED ........................37 PASSIVE DEPLOYMENT CONSIDERATIONS........................ 38 WEATHERPROOFING ............................... 38 MOUNTING &...
- Page 5 Using Toolbox ......................................44 METADATA .................................... 45 TROUBLESHOOTING & FAQS ............................46 How do I set up the detector for ultrasonic bat recording? ......................... 46 How do I set up the recorder for acoustic (audible sound) recording? ..................46 What does microphone frequency response mean? ..........................
-
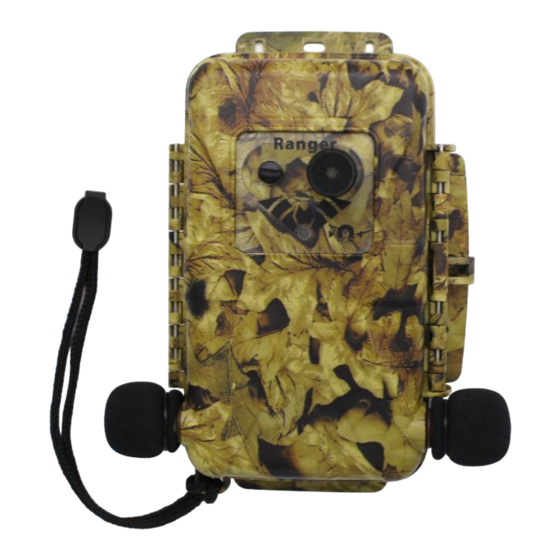
Page 6: Features Of The Ranger
1 front-mount microphone socket, 2 side-mount microphone sockets, an external power socket, a check LED and lanyard with a magnet. Inside the Ranger case is the control panel, 2 battery compartments, 2 SD card slots, headphone jack and basic... - Page 7 External Features Internal Features...
-
Page 8: Microphones
The main screen is called the Dashboard. This is where you can see information such as the status of your Ranger, the date and time, recording mode, SD card free space, and microphone signal. For more information on understanding the dashboard, see Using the Dashboard. -
Page 9: Power Requirements
Please note: For all microphones, please refer to Weatherproofing for considerations for use in the rain. POWER REQUIREMENTS The Ranger can be powered by 4 or 8 AA batteries, or external power (with or without solar panels). The Low Power Symbol will flash at the top of the dashboard when the battery voltage is low. -
Page 10: Data Storage Requirements
The recorder can use SDHC and SDXC memory cards. Titley Scientific highly recommends Sandisk® Extreme and Sandisk® Ultra SD cards, these cards have been tested with the Ranger and are recommended due to their reliable performance and low power consumption. Using... -
Page 11: Usb Connection
SD card capacity. USB CONNECTION The Ranger can be used with a micro-USB cable (not supplied) for connection to your computer. You can use this cable to upgrade the firmware using Anabat Insight (see Using Toolbox in Anabat Insight). Firmware updates can also be performed using the SD card . See Update Firmware for more information. -
Page 12: Using The Ranger
USING THE RANGER The Ranger is designed for fast and easy deployment. Before you start recording you must first set your current time zone (see Time zone). The clock will be automatically set when the GPS obtains a signal. We also highly recommend you check for firmware updates (see Update Firmware). - Page 13 Align jack and locking tabs Turn 1/8 turn to stop Front-Mount Channel C instructions: To connect a front-mount microphone, gently insert the microphone into the microphone socket (there is a keyway to ensure correct alignment) and rotate the knurled ring clockwise to tighten the connection finger tight.
-
Page 14: Turning The Recorder On/Off & Sleep
You can use the magnet to check the recorder is functional after final deployment (see Testing Your Ranger). Do not deploy the Ranger if the Check LED is flashing, recording may not occur. 11. Retrieve your recorder. After the deployment is complete, observe the following precautions when retrieving the recorder: If it is wet, dry the unit off before opening it to avoid water entering the unit. -
Page 15: Using The Dashboard
To turn the screen back on, briefly press the button again. The Ranger will also automatically enter sleep mode to save power if there has been no user interaction for one minute. - Page 16 the sample rate and minimum trigger frequency. The Microphone Settings icon will flash if there is an issue with your microphone/recording settings. Pressing anywhere on the microphone settings icon or recording profile will take you to the Recording Profile Menu. To the right of the Recording Profile, some summary information about your recording session is displayed.
-
Page 17: Updating Firmware
VU Meter UPDATING FIRMWARE It is important to keep the firmware on your Ranger up to date to ensure trouble-free operation. The Ranger firmware can be updated through Toolbox using an SD card, or via USB cable to your PC. It is highly recommended that you subscribe to receive email alerts of new Ranger firmware updates using this website: https://titley.m-pages.com/Ot7VRx/ranger-firmware-updates-subscription-form... -
Page 18: Recording Modes
3. Safely eject the SD card from the computer. 4. Insert the SD card and fresh batteries into your Ranger then turn it on. After a few moments a message will appear: There is new firmware available. Update to version X.X.X? Select Yes to start the update. -
Page 19: Selecting A Recording Mode
The continuous recording mode will record continuously (either triggered or constant activation mode depending on your settings), starting as soon as this mode is selected. No GPS fix is required for this mode, but the Ranger will still attempt a fix to geotag recordings and ensure the clock is accurate. -
Page 20: Recording Profile / Settings
PRESET RECORDING PROFILES There are 4 preset recording profiles you can choose from, these are designed to cover the 4 most common uses for the Ranger. To select a recording profile, tap the profile you want, then press Use. -
Page 21: Custom Recording Profiles
Minimum Trigger Frequency 10kHz Maximum Trigger Frequency 250kHz Minimum Event Time Minimum Record Time 2 seconds Maximum File Length 10 seconds File Prefix Type HP Filter - On • Simultaneous This will record full spectrum ultrasonic (from the front-mounted microphone) and acoustic (from Channel A) simultaneously. File Type Microphone Channel A (acoustic) &... -
Page 22: Settings
To add a new profile, press the menu icon in the top right, then select Choose you can then edit the settings as you would a pre-existing profile. You can give the profile a new name, enter text by tapping using your fingernail, to reveal more letters/numbers/ symbols either swipe right/left on the keyboard, or tap the green buttons. -
Page 23: Frequency Division Ratio (Zc Only)
For acoustic recording, or ultrasonic full spectrum recording, choose WAV. For ultrasonic zero crossing recording choose ZC. See here to learn about the difference between full spectrum and zero crossing. Frequency Division Ratio (ZC Only) The division ratio affects the amount of data which is saved in Zero Crossing recordings, the lower the division ratio, the greater the number of data points in the resulting sonogram. -
Page 24: Gain (Channel A & B Only)
either Constant, or Triggered. To toggle between activation options, use the arrows on either side of Activation. Please note: Triggered is only available for ultrasonic recordings. Acoustic recordings are always Constant. The triggered activation mode will record all sound for a set amount of time (usually a few seconds) every time it is triggered when active (based on recording mode selected: Night, Dusk &... -
Page 25: Sensitivity (Ultrasonic Only)
To trigger only on louder noises, reduce the sensitivity. The ambient noise level when deploying may be different to when your Ranger will be recording, and this should be kept in mind when setting the sensitivity. To change, press the... -
Page 26: Filename Prefix
ended and a new file started immediately. To change, press the arrow on the right of Min. Event and then use the arrows above each digit to choose the value, then tap the button on the right to save your changes. The default minimum recording time is 2s. Filename Prefix You can choose between several prefixes which will be added to the start of all recordings: including:... -
Page 27: Metadata Value
Metadata Value You can add a custom metadata value to be added under the Metadata Key (specified above) to every file recorded with this profile (e.g. Cat Tien National Park). To do this tap Metadata Value. Enter text by tapping using your fingernail, to reveal more letters/ numbers/symbols either swipe right/left on the keyboard, or tap the green buttons. -
Page 28: Erase / Format Sd Card
GPS Information screen. If left on/sleeping, it will attempt a GPS fix every 24 hours. If the Ranger fails to get a GPS fix three times in a row during a deployment, the GPS will not try again for the duration of the deployment ( to save power). When the recorder is attempting a fix, it will try for up to 10 minutes. -
Page 29: Detector Settings
On this screen you can determine: • Number of transect points • Elevation • Heading • GPS dimension: whether the fix is 2D (inaccurate) or 3D (more accurate) • GPS coordinates • When the last GPS fix was last received; •... -
Page 30: Display Settings
• Temperature Scale choose between Celsius and Fahrenheit. • Distance Units choose between Metres, Feet and Yards. Toggle between the Regional Settings options using the arrows on either side of the relevant setting. To exit Regional Settings and return to Detector Settings tap DISPLAY SETTINGS To view/edit the Display Settings, tap Display in the Detector Settings menu. -
Page 31: System Information
To view the Regulatory Information for your region, tap Regulatory in the Detector Settings menu. To exit this screen, tap anywhere to return to Detector Settings. LOG START TIME By default the Ranger will start new log files at midday. Use the arrows on either side of the Logs Start At to toggle between 00:00 (midnight) and 12:00 (midday). -
Page 32: Sensor Log Frequency
Sens. Log Freq. to toggle between 10, 15, 20, 30, and 60 minutes. EXTERNAL POWER CUTOFF If you are running the Ranger from an external power supply, you can set the minimum voltage when the recorder will automatically turn off. Use the arrows on either side of the Ext. - Page 33 1. Choose a schedule name (eg. Dawn chorus). Tap on Name, then enter text by tapping using your fingernail, to reveal more letters/numbers/ symbols either swipe right/left on the keyboard, or tap the green buttons. To erase a letter tap the icon in the top right, once the text is complete, tap the icon in the top left.
-
Page 34: Import A Schedule From An Sd Card
3. Tap the menu in the top right, then click Import and the schedule files from the SD card will be saved to the Ranger. EXPORT A SCHEDULE TO AN SD CARD To export a schedule to an SD card, first create the schedule, then insert an SD card and turn the detector on. -
Page 35: Edit/Copy/Delete A Schedule
EDIT/COPY/DELETE A SCHEDULE To edit, copy or delete a schedule from the Ranger, choose Schedule for the Recording Mode. In the Dashboard, the tap the existing schedule name next to next to Microphone Settings . In the Schedules Overview, tap the appropriate schedule, then select either Edit, Copy or Delete. -
Page 37: Flashing Status Icons Or Check Led
No GPS fix enter the GPS Information screen to reactivate the GPS. It may take several minutes to secure a fix. If the Ranger cannot secure a new fix, it will revert to the last known location. The system clock is not set. Get a new GPS fix in clear view of the sky to set the Clock not set time. -
Page 38: Passive Deployment Considerations
PASSIVE DEPLOYMENT CONSIDERATIONS WEATHERPROOFING The Ranger is designed as a weatherproof recorder, which means the recorder can be left in the field during rain, sunshine and snow without any additional weatherproofing. However, if the device is left in the rain, please consider the following advice: 1. -
Page 39: Mounting & Placement
To minimise the chance of electrostatic damage, 1. Isolate the detector from ground, i.e. operate it from internal batteries or make sure 2. In dry conditions avoid mounting microphones on tall non -conductive masts (inc. fibreglass and nylon), wood or metal masts are preferable. 3. -
Page 40: Equalization & Calibration
You can also purchase a microphone extension cable, which we recommend for mounting the ultrasonic microphone, so it can be placed away from flat reflective surfaces. The Ranger case is designed so that the device can be padlocked closed. A lockable metal security box is also available for purchase from Titley Scientific. - Page 41 storage periods. Do not remove the SD card without first turning off the recorder or ejecting the SD card otherwise the SD card data could be corrupted or lost.
-
Page 42: Downloading Data
2. Insert the SD card into your computer (if it has a SD card slot) or into an external SD card reader (available from Titley Scientific). 3. Open the SD card folder in Windows Explorer. 4. Copy/cut the files from the SD card folder into the desired folder/storage device. -
Page 43: Software
Anabat Insight is the free software you can use to view and analyse zero crossing and full spectrum recordings from your Titley Scientific detectors. You can open/view .zc and .wav files in Anabat Insight. The program offers the following features: •... -
Page 44: Using Toolbox
Using Toolbox To use Toolbox with your Ranger, you will either need an SD card, or to connect the detector via USB to your computer. For certain functions (eg. checking the device info or firmware version), you need to connect to the PC. -
Page 45: Metadata
METADATA All metadata recorded on the Ranger is saved to files in the GUANO (Grand Unified Acoustic Notation Ontology) format. This format is now the standard across bat acoustic fields. For recordings from a Ranger, it includes the following: •... -
Page 46: Troubleshooting & Faqs
TROUBLESHOOTING & FAQS How do I set up the detector for ultrasonic bat recording? If you are using the Ranger with an ultrasonic microphone to record ultrasonic frequencies (e.g. bat echolocation), you will need to check the following settings: 1. Mount an ultrasonic microphone to the front channel (channel C). - Page 47 & right. This gives the recordings a sense of a spatial soundscape when played back, or you can set different microphone gain for the left & right channels to capture both loud and soft sounds without distortion. The Ranger is capable of recording stereo acoustic files.
- Page 48 (such as boxes or walls). This will produce much clearer recordings. You may also wish to purchase microphone extension cable accessory from Titley Scientific, which allows you to position the ultrasonic microphone up to 1.5m away from the detector/mounting surface.
-
Page 49: What Does Microphone Frequency Response Mean
How far away can a bat be detected using the Ranger? Detection distances will vary with frequency and loudness (amplitude) of the bat calls, atmospheric attenuation, and the directional characteristics and sensitivity of the bat recorder. It will also be affected by the amount of structural clutter (obstacles such as vegetation) which can block the path of the signal. -
Page 50: Further Information
Can I use the Ranger as an active recorder? While the Ranger is designed as a passive recorder, it can be used as an active recorder by connecting your headphones. You can also use the built -in GPS to log your track using the Transect Mode function.
Need help?
Do you have a question about the Ranger and is the answer not in the manual?
Questions and answers