Advertisement
Table of Contents
- 1 Table of Contents
- 2 Safety Precautions
- 3 Grounding Methods
- 4 Technical Parameters
- 5 Assembly Instructions
- 6 Folding Instructions
- 7 Operation Guide
- 8 Treadmill Maintenance
- 9 Trouble Shooting Guide
- 10 Exercise Instructions
- 11 Warm up Instructions
- 12 Exploded Parts Diagram
- 13 Parts List
- Download this manual
Advertisement
Table of Contents

Related Manuals for BORGUSI CTM5103


Summary of Contents for BORGUSI CTM5103
- Page 1 BORGUSI USER’S MANUAL MOTORIZED TREADMILL Model: CTM5103 Read all instructions carefully before using this treadmill. Retain this user’s manual for future reference.
-
Page 2: Table Of Contents
TABLE OF CONTENTS SAFETY PRECAUTIONS ---------------------------------------------------------- 1 GROUNDING METHODS -------------------------------------------------------- 2 TECHNICAL PARAMETERS ------------------------------------------------------- 2 ASSEMBLY INSTRUCTIONS -------------------------------------------------- 3 - 6 FOLDING INSTRUCTIONS ------------------------------------------------------- 7 OPERATION GUIDE ------------------------------------------------------- 8 - 12 TREADMILL MAINTENANCE ----------------------------------------------- 13 - 14 TROUBLE SHOOTING GUIDE---------------------------------------------------- 15 EXERCISE INSTRUCTIONS-------------------------------------------------- 16 - 17 WARM UP INSTRUCTIONS ------------------------------------------------------ 18 EXPLODED PARTS DIAGRAM --------------------------------------------------- 19... -
Page 3: Safety Precautions
SAFETY PRECAUTIONS Warning: We suggest that you should consult with your physician or health professional before starting your workout, especially for the age up to 35 old or health problem-related people. We take no responsibility for any injury or damage if you don’t follow our specifications. The treadmill should be carefully assembled and covered with the motor shield, then connected to the power. -
Page 4: Grounding Methods
GROUNDING METHODS This treadmill must be grounded. If it malfunctions or breakdown, grounding provides a path of least resistance for electric current to reduce the risk of electric shock. This treadmill is equipped with a cord having an equipment-grounding conductor and a grounding plug. The plug must be plugged into an appropriate outlet that is properly installed and grounded in accordance with all local codes and ordinances. -
Page 5: Assembly Instructions
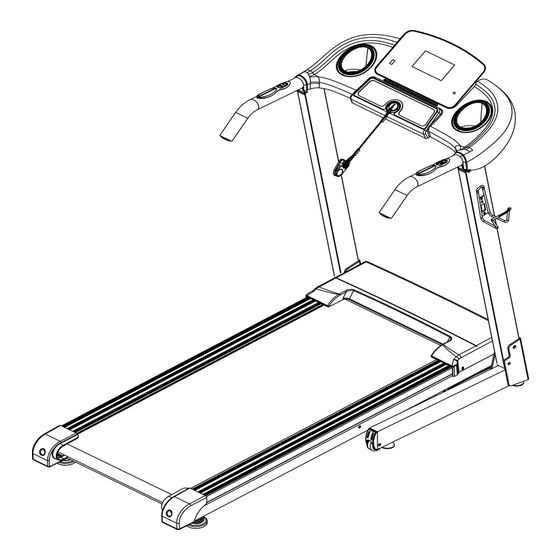
ASSEMBLY INSTRUCTIONS Assembly Parts Checklist: When you open the carton, and you will find the below parts in the carton. Description Spec. Description Spec. Qty. Qty. Bottle cage Aluminum Main frame 5 mm Bolt ST4.2*19 5# Allen wrench M8*42 6# Allen wrench 6 mm Bolt M8*16... - Page 6 STEP 1: Open the carton, take out the above spare parts, put the Main frame (1) on the level ground. STEP 2: Hold on the computer frame and use the 5# Allen wrench (12), the Bolt (51) and the Lock washer (64), fix the computer frame onto the left and right upright frame.
- Page 7 STEP 4: 1. Fold up the Main frame (1) firstly. 2. Tighten the Rubber foot pad (16) into the Main frame (1). 3. Right side is the same as the left side, such as the left view. STEP 5: 1. Put the Left back end cap (21) to the Main frame (1), then use the Wrench with screwdriver (76) and the Bolt (60) to lock the Left back end cap (21) onto the Main...
- Page 8 STEP 6: Use the Wrench with screwdriver (76) and the Bolt (77) to lock the Bottle cage (75) onto the Right upright frame (3). STEP 7: 1. Put the Safety key (49) on the comput- 2. Insert the Safety insert (78) into the Main frame (1).
-
Page 9: Folding Instructions
FOLDING INSTRUCTIONS Pulling up: Pull up the base frame at position (A) till hearing the sound that the air pressure bar (B) is locked into the round tube. Notice: Please unplug the safety insert when folding. Pulling down: Support place (A) with hand, kick the place of the air pressure bar (B), then the base frame will fall down automatically. -
Page 10: Operation Guide
OPERATION GUIDE 1. DISPLAY WINDOW 2. LCD WINDOW DISPLAY DETAILS PROG: Show programs, “---” is displayed in manual mode. TIME: Show running time. SPEED: Show speed. During the start-up process, a 3-second countdown is displayed: 3, 2, 1. INCLINE/PULSE: Show incline/heartbeat data. When the INCL character is lit, the corresponding window displays the incline;... - Page 11 3.2.2. When the treadmill is in FAT mode, the chosen sequence is “Sex”“Age”“Height” “Weight”. 3.3. START button: Press this button to start the treadmill, the treadmill will run at the lowest speed or at the speed of the default program after 3 seconds of time count down. 3.4.
- Page 12 button to set the running time. Each program has been divided into 20 sections, each exercise time=the setting time/20. Press “START”, the treadmill will run at the first section speed and incline. When the section is over, it will enter into the next section automatically, the speed will change as of next section data.
- Page 13 6.2. BMI REFERENCE: (BMI) <19 Under weight 19-26 Normal weight 26-30 Over weigh >30 Obesity 7. SLEEP FUNCTION Stopped for more than 2 minutes without any operation, the system is reset to standby state and the backlight is off. When it is more than 10 minutes, the system turns off all displays and enters a sleep mode.
- Page 14 DATE TABLE: etting time/20=interval running time TIME PROG SPEED INCLINE SPEED INCLINE SPEED INCLINE SPEED INCLINE SPEED INCLINE SPEED INCLINE SPEED INCLINE SPEED INCLINE SPEED INCLINE SPEED INCLINE SPEED INCLINE SPEED INCLINE SPEED INCLINE SPEED INCLINE SPEED INCLINE - 12 -...
-
Page 15: Treadmill Maintenance
TREADMILL MAINTENANCE Warning: Always unplug the treadmill from the electrical outlet before cleaning or servicing the treadmill. Clean: General cleaning the treadmill will greatly prolong the treadmill. Keep the treadmill clean regularly. Be sure to clean the exposed part of the deck on either side of the walking belt and also the side rails. - Page 16 RUNNING BELT ADJUSTMENTS ● Place the treadmill on a level surface. Run the treadmill at approximately 3.7-5 mph, checking the running condition. ● If the belt has drifted to the right, unplug the safety key and power switch, turn the right adjusting bolt 1/4 turn clockwise, then start running until center- ing the belt.
-
Page 17: Trouble Shooting Guide
TROUBLE SHOOTING GUIDE CODE REASON SOLUTION 1.Check if the computer and the bottom control Message wire is broken board wire connect well. 2.Check if IC on the bottom control board is loosen, or not connected well reset the IC. 1. Check if the power voltage is 50% lower than the normal voltage, please use the normal voltage to test. -
Page 18: Exercise Instructions
EXERCISE INSTRUCTIONS Warm up stage: If you are over 35 years old or have health problems, also it`s your first time doing exercise, please consult with your doctor or professional people. Before you use the motorized treadmill, please learn how to control the treadmill first, know well how to start, stop, adjust the speed and so on. - Page 19 Exercise frequency: The cycle time: 3-5 times/week, 15-60 minutes/times. Make up the schedule of workout scientific, not only for your hobby. You can control the running intensity by adjusting the velocity and incline of the treadmill. We suggest that you don’t set the incline at first, improving the incline is the effective way to strengthen the exercise intensity.
-
Page 20: Warm Up Instructions
WARM UP INSTRUCTIONS Before exercise, it is better to do stretching exercises . Warm muscles stretch more easily, spend the first of 5-10 minutes to warm up. Then in accordance with the following methods to stop and do stretching exercises - do five times, each leg every time 10 seconds or more time to do it again after the end of the exercise. -
Page 21: Exploded Parts Diagram
EXPLODED PARTS DIAGRAM - 19 -... -
Page 22: Parts List
PARTS LIST Description Qty. Description Spec. Spec. Qty. Main frame Computer bottom cover Base frame Computer seal cover Right upright frame Bolt ST4.2*20 Incline bracket Pulse with speed +/- Computer bracket Pulse with incline +/- Standard spring washer Control board Cushion Computer bottom wire Oil bottle... - Page 23 Spec. Spec. Description Description Qty. Qty. Bolt M8*25 Bottle cage Aluminum Bolt M8*42 Wrench with screwdriver Left upright frame Bolt ST4.2*19 Motor bottom cover Safety insert 6# Allen wrench 6 mm Bottle holder Bolt M10*55 - 21 -...
Need help?
Do you have a question about the CTM5103 and is the answer not in the manual?
Questions and answers
How can I get a repair person to come and check, my incine is not working
The BORGUSI CTM5103 is a treadmill, not an incinerator. For repair service, you need to contact the service center mentioned in the manual.
This answer is automatically generated