Table of Contents
Advertisement
Available languages
Available languages
Quick Links
THIS INSTRUCTION BOOKLET CONTAINS
IMPORTANT SAFETY INFORMATION. PLEASE
READ AND KEEP FOR FUTURE REFERENCE.
WARNING:
To reduce the risk of
injury, the user must read and understand the
operator's manual before using this product.
CE LIVRET D'INSTRUCTIONS CONTIENT DES
CONSIGNES DE SÉCURITÉ IMPORTANTES.
VEUILLEZ LE LIRE ET LE CONSERVER POUR
TOUTE RÉFÉRENCE FUTURE.
AVERTISSEMENT :
réduire les risques de blessures, l'utilisateur
doit lire et veiller à bien comprendre le manuel
d'utilisation avant d'employer ce produit.
HGPC011 20V
Portable Power Cleaner
Nettoyeur à pression portatif
Limpiador eléctrico portátil
OPERATOR'S MANUAL
Important Safety Instructions 2
Specific Safety Rules 3
MANUEL D'UTILISATION
Instructions importantes 2
concernant la sécurité
Règles particulières 4
concernant l'utilisation de la pile
Commande de pièces et dépannage Page arrière
MANUAL DEL OPERADOR
Instrucciones de seguridad importantes 2
Reglas de seguridad específicas 3
para el funcionamiento a batería
Funcionamiento 8-10
Pedidos de piezas y servicio Pág. posterior
ESTE FOLLETO DE INSTRUCCIONES CONTIENE
INFORMACIÓN DE SEGURIDAD IMPORTANTE.
LÉALO Y CONSÉRVELO PARA REFERENCIA
FUTURA.
Pour
ADVERTENCIA:
el riesgo de lesiones, el usuario debe leer y
comprender el manual del operador antes de
usar este producto.
Symbols 5-6
Features 6
Assembly 7-8
Operation 8-10
Maintenance 10
Parts/Service Back page
Symboles 5-6
Assemblage 7-8
Utilisation 8-10
Entretien 11
Símbolos 5-6
Armado 7-8
Para reducir
Advertisement
Table of Contents

Related Manuals for HART HGPC011 20V


Summary of Contents for HART HGPC011 20V
-
Page 1: Table Of Contents
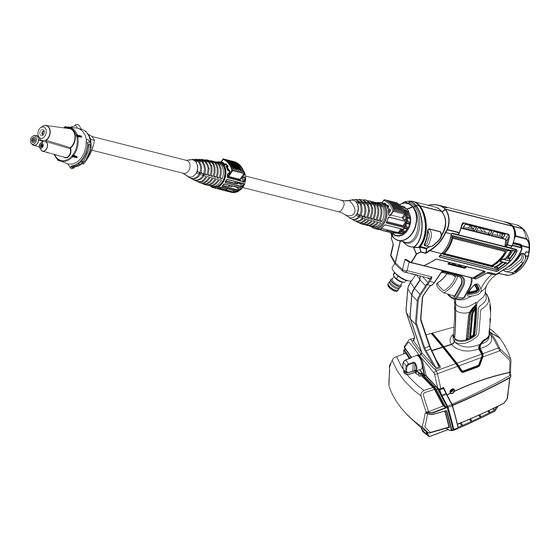
HGPC011 20V Portable Power Cleaner Nettoyeur à pression portatif Limpiador eléctrico portátil OPERATOR’S MANUAL Important Safety Instructions 2 Specific Safety Rules 3 Specific Rules for Battery Operation 4 Symbols 5-6 Features 6 Assembly 7-8 Operation 8-10 Maintenance 10 Parts/Service Back page MANUEL D’UTILISATION... - Page 2 See this fold-out section for all of the figures referenced in the operator’s manual. Consulter l’encart à volets afin d’examiner toutes les figures mentionnées dans le manuel d’utilisation. Consulte esta sección desplegable para ver todas las figuras a las que se hace referencia en el manual del operador. FIG.
- Page 3 FIG. 6 FIG. 9 FIG. 12 FIG. 10 A - Lock knob (bouton de verrouillage, perilla de FIG. 13 fijación) B - Battery cover (couvercle du logement de pile, tapa del compartimiento para la batería) FIG. 7 A - Foamer nozzle (buse à mousser, boquilla A - Brush attachment (suceur...
- Page 4 IMPORTANT SAFETY INSTRUCTIONS Check damaged parts. Before further use of the tool, a WARNING: guard or other part that is damaged should be carefully Read and understand all instructions. Failure to follow checked to determine that it will operate properly and all instructions listed below may result in electric shock, perform its intended function. Check for alignment of fire and/or serious personal injury. moving parts, binding of moving parts, breakage of parts, mounting, and any other conditions that may affect its READ ALL INSTRUCTIONS operation. A guard or other part that is damaged must be properly repaired or replaced by a qualified service ...
- Page 5 SPECIFIC SAFETY RULES Never direct a water stream toward people or pets, Protective covers must always cover rotating parts or any electrical device. when the motor is running. Before starting any cleaning operation, close doors Check bolts and nuts for looseness before each use. and windows. Clear the area to be cleaned of debris, A loose bolt or nut may cause serious motor problems. toys, outdoor furniture, or other objects that could create When servicing use only recommended or equivalent a hazard. replacement parts. Use of any other parts may create a Never start the machine if ice has formed in any part hazard or cause product damage.
-
Page 6: Specific Rules For Battery Operation
SPECIFIC RULES FOR BATTERY OPERATION Do not use battery-operated appliance in rain. improperly or at temperatures outside of the specified range may damage the battery and increase the risk Remove or disconnect battery before servicing, of fire. cleaning or removing material from the tool. Have servicing performed by a qualified repair per- Use this product only with batteries and chargers son using only identical replacement parts. This will listed in tool/appliance/battery pack/charger cor- ensure that the safety of the product is maintained. relation supplement 995000850. Do not dispose of the batteries in a fire. The cell Store idle appliances – When not in use, tool should may explode. Check with local codes for possible be stored indoors in a dry, locked place out of the special disposal instructions. - Page 7 SYMBOLS The following signal words and meanings are intended to explain the levels of risk associated with this product. SYMBOL SIGNAL MEANING DANGER: Indicates a hazardous situation, which, if not avoided, will result in death or serious injury. Indicates a hazardous situation, which, if not avoided, could result in death or serious WARNING: injury. Indicates a hazardous situation, that, if not avoided, may result in minor or moderate CAUTION: injury. (Without Safety Alert Symbol) Indicates information considered important, but not NOTICE: related to a potential injury (e.g. messages relating to property damage). Some of the following symbols may be used on this product. Please study them and learn their meaning. Proper interpretation of these symbols will allow you to operate the product better and safer. SYMBOL NAME DESIGNATION/EXPLANATION Safety Alert Indicates a potential personal injury hazard. To reduce the risk of injury, user must read and understand operator’s Read Operator’s Manual manual before using this product. Always wear eye protection with side shields marked to comply with Eye Protection ANSI Z87.1.
- Page 8 SYMBOLS Some of the following symbols may be used on this product. Please study them and learn their meaning. Proper interpretation of these symbols will allow you to operate the product better and safer. SYMBOL NAME DESIGNATION/EXPLANATION Volts Voltage No Load Speed Rotational speed, at no load .../min Per Minute Revolutions, strokes, surface speed, orbits, etc., per minute FEATURES PRODUCT SPECIFICATIONS Motor ...................................20 V DC Maximum Pounds Per Square Inch* ........................... 320 PSI Maximum Gallons Per Minute ............................0.8 GPM KNOW YOUR POWER CLEANER bucket of water. It can also be attached to a garden hose for a continuous water supply. See Figure 1. The safe use of this product requires an understanding of the TOTAL STOP SYSTEM information on the product and in this operator’s manual as The power cleaner is equipped with a power-saving fea- well as a knowledge of the project you are attempting. Before ture that causes the motor to stop whenever the trigger is use of this product, familiarize yourself with all operating...
- Page 9 ASSEMBLY UNPACKING CONNECTING THE SPRAY WAND TO THE POWER CLEANER This product requires assembly. See Figure 2. Carefully remove the product and any accessories from the box. Make sure that all items listed in the Packing Align the arrows and insert the end of the spray wand into List are included. the power cleaner and push it until it clicks into place. Pull on the spray wand to be certain it is properly s ecured. WARNING: To remove, press the button on the power cleaner and Do not use this product if any parts in the Packing pull to remove the spray wand. List are already assembled to your product when you CONNECTING THE 3-IN-1 NOZZLE TO THE unpack it. Parts on this list are not assembled to the...
- Page 10 ASSEMBLY NOTE: There must be a minimum of 10 feet of unrestricted Attach the quick connector to the water inlet on the power hose between the power cleaner intake and the hose cleaner. faucet or shut off valve (such as a “Y” shut off connector). NOTICE: Unscrew and remove the filter from the end of the siphon hose. Store filter for later use. Do not run the power cleaner without water supply connected and turned on, as this may damage the high With the hose faucet turned completely off, attach the pressure seals and decrease pump life. Completely end of the garden hose to the siphon hose water intake. Tighten by hand. unwind the hose from its reel or coil and make sure the hose is not being restricted by tires, rocks, or any To connect a garden hose to the power cleaner:...
- Page 11 OPERATION NOTICE: SELECTING THE RIGHT NOZZLE FOR THE JOB See Figure 9. When placing battery pack in the tool, be sure raised rib on battery pack aligns with the bottom of the tool and Each of the nozzles has a different spray pattern. Before latches into place properly. Improper installation of the starting any cleaning job, determine the best nozzle for battery pack can cause damage to internal c omponents. the job. Refer to the Nozzle Selection Guide for more information. Rotate the nozzle until the desired position is Close the battery cover and turn the lock knob to secure ...
- Page 12 OPERATION ATTACHING AND USING THE BRUSH RINSING WITH THE POWER CLEANER See Figure 15. ATTACHMENT Turn off the power cleaner and shut off the water supply. See Figures 13 - 14. Engage the lock out on the trigger by moving the lock-out Place the lock-out button in the locked position. button to the locked position. Remove the battery pack. Rotate the 3-in-1 nozzle to the desired position of the To remove the spray wand press the button on the power ...
- Page 13 INSTRUCTIONS IMPORTANTES CONCERNANT LA SÉCURITÉ Vérifier l’état des pièces. Avant d’utiliser l’outil de nouveau AVERTISSEMENT : examiner soigneusement les pièces et dispositifs de protection qui semblent endommagés afin de déterminer s’ils Lire tous les avertissements et toutes les instructions. fonctionnent correctement et s’ils remplissent les fonctions Ne pas suivre l’ensemble des avertissements et des prévues.
-
Page 14: Règles De Sécurité Particulières
RÈGLES DE SÉCURITÉ PARTICULIÈRES Les dispositifs de protection doivent toujours couvrir Ne jamais diriger le jet d’eau vers des personnes, animaux domestiques ou dispositifs électriques. des pièces en rotation quand le moteur tourne. Vérifier le serrage de la boulonnerie avant chaque Avant de commencer toute opération de nettoyage, fermer les portes et fenêtres. - Page 15 RÈGLES PARTICULIÈRES CONCERNANT L’UTILISATION DE LA PILE Ne pas utiliser un appareil alimenté par pile sous la pluie. recharge incorrecte ou hors des températures spécifiées peut endommager la pile et augmenter les risques de feu. Retirer ou débrancher la pile avant l’entretien ou le nettoyage de l’produit ou avant d’en retirer des ...
-
Page 16: Symboles
SYMBOLES Les termes de mise en garde suivants et leur signification ont pour but d’expliquer le degré de risques associé à l’utilisation de ce produit. SYMBOLE SIGNAL MEANING Indique une situation dangereuse qui, si elle n’est pas évitée, aura pour DANGER : conséquences des blessures graves ou mortelles. -
Page 17: Caractéristiques
SYMBOLES Certains des symboles ci-dessous peuvent être utilisés sur produit. Veiller à les étudier et à apprendre leur signification. Une interprétation correcte de ces symboles permettra d’utiliser produit plus efficacement et de réduire les risques. SYMBOLE DÉSIGNATION / EXPLICATION Ce produit utilise les piles de lithium-ion (Li-ion). Les réglementations locales ou gouvernementales peuvent interdire de jeter les piles dans Symbole de recyclage les ordures ménagères. -
Page 18: Assemblage
ASSEMBLAGE DÉBALLAGE AVERTISSEMENT : Ce produit doit être assemblé. Ne insérer le bloc-piles avant de compléter l’assemblage. Avec précaution, sortir le produit et les accessoires de la Le non respect de cet avertissement pourrait résulter en un boîte. S’assurer que toutes les pièces figurant sur la Liste démarrage accidentel et des blessures corporelles graves. -
Page 19: Utilisation
ASSEMBLAGE CONNEXION DU TUYAU D’ARROSAGE AU NOTE : Il doit y avoir un minimum de 3 m (10 pi) de tuyau entre l’admission du nettoyeur à pression et le robinet de NETTOYEUR À PRESSION tuyau ou le robinet de sectionnement (comme un connecteur Voir la figure 5. - Page 20 UTILISATION APPLICATIONS AVERTISSEMENT : Utiliser ce produit pour nettoyer les objets comme dans les Les outils à piles sont toujours en état de fonctionnement. exemples suivants : Il est donc nécessaire de toujours verrouiller la gâchette Meubles de jardin, fenêtres, automobiles, bateaux ou et de garder ensuite les mains à...
- Page 21 UTILISATION SÉLECTIONNER LA BUSE À RACCORD RAPIDE Pour remettre le réservoir à détergent, aligner les languettes du haut avec les encoches du couvercle. APPROPRIÉE POUR LA TÂCHE Faire pivoter le réservoir de détergent à 90° dans le sens Voir la figure 9.
-
Page 22: Entretien
ENTRETIEN ENTRETIEN GÉNÉRAL AVERTISSEMENT : Éviter d’utiliser des solvants pour le nettoyage des pièces en Pour empêcher un démarrage accidentel pouvant entraîner plastique. La plupart des matières plastiques peuvent être des blessures graves, toujours retirer le bloc-piles de l’outil endommagées par divers types de solvants du commerce. avant tout nettoyage ou entretien. - Page 23 INSTRUCCIONES DE SEGURIDAD IMPORTANTES funcionará correctamente y desempeñará la función a la que ADVERTENCIA: está destinada. Verifique la alineación de las partes móviles, que no haya atoramiento de las mismas, que no haya piezas Lea todas las advertencias de seguridad y todas rotas, el montaje de las piezas y cualquier otra condición instrucciones.
-
Page 24: Reglas Específicas
REGLAS DE SEGURIDAD ESPECÍFICAS Cuando el motor esté en marcha, es imperativo que Nunca dirija un chorro de agua en dirección de personas o animales, ni hacia dispositivos eléctricos. las cubiertas de protección cubran las partes en movimiento. Antes de iniciar cualquier operación de limpieza, cierre ... - Page 25 REGLAS ESPECÍFICAS PARA EL FUNCIONAMIENTO A BATERÍA No use aparatos accionados por baterías en la lluvia. Siga todas las instrucciones de carga y no cargue el paquete de baterías ni el aparato fuera del rango de Quite o desconecte la batería antes de proporcionarle temperaturas especificado en las instrucciones.
-
Page 26: Símbolos
SÍMBOLOS Las siguientes palabras de señalización y sus significados tienen el objeto de explicar los niveles de riesgo relacionados con este producto. SÍMBOLO SEÑAL SIGNIFICADO PELIGRO: Indica una situación peligrosa, la cual, si no se evita, causará la muerte o lesiones serias. Indica una situación peligrosa, la cual, si no se evita, podría causar la muerte o lesiones ADVERTENCIA: serias. -
Page 27: Características
SÍMBOLOS Es posible que se empleen en este producto algunos de los siguientes símbolos. Le suplicamos estudiarlos y aprender su significado. Una correcta interpretación de estos símbolos le permitirá utilizar mejor y de manera más segura el producto. SÍMBOLO NOMBRE DENOMINACIÓN/EXPLICACIÓN Volts Voltaje... -
Page 28: Armado
ARMADO DESEMPAQUETADO ADVERTENCIA: Este producto requiere armarse. Para evitar un arranque accidental que podría causar Extraiga cuidadosamente de la caja la herramienta y los lesiones corporales graves, siempre desconecte el accesorios. Asegúrese de que estén presentes todos los paquete de baterías del productoal ensamblar las piezas. artículos enumerados en la Lista de empaquetado. -
Page 29: Funcionamiento
ARMADO CONEXIÓN DE LA MANGUERA DE JARDÍN AL NOTA: Debe haber un mínimo de 3 metros (10 pies) de manguera sin ninguna restricción en el flujo de la misma, LIMPIADOR ELÉCTRICO entre la entrada de la lavadora de presión y el grifo o válvula Vea la figura 5. - Page 30 FUNCIONAMIENTO PARA DESMONTAR Y MONTAR EL PAQUETE ADVERTENCIA: DE BATERÍAS Las herramientas que funcionan a pilas siempre están en Vea las figuras 6 y 7. condiciones de funcionamiento. Por lo tanto, el interruptor de bloqueo debe estar asegurado y las manos deben estar ADVERTENCIA: alejados del botón de bloqueo cuando la unidad no esté...
- Page 31 FUNCIONAMIENTO SELECCIÓN DE LA BOQUILLA CORRECTA DE Para volver a colocar el recipiente de detergente, alinee las lengüetas de la parte superior con las muescas en la tapa. CONEXIÓN RÁPIDA PARA CADA TRABAJO Gire el recipiente de detergente 90˚ en sentido horario para Vea la figura 9.
-
Page 32: Mantenimiento
MANTENIMIENTO MANTENIMIENTO GENERAL ADVERTENCIA: Evite el empleo de solventes al limpiar piezas de plástico. La Para evitar lesiones corporales serias, siempre retire el mayoría de los plásticos son susceptibles a diferentes tipos paquete de baterías de la herramienta al limpiarla o darle de solventes comerciales y pueden resultar dañados. - Page 33 NOTES / NOTES / NOTAS...
- Page 34 Los detalles de la garantía están disponibles en www.HARTtools.com Para validar la garantía limitada de 3 años, se solicitará una prueba de compra. 998000401 1-6-21 (REV:01) HART, el logo de HART y el logo H son marcas de Techtronic Cordless GP.
Need help?
Do you have a question about the HGPC011 20V and is the answer not in the manual?
Questions and answers