Advertisement
Safety Information

- If you smell gas:
- Shut off gas to the appliance.
- Extinguish any open flame.
- Remove hood.
- If odor continues, keep away from the appliance and immediately call your local fire department.
- Never leave this appliance unattended during operation.
- Never operate this appliance within 10ft (3.0m) of any structure, combustible material, or other gas cylinder.
- Never operate this appliance within 25ft (7.5m)of any flammable liquid.
- If a fire should occur, keep away from the appliance and immediately call your fire department.
- Do not attempt to extinguish an oil or a grease fire with water.
Failure to follow these instructions could result in fire or explosion, which could cause property damage, personal injury, or death.

- Do not store or use gasoline or other flammable liquids or vapors in the vicinity of this or any other appliance.
- Any LP cylinder not connected for use should not be stored in the vicinity of this or any other appliance.
- Never operate this appliance unattended. The appliance is not intended for commercial use.
- The use of alcohol, prescription or nonprescription drugs may impair your ability to properly assembly or safely operate the appliance.
- This appliance must be kept away from flammable materials during use. The parts sealed bv the manufacturer must not be altered bv the user.
This product contains chemicals known to the State of California to cause cancer and birth defects or other reproductive harm.
- For OUTDOOR use only.
- Do not leave the appliance unattended. Keep children and pets away from the appliance at all times.
- Do not operate the grill under unprotected combustible construction.
- Inspect hoses before each use for excessive abrasion, wear, or cuts that may affect safe operation of the oven. If there is evidence of excessive abrasion or wear, or the hose is cut, it must be replaced prior to the oven being put into operation. The replacement hose assembly must be specified bv the manufacturer.
- Keep the fuel supply hose away from any heated surface(s). The hose should not be routed under oven.
- This appliance is not intended for and should never be used as a heater.
- Never operate this gas oven without a pressure regulator.
- If the regulator is not supplied with your gas pizza oven - depending on which gas you decide to use - turn to your local gas dealer for a regulator.
- Supply pressures are referred to in the technical description are a guide only.
Care and Maintenance
- This product is not designed for industrial or commercial applications. Do not use this appliance to perform applications for which it is not designed.
- When cooking, the appliance must be on a level surface in an area clear of combustible material.
- When using the gas pizza oven, do not touch the pizza oven and grill rack, burner grate or immediate surroundings which become extremely hot during use and could cause burns.
- Use caution when placing anything into oven while the appliance is in operation.
- Do not move the appliance when in use. Allow the oven to cool to 1150F ( 450C) before moving or storing.
- This appliance will be hot during and after use. Use insulated oven mitts or gloves for protection from hot surfaces.
- This oven is equipped with a flame observation hole on the right side of the oven body. Wear protective eye wear to look through hole as it will be very hot and could burn you. Do not get too close.
- The hood should not be removed during cooking or while oven is hot.
- Clean the grease tray frequently. Avoid excess grease collecting in the grease tray at the bottom of the grill's firebox.
- For proper burner lighting and performance, keep the burner ports clean. It is necessary to clean them periodically for optimum performance. For safe operation, the burners must be mounted correctly and the burners will only operate in one direction.
- Clean the stone and grill with caution. To avoid steam burns, do not use a wet sponge or cloth to clean the grill. Turn off all controls knobs and make sure the grill is cool before cleaning. Be very careful when using any aerosol sprays to clean the grill or burners.
- Ensure that the equipment is cool before using any aerosol spray, as the presence of heat could cause it to corrode or light the equipment on fire.
Beware of Flashback

Spiders and small insects occasionally spin webs or make nests in the grill burner tubes during transit and ware housing. These webs can lead to gas flow obstruction, which could result in a fire in and around burner tubes. This type of fire is known as "flash-back" and can cause serious damage to your grill and create an unsafe operating condition for the user. Although an obstructed burner tube is not the only cause of flashback, it is the most common cause.
To reduce the likelihood of flashbacks, you must clean the burner tubes before assembling your grill, and at least once a month in late summer or early fall when spiders are most active. Also perform this burner tube cleaning procedure if your grill has not been used for an extended period of time. A clogged tube can lead to a fire beneath the grill.
Proper Placement And Clearance Of Grill

- Never use the gas pizza oven in a garage, porch, shed, breezeway, or any enclosed area. This pizza oven is only for outdoor use.
- Do not install this unit under combustible enclosures, tents, or similar structures.
- Do not use this appliance under over head combustible surfaces. This outdoors gas pizza oven is not intended to be installed in or on recreational vehicles and/or boats.
- Maintain a minimum distance of 24 inches (61cm) on all sides of the unit and the nearest combustible object.
- Do not obstruct the flow of ventilation air around the gas pizza oven housing.
- Only use the regulator and the hose assembly supplied with your gas grill. Replacement regulators and hose assemblies must be those specified in this manual.
- The regulator and hose assembly must be inspected before each use of the grill. The hose used should not exceed 1.5 cm diameter, if there is excessive abrasion or wear or if the hose is cut, it must be replaced prior to the grill being put into operation. The replacement hose assembly shall be that specified by manufacturer. Please contact support@razorri.com for more details if needed.
- Pressure regulator and hose assembly supplied with the outdoor cooking gas appliance must be used. Never substitute other types of regulator. Contact customer service for manufacturer specified replacement parts.
- Do not use briquettes of ane kind in the grill. Adding briquettes can damage ignition components and knobs and void the warranty.
- The gas pizza oven is designed for optimum performance without the use of briquettes. Do not place briquettes on the radiant as this will block off the area for the grill burners to vent.
- Keep the back and side cart free and clear from debris. Keep any electrical supply cord or the rotisserie motor cord away from the heated areas of the grill.
- Never use the gas pizza oven in extremely window conditions. If located in a consistently window area (ocean front, mountain top, etc.) a windbreak will be required. Always adhere to the specified clearance.
- Never use a dented or rusty propane tank.
- Keep any electrical supply cord and the fuel supply hose away from a heated surface.
- Keep your face and hands a safe distance from the grill when working.
- Burner adjustment should only be performed after the burner has cooled.
Do not step over the propane hose, always walk around it. Stepping over the fuel hose may cause tipping of the gas cylinder.
Gas Requirements
GasTank Specifications

- All L.P. gas cylinders used with this appliance shall be constructed and marked in as 18 inches high. The maximum fuel capacity is 80% and is approximately 20 pounds of propane.
- The L.P. cylinder must have a shut off valve (see picture) terminating in a Type 1 L.P.

- A Type 1 compatible cylinder with a Type1 cylinder valve has a back check valve which does not permit gas flow, until a positive seal has been obtained.
- The cylinder must be arranged for vapor withdrawal. It must also include a collar to protect the cylinder valve. A safety relief device having direct communication with the vapor space of cylinder must be provided. This will expel high pressure gas if the cylinder is overfilled or overheated which could result in fire or explosion.
- All L.P. gas cylinders used with this appliance shall be constructed and marked in accordance with the specifications for L.P. gas cylinders of the US Departmentof Transportation (DOT) or the National Standard of Canada, CAN/CSA-8339, Cylinders, Spheres and Tubes for Transportation of Dangerous Goods, and commission, as applicable; and shall be provided with a listed overfilling prevention device.
- Read labels on the L.P. Gas Supply Cylinder.
- New cylinders are always shipped empty for safety.
- Allow only qualified L.P. gas dealers to fill or repair your L.P. gas supply cylinder.
- Inform the gas dealer if it is a new or used cylinder to be filled.
- After filling, have the gas dealer check for leaks and to see that the relief valve remains effective and in good condition.

Hose and Regulator (Included with the Oven)
TheType 1 connection system has the following features:

- The system will not allow gas to flow until a positive connection has been made.
The cylinder control valve must be turned off LB before any connection is made or removed.
- The system has a thermal element that will shut off the flow of gas in the event of a fire.
- The system has a flow limiting device which, when activated, will limit the flow of gas to 10 cubic feet per hour.
- NEVER use gas pizza oven without leak testing this connection.
LP(Propane) Gas supply Connection
- The tank valve should be in the "OFF"position. If not, turn the knob clockwise until it stops.
- Make sure all burner valves are in the "OFF" position.
- Always connect the gas supply regulator as follows: Insert the regulator inlet into the tank valve and turn the coupling nut clockwise until the coupler tightens up (see picture).
![]()
Do not over-tighten the coupler. Turn the main tank valve on, and turn the burner control valves on. - The outdoor cooking gas appliance must be isolated from the gas supply piping system by closing its individual manual shut off valve during any pressure testing of the gas supply piping system at test pressures equal to or less than 1/2 psi {3.5kPa}. Rotate the knob to the "HIGH"position for about 20 seconds to allow the air in the system to purge before attempting to light the burners.

Pre-operation Leak Testing
- Do not insert any tool into the valve outlet or safety relief valve. Youmay damage the valve and cause a leak. Leaking propane may result in explosion, fire, severe personal injury, or death.
- If a leak is detected at any time, or you cannot stop a gas leak, immediately close the tank's shut-off valve (gas supply from LP tank to the gas pizza oven) and call LP gas supplier or your fire department.
- Check all gas supply fittings before each use and each time the gas supply cylinder is connected to the regulator. Have a qualified service technician leak test the gas pizza oven any time a part of the gas system is replaced.
Never attempt to attach this gas pizza oven to a self contained LP gas system. Do not use the gas pizza oven until leak testing has been completed.
Leak Testing for Valves, Hose and Regulator
- NEVER smoke while leak testing.
- Extinguish all open flames. Never leak test with an open flame.
- Mix a solution of equal parts mild detergent or liquid soap and water.
- Turn control knobs to OFF.
- Ensure that the connections from the regulator to the gas pizza oven and tank are tight and secure (see picture).

- Completely open LP tank valve by turning cylinder valve knob counterclockwise (right to left). If you hear a rushing sound, turn gas off immediately. There is a major leak at the connection.
- If no rushing sound, brush soapy solution onto areas where bubbles are shown in LP tank (see picture).
- If "growing" bubbles appear, there is a leak. Close LP tank valve immediately and re-tighten connections.
- Always close LP tank valve after performing leak test by turning cylinder valve knob clockwise.

NOTE: When doing leak testing this appliance, make sure to tighten and test all loose connections. A slight leak in the system can result in a low flame, or a hazardous condition that could result in a fire or explosion.
LP Gas Supply Cylinder Disconnection
In order to disconnect the LP tank from the gas pizza oven.
- Turn the burner valves off.
- Turn the tank valve off. (Turn shut-off clockwise to stop).
- Detach the regulator assembly from the tank valve by turning the quick coupling nut counter clockwise.
LPTank Removal, Transportation and Storage

- Turn OFF all control knobs and LP tank valve. Turn coupling nut counterclockwise bv hand only do not use tools to disconnect. Install safety cap onto LP tank valve. Always use cap and strap supplied with valve. Failure to use safety cap as directed may result in serious personal injury and/or property damage.
- Place dust cap on cylinder valve outlet whenever the cylinder is not in use. Only install the type of dust cap on the cylinder valve outlet that is provided with the cylinder valve. other types of caps or plugs may result in leakage of propane
- Never leave a LP tank inside a motor vehicle. (Heating of the vehicle could cause an increase in the gas pressure which may open the valve allowing gas to escape resulting a serious risk of fire or explosion.)
- Do not store an LP tank in enclosed spaces such as a carport, garage, porch, covered patio or other building.
- Do not store LP tank in an area where children play.
LPTank Exchange
- Exchange your Type1cylinder for OPD safety feature-equipped replacement tank ONLY.
- Always keep new and exchanged LP tanks in upright position during use, transit or storage. Leak test new and exchanged LP tanks BEFORE connecting to gas pizza oven.
- Never connect the gas oven to an unregulated gas supply.
Operating the Gas Oven
- Failure to open the lid prior to igniting the barbecue s burners, or not waiting 5 minutes to allow the gas to clear if the barbecue does not light, may result in an explosive flame up which can cause serious injury or death.
- NEVER use the grill if gas odor is present.
- NEVER stand with head, body, or arms over the grill when lighting.
- ALWAYS inspect the hose before using the grill. If there is excessive abrasion or wear, or if the hose is cut, it must be replaced prior to the outdoor cooking gas appliance being put into operation. The replacement hose assembly shall be that specified bv the manufacturer.
- ALWAYS ensure the area around the barbecue is clear of flammable substances such as gasoline, yard debris, wood, etc.
- ALWAYS ensure there is no blockage of the airflow through the vent space located below the face of the unit.
Install Propane Tank

- Locking screw
- Tank tray
- 20 lb LP gas fuel tank tray
- This grill is equipped with a LP tank (not supplied).
- Grill tank tray is compatible with most of the propane tank in the market. The LP tank must be mounted and secured.
- Open both cabinet doors and - Loosen the tank tray locking screw, then put LPtank into the tank tray under the grill.
- Tighten the locking screw clockwise against the bottom collar of the propane tank to secure the tank (detailed info please see above picture - LP Tank Installation Layout)
![]()
Cylinder must be arranged to provided vapor withdraw.
- For easy installation, the tank liquid withdrawal valve is suggested to face right side.

Preparation
Before beginningassembly, make sure all parts are present. Compare parts with package contents list and diagram above. If any part is missing or damaged, do not attempt to assemble the product. contact customer service for replacement parts.
- Estimated Assembly Time: 10 minutes
- Tool Required for Assembly: screwdriver (not included) and wrench (not included)
![warning]() Note: The right and left sides of the grill are designated as if you are facing the front of the grill.
Note: The right and left sides of the grill are designated as if you are facing the front of the grill.
Parts List


Assembly Instructions
- Open the Main Lid, take out the Round stone (7), Cooking Grid (8), and Flame Tamer (9) from the bottom of the oven.

Fig.1
- Installing the Support Legs
Install the 4 pcs Support Legs(6)to the oven bottom with 12 pcs 1/4"*L12 Hex Bolts(5) bv tightening in a clockwise direction.

Fig.2
- Installing the Handles
- Install 2 pcs Main Lid Handle(2) on each side of Main Lid, then install 1 pc Main Lid Handle(2) on the door.
- Use 4 pcs 1/4"*L12 Hex BoIts(5) t o install 2 pcs Bottom SideHandle(3) on each side of the Bottom and tighten them in a clockwise direction.

Fig.3
- Putting the Flame Tamer(9), CookingGrid(8), and Round stone(7) into the oven

Fig.4
- Installing the Oil Drip Pan(4) in the bottom of the oven.
Slide the Oil Drip Pan(4) in from the rear of the unit.

Fig.5


Instructions For Use
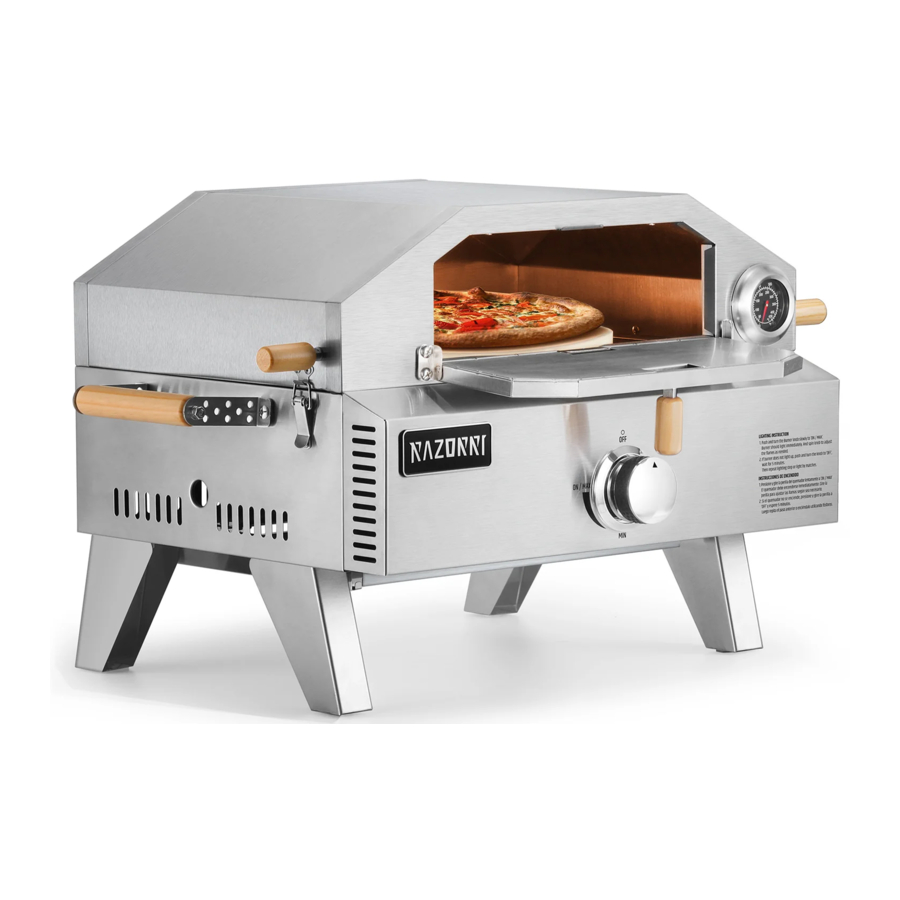
Lighting Instruction
- Push and turn the burner knob slowly to 'ON/ MAX'
![]()
The burner should light immediately. Turn the knob to adjust the flames as needed. - If the burner does not light up, push and turn the knob to 'OFF', wait 5 minutes, then repeat the previous lighting step or light with matches.
- If you need to adjust the flame when it's working:
Turn the knob to adjust the flames. You can check the flame level via the flame observation hole on the right side.

Note: Due to the heat condition difference, the temperature inside the oven may have a 70ºF-125ºF difference with the thermometer. It's recommended to use an infrared thermometer to measure temperature more accurately.
Steps for cooking Pizza

- Place the Round stone inside on the Cooking Grid.
- Close the door and pre heat the oven to 580ºF, then put the pizza on the Round stone.
- When baking pizza, please do not open the Main Lid. It must remain closed to maintain even heat.
- Open the Door after 60-90 seconds to rotate the direction of the pizza and ensure even cooking. It takes approximately 3 minutes to finish baking a pizza.
Notes for Barbecue

- When barbecuing or grilling, place the cooking Grid as shown and remove the Round stone.
- It's recommended to pre-heat the oven to 400ºF before barbecue. During barbecue, the Main Lid needs to open.
Warranty Information
How to request warranty services?
To obtain the benefit of this warranty, please leave a message online (https://razorri.com/pages/contact-razorri), or send an email to support@razorri.com.
What will RAZORRI do?
- Repair the item.
- Replace the item if not repairable.
- Refund the item under certain circumstances.
Documents / Resources
References

Download manual
Here you can download full pdf version of manual, it may contain additional safety instructions, warranty information, FCC rules, etc.
Advertisement


Need help?
Do you have a question about the PZ12A and is the answer not in the manual?
Questions and answers