Table of Contents
Advertisement
Quick Links
Advertisement
Table of Contents

Related Manuals for JAVS RecorderDeck

Summary of Contents for JAVS RecorderDeck
- Page 1 RecorderDeck User Reference & Setup Guide 1.3...
-
Page 2: Table Of Contents
Setting the IP Address from the Front Panel ........................12 Step 5: Set the IP Address in the Global Client Configuration Editor ................13 Step 6: Create a New JAVS Site & Location ..........................13 Step 7: Register Your Device ................................14 Step 8: Creating New Users ................................. -
Page 3: Introduction
RECORDERDECK & SUITE 8 Suite 8 integrates tightly with the JAVS RecorderDeck, allowing a user to take advantage of the entire JAVS software suite for whatever their recording needs. With Suite 8, professionals can create, manage, publish, and view the complete, permanent record of typical meeting scenarios, including courtroom proceedings, business meetings, and classroom settings. -
Page 4: Technical Features
USB Outputs The JAVS Audio Mixer provides up to 6 USB output channels for recording or other audio purposes. This not only allows you to have a visual indicator of which person is speaking at any time, but it also allows you to mute channels on playback to clearly hear what an individual is saying, even when people talk over one another. - Page 5 Instead of turning microphones on and off, the Automatic Gain Sharing in each JAVS Audio Mixer will automatically increase the gain of any microphones that are active and reduce the audio gain of any microphone that is not active, producing the same effect as turning microphones on and off, but eliminating any clipping noises that might destroy the integrity of the recording.
- Page 6 Optional Video Support via USB The RecorderDeck now supports the incorporation of video input via USB. HDMI or HD/SDI camera video can be captured using the following Magewell Capture devices: Magewell USB Capture HDMI Gen 2 • Magewell USB Capture SDI Gen 2 •...
-
Page 7: Hardware
HARDWARE Each RecorderDeck will come with the following: RecorderDeck Power cord and power source 4-6 JM14 Microphones 4-6 PLX-CB Mic Strands 4-6 15-foot ethernet cables Page 7 of 26... -
Page 8: Installation & Setup
5. When downloading SiteManager, it is highly recommended that you check the “Create A Start Menu Icon for the Global Client Configuration Editor” checkbox. 6. When downloading each software component, a JAVS Setup Wizard will guide you through the process, allowing you to choose the appropriate settings for your room. -
Page 9: Step 2: Install The Recorderdeck Configuration Tool
2. Click the downloaded file and a dialogue box will open asking, “Do you want to allow this app to make changes to your device?” Select Yes. 3. On the Select Folder window, accept the default installation of JAVS (unless you have need or reason to use a different location). The default is highly recommended. -
Page 10: Step 3: Hardware Setup
• assistive listening, camera input, or presentation monitor. 3. The Network connection via CAT5 or CAT6 Ethernet cable should run from the Network port on the RecorderDeck to your local network source. When applicable, the Ethernet cable can be run directly from a Network port to an ethernet port on your laptop •... - Page 11 Page 11 of 26...
-
Page 12: Step 4: Define The Ip Address
RecorderDeck will display the location name in place of the IP Address once it has been configured through SiteManager. You can locate your RecorderDeck’s IP Address at any time by using the RecorderDeck menu via the front panel. The default IP Address for the RecorderDeck is 192.168.10.110. -
Page 13: Step 5: Set The Ip Address In The Global Client Configuration Editor
1. Log into SiteManager. 2. Because this is a new installation, you will immediately see the JAVS New Location Wizard pop-up showing the message “There are currently no locations for the database. Please follow this wizard to add a Site and Location to this database.”... -
Page 14: Step 7: Register Your Device
1. In the Register Device Wizard, you will be prompted to register a Centro or a Recorder. Choose Register Recorder, then select Next. 2. You will be prompted to add the Device IP Address. Add your RecorderDeck IP Address, then select Next. -
Page 15: Step 8: Creating New Users
Checking the Account Disabled checkbox will prevent the user from logging in to any of the JAVS software. • Do not check this box unless you do not intend for the user to access any of the JAVS Suite 8 applications. •... - Page 16 6. The screen below will appear if you select the Group Security Rights selection in the navigation pane. From here you can see the rights each security group has enabled, denoted by a checked box next to each right. • Note that you cannot edit these rights.
-
Page 17: Step 9: Configuring Optional Video
2. Click on the Recording tab in the editor view as outlined below. 3. Make sure you have the Magewell device connected to one of the USB inputs on the back of the RecorderDeck. 4. The Magewell device should display as a discovered option in the pull-down for Video Source Device. Select the installed device. -
Page 18: Testing & Configuring The Recorderdeck In Suite 8
3. Press the + next to your location to display the Mixer and Recorder. 4. Click on Mixer below the Location and then press Launch Mixer Control. 5. The RecorderDeck Configuration Tool will open. In the RecorderDeck Configuration Tool, you will be able to control inputs, outputs, gain levels, and other RecorderDeck settings. -
Page 19: Recorder Deck Configuration Tool
RECORDER DECK CONFIGURATION TOOL The RecorderDeck Configuration Tool allows you to adjust gain, attenuation, input, outputs, and a variety of settings for the RecorderDeck. INPUTS TAB (1) Microphone screen selection button. (2) Audio VU Meter: Represents real time audio levels. -
Page 20: Outputs Tab
OUTPUTS TAB (1) Output Selection buttons: Once an output is selected that button will then turn grey. (2) Mute Toggle: Switches an input to an ON (unmuted) / OFF (muted) state. (3) Attenuation Slider: Ranges from -45 dB to 0 dB. (4) Attenuation Level: Displays the current input level for the selected output. -
Page 21: Application Settings
The Inputs section allows for enabling and disabling of physical inputs as well as input configuration. Disabling an input differs from muting in that the input cannot be unmuted. When configured for “JAVS Mic”, Microphone Pattern, Button Action, and Record Status can be configured. Any changes must be saved / uploaded to RecorderDeck before they take effect. -
Page 22: Outputs Tab
The Outputs section enables configuration of outputs to be mutable and allows USB audio to be routed to the specified output. The Global mute setting is only used when RecorderDeck is being used with JAVS Suite 8 software. Any changes must be saved / uploaded to RecorderDeck before they take effect. -
Page 23: Advanced Settings
Any changes must be saved / uploaded to RecorderDeck before they take effect. (1) Record LED Color: Selects the color- either Red or Green- used to indicate recording on JAVS JM-14 Microphones. (2) Brightness: Changes the Record LED brightness on the JAVS JM-14 microphones. -
Page 24: Additional Settings
ADDITIONAL SETTINGS Low Pass Filter: The JAVS Audio Device includes the ability to configure a low-pass filter (LPF) for each audio input. The LPF passes signals with a frequency lower than the selected cutoff frequency and attenuates signals with frequencies higher than the selected cutoff frequency. -
Page 25: Firmware Tab
FIRMWARE TAB This section allows for the update of RecorderDeck firmware as well as display of the current firmware version. UPDATING FIRMWARE 1. Click Browse to search for the firmware file (.bin extension). 2. Once file has been loaded, click the Update button. -
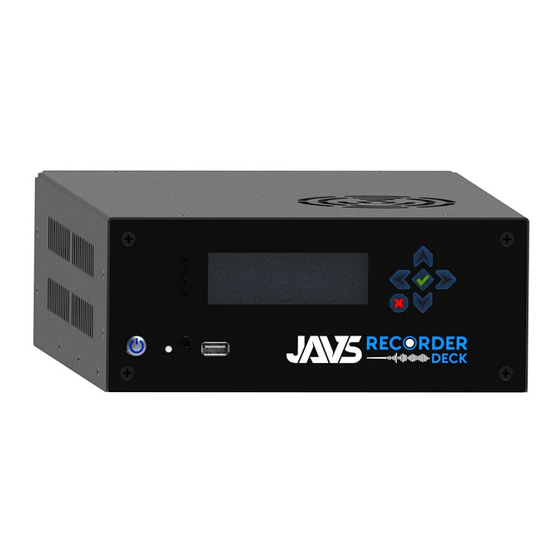
Page 26: Lcd Menu & Front Panel
You can control recording Sessions directly from the front panel of the RecorderDeck using the arrow buttons, the green checkmark, and red X. When the RecorderDeck is powered on but not recording, the LCD Menu will read “Not Recording” at the top and your room Location will be displayed below.
Need help?
Do you have a question about the RecorderDeck and is the answer not in the manual?
Questions and answers