Table of Contents
Advertisement
Quick Links
WARNING:
To reduce the risk of injury to persons
- FOR RESIDENTIAL USE ONLY
- INSTALL ON SECTIONAL DOORS WITH TORSION SHAFT AND SPRINGS ONLY
Owner's Manual
Please read and understand this manual and safety instructions carefully before installation.
• Please read and understand this manual and safety instructions carefully before installation.
• The Opener WILL NOT CLOSE until the Photo Eye Safety System and Cable Tension Monitor is properly installed and aligned.
The Opener WILL NOT CLOSE until the Photo Eye Safety System is properly installed and aligned.
• REGULARLY CHECK and TEST the Opener according to the safety label to ENSURE SAFE OPERATION.
REGULARLY CHECK and TEST the Opener according to the safety label to ENSURE SAFE OPERATION.
• If using the unattended operation feature, use ONLY with sectional doors.
• Retain this manual for future reference.
Retain this manual for future reference.
• This product should only be installed by a trained garage door technician.
• Adjustments to door springs or track may be required.
• This product should not be used on garage doors with extension springs, outside pickup drums or low-headroom tracks.
• *In California: To be in compliance with CA SB-969, this operator must be installed with the backup battery kit, STDBBUKIT.
Serial # __ __ __ __ __ __ __
Located on label on top of your opener.
The illustrations used in this instruction manual may differ from the actual product you have purchased.
GDO Manual Revised: 05-24
Date Installed __ __ /__ __ /__ __ __ __
Date Installed __ __ /__ __ /__ __ __ __
MODEL 928V
Works with the beam
Smart Controller
Advertisement
Table of Contents

Related Manuals for Guardian 928V


Summary of Contents for Guardian 928V
- Page 1 MODEL 928V WARNING: To reduce the risk of injury to persons - FOR RESIDENTIAL USE ONLY - INSTALL ON SECTIONAL DOORS WITH TORSION SHAFT AND SPRINGS ONLY WARNING: To reduce the risk of injury to persons - Use this operator only with Residential Sectional Garage doors.
-
Page 2: Table Of Contents
Table of Contents Inventory Symbols and Icons Inventory Tools Needed Prepare Your Garage Door Safety Instructions Assembly Assembly Installation Installing Door Lock Installing Cable Tension Monitor Wiring Connecting Photo Eye Safety System Connecting Deluxe Door Control Console Motion Activated Security Lighting Connecting Power Adjustment Aligning the Photo Eye Safety System... -
Page 3: Inventory
6. Manual Release Cord 7. Mounting Bracket 8. Cable Tension Monitor 9. Door Lock 10. Manual 11. Template GU-LOCK MODEL 928V DRILL 5/16” DRILL 3/4” DRILL 5/16” Hardware Needed INSTALLATION HARDWARE, LOCATED IN HARDWARE BAG* (SHOW ACTUAL SIZE 1:1) Lag Screw Dowel 1-3/8’’... -
Page 4: Prepare Your Garage Door
Prepare Your Garage Door PREPARE for installation This operator is compatible with the following doors: - Sectional doors up to 14 feet (4.3 m) high. LEARN - Sectional doors up to 18 feet (5.5 m) wide. FORCE DOWN - Doors with 1” diameter torsion bar and torsion springs with 4” to 6” drums. DOWN CABLE MONITOR... -
Page 5: Safety Instructions
Safety Instructions WARNING To reduce the risk of severe injury or death: 1. READ AND FOLLOW ALL INSTALLATION INSTRUCTIONS. 2. Install only on a properly balanced garage door. An improperly balanced door has the potential to inflict severe injury. Have a qualified service person make repairs to cables, spring assemblies, and other hardware before installing the opener. -
Page 6: Assembly
Assembly WARNING To prevent possible SERIOUS INJURY or DEATH, the collar MUST be properly tightened. The door may NOT reverse correctly or limits may be lost due to collar slip. 1. Attach collar to the drive shaft assembly, align one of the set screws to the drive shaft hole. Notice that the side of the collar with the larger hole must be placed on the drive shaft, seated all the way on drive shaft assembly. - Page 7 Assembly WARNING To prevent possible SERIOUS INJURY or DEATH: - Concrete anchors MUST be used if mounting bracket into masonry. - Never try to loosen, move or adjust garage door, springs, cables, pulleys, brackets or their hardware, ALL of which are under EXTREME tension. - ALWAYS call a trained door systems technician if garage door binds, sticks or is out of balance.
-
Page 8: Installing Door Lock
Installing Door Lock The automatic door lock (GU-LOCK2) prevents manual operation of the door when fully closed. 1. The lock must be mounted on the same side as the Opener and within 10 ft (3.05m) max of the operator. Measure 3 in. above the second roller from the bottom. -
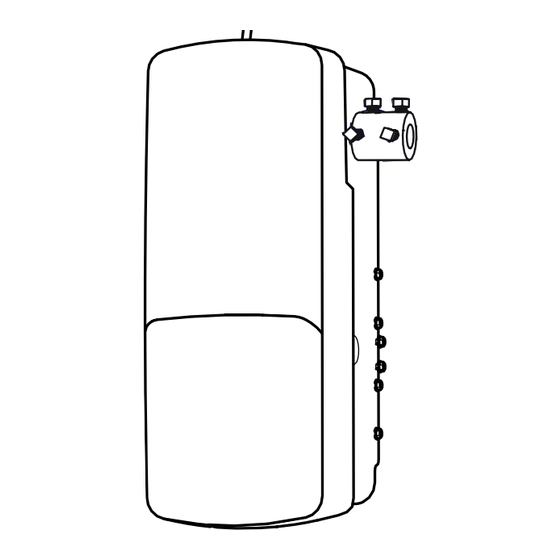
Page 9: Installing Cable Tension Monitor
Installing Cable Tension Monitor Note: Cable tension monitor is shipped for right side installation. If installed on the left side, remove the e-ring at the end of the roller, remove the roller and reassemble on the opposite side. 1. Position cable tension monitor above the door and close to the drum. 2. -
Page 10: Connecting Photo Eye Safety System
Connecting Photo Eye Safety System WARNING To prevent possible SERIOUS INJURY or DEATH: - Power MUST NOT be connected BEFORE Photo Eye Safety system is connected and aligned. - The Opener will not operate until the Photo Eye Safety System is properly connected and aligned. - Install the Photo Eyes NO higher than 6”... -
Page 11: Connecting Deluxe Door Control Console
Connecting Deluxe Door Control Console WARNING To prevent possible SERIOUS INJURY or DEATH. - Power MUST NOT be connected until instructed. To prevent SERIOUS INJURY or DEATH from using the Deluxe Door Control Console and a closing door: - Install the Deluxe Door Control Console or Push Button within sight of the door at a minimum height of 5 feet (1.5m) above the floor. -
Page 12: Motion Activated Security Lighting
Motion Activated Security Lighting Using the Deluxe Door Control ONLY after Installation is completed. Buttons Operation Door - Press and release to open/close the door. Light -- Press and release to turn the courtesy light on / off. Press and hold the light button for 2s to activate / deactivate motion sensing security lighting. -
Page 13: Connecting Power
Connecting Power WARNING To prevent possible FROM ELECTROCUTION or FIRE: - Power MUST be DISCONNECTED BEFORE proceeding with permanent wiring procedures. - Garage Door Opener installation and wiring MUST be in compliance with all local electrical and building codes. Make sure the Opener is ALWAYS grounded. - NEVER use an extension cord, 2-wire adapter or modify the power plug in any way to make it fit the outlet. -
Page 14: Travel Limit Adjustment Up
Travel Limit Adjustment UP WARNING To prevent SERIOUS INJURY or DEATH from improper Force Adjustment: - DO NOT adjust force manually to compensate for binding or sticking of the garage door. Call a qualified garage door service technician to make necessary adjustments in case of binding. - DO NOT manually increase the force required for closing the door. -
Page 15: Travel Limit Adjustment Down
Travel Limit Adjustment DOWN WARNING To prevent SERIOUS INJURY or DEATH from improper Force Adjustment: - DO NOT adjust force to compensate binding or sticking of the garage door. Call a qualified garage door service person to make necessary adjustments in case of binding. - DO NOT increase force beyond minimum force required for closing the door. -
Page 16: Auto Force Adjustment
Auto Force Adjustment WARNING To prevent possible SERIOUS INJURY or DEATH: - DO NOT adjust force to compensate binding or sticking of the garage door. Call a qualified garage door service technician to make necessary adjustments in case of binding. - DO NOT increase force beyond minimum force required for closing the door. -
Page 17: Final Adjustment And Testing
Final Adjustments and Testing WARNING To prevent SERIOUS INJURY or DEATH from a closing garage door: - The Safety Reversal Test MUST be conducted ONCE A MONTH. - NO ONE should cross the path of and moving door during operation and / or testing. - After ANY adjustments to the door system, the Safety Reversal Test MUST be performed to ensure the door reverses on contact with a 1-1/2 inch (3.8 cm) thick (2x4 laid flat) object. -
Page 18: Programming Remote Controls
Programming Remote Controls WARNING To prevent possible SERIOUS INJURY or DEATH: - Keep remote control and battery out of reach of children. - NEVER permit children to access the Deluxe Door Control Console or Remote Controls. - Operate the door ONLY when it is properly adjusted, and there are no obstructions present. - ALWAYS keep a moving door in sight until completely closed. -
Page 19: Important Safety Instruccions
Important Safety Instructions IMPORTANT SAFETY INSTRUCTIONS WARNING To reduce the risk of severe injury or death: 1. READ AND FOLLOW ALL INSTRUCTIONS. 2. Never let children operate or play with door controls. Keep the remote control away from children. 3. Always keep the moving door in sight and away from people and objects until it is completely closed. -
Page 20: Operating The Opener
Operating the Opener WARNING To Prevent SERIOUS INJURY or DEATH: - READ AND FOLLOW ALL INSTRUCTIONS AND WARNINGS IN THE OWNER’S MANUAL AND LABELS. - Keep Remote Control and battery out of reach of children. - NEVER permit children to access the Door Control Console, Push Button or Remote Controls. - Operate the door ONLY when it is properly adjusted, and there are no obstructions and is in clear sight. - Page 21 Operating the Opener WARNING To prevent SERIOUS INJURY or DEATH: - Use emergency release to disconnect the motor ONLY when the door is CLOSED to prevent unexpected rapid falling in case of a unbalanced / poor-conditioned door. - Use emergency release ONLY when doorway is clear of persons and obstructions. - DO NOT use emergency release to pull the door open or closed.
-
Page 22: Beam Smart Controller Installation
beam Smart Controller Installation (Optional) WARNING To reduce the risk of INJURY to persons: - Disconnect ALL electric power BEFORE performing ANY service or maintenance. - Operate the door ONLY when it is properly adjusted, and there are no obstructions present. - Use this Smart Garage Door Controller only with Residential Sectional Garage Doors. -
Page 23: Installing Battery Backup
To reduce the risk of FIRE or INJURY to persons: - Disconnect ALL electric and battery power BEFORE performing ANY service or maintenance. - Use ONLY Guardian part for replacement battery. - DO NOT dispose of battery in fire. Battery may explode. Check with local codes for disposal instructions. -
Page 24: Maintenance And Troubleshooting
(Refer to pages 14-16 to reset the travel limits & travel force). SYMPTOM: During limit learn mode, if door travels only 1” to 28” then stops. • Check RPM encoder connections or replace RPM encoder (call service tech). Please contact Guardian Tech Support for further assistance. www.adhguardianusa.com 24... - Page 25 The door is obstructed during travel (Refer to pages 14-16 to reset the travel limits and the travel force). Please contact Guardian Tech Support for further assistance. SYMPTOM: Door travels 1” to 12” then stops, and beeps 25 times • Remove soft settings by pressing the LIMIT and FORCE BUTTONS simultaneously for 2 seconds and reset Up / Down and Force limits.
-
Page 26: Replacement Parts
Replacement Parts Name/Description Part number B5A928 12V, 5Ah Battery, Enclosure & Hardware Kit GUAT-201 Photo Eyes Remote Control 3-FDCC Deluxe Door Control Console GUDT-354 Collar GUDT-355 Mounting Bracket GU-CTM Cable Tension Monitor GU-LOCK2 Door Lock GUDT-358 Emergency Release Cord with Knob 10 GUDT-360 Hardware Bag 11 GUTD-359... -
Page 27: Opener Assembly Parts
Opener Assembly Parts Part number Name/ Description Part number Name/ Description 1 GUDT-398 Control Panel Cover 12 GUDT-381 Button Membrane 2 GUDT-367 Light Lens 13 GUDT-382 Battery Backup Connector/ Terminal 3 GUDT-397 Chassis Cover 14 GUDT-383 LED Driver Board 4 GUDT-369 Chassis 15 GUDT-384 Drive Sprocket... -
Page 28: Warranty
Your operator has been installed by a professional installation specialist. If service information is required please contact the installing company or your local Guardian dealer. Look for your Guardian dealer on line, in the yellow pages or call our service number for a dealer near you.
Need help?
Do you have a question about the 928V and is the answer not in the manual?
Questions and answers