Advertisement
Advertisement
Table of Contents

Related Manuals for Kogan KAESCOFFGRA


Summary of Contents for Kogan KAESCOFFGRA
- Page 1 ESPRESSO BARISTA PRO COFFEE MACHINE AND GRINDER KAESCOFFGRA...
-
Page 2: Table Of Contents
Safety & Warnings Overview Before First Use Operation Cleaning & Care Troubleshooting Notes... -
Page 3: Safety & Warnings
• Remove the plug from the electrical outlet before cleaning and when not in use. Always turn the switch off first and hold the plug; never pull the cord. • If the cord or plug is damaged, cease use immediately and contact help.Kogan.com for support. - Page 4 • This appliance is intended to be used in household and similar environments such as: Staff kitchen areas in shops, offices, and other working environments. Farmhouses. By clients in hotels, motels, and other residential type environments. Bed and breakfast type environments. •...
-
Page 5: Overview
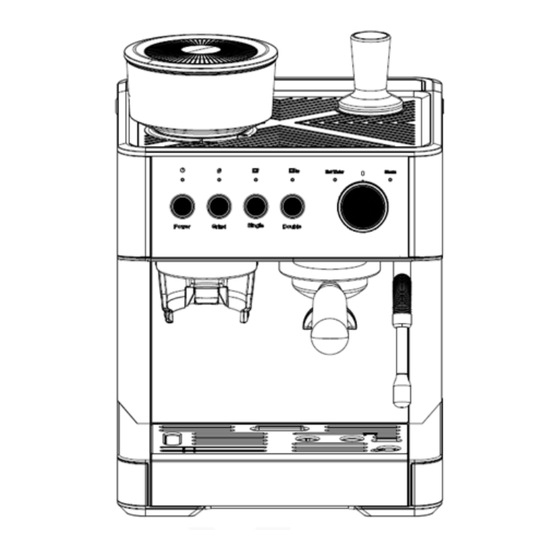
OVERVIEW Hopper Tamper Cleaning pin Cleaning brush Filter Cutter head Portafilter Water tank Steam tube Machine body Drip tray Milk pitcher... - Page 6 Tamper Hopper Single cup button Power button Knob Double cup button Grind button Indicators Hot water Centre Steam...
-
Page 7: Before First Use
BEFORE FIRST USE Ensure all components are included and not damaged. Fill the water tank with clean water. The water level should not exceed the ‘MAX’ mark in the tank. Insert a single cup or double-cup filter into the portafilter. Align the filter with the portafilter (do not add coffee yet) and rotate the portafilter anti-clockwise to lock it in place. -
Page 8: Operation
OPERATION Install the Grinder Insert the cutter head into the coffee machine and tighten it clockwise. Then, place the hopper on top. Hopper Cutter head Align the hopper with the grooves in the coffee machine. Press the hopper down and rotate it clockwise to install it. - Page 9 Grind Size • To ensure the coffee grounds are consistent and create high-quality coffee, adjust the grinding degree on the hopper according to the type and quality of the coffee beans. • There are markings on the hopper to indicate the size of the coffee grounds. Slower Faster Extraction...
- Page 10 Modes Preheat Mode: • Press the power button to turn the coffee machine on and enter preheat mode. • The power indicator will flash slowly as the coffee machine is preheating. Standby Mode: • When the coffee machine has preheated, it will enter standby mode. •...
- Page 11 Press the ‘Grind’ button once for single cup grinding and twice for double cup grinding. Grinding will automatically stop after reaching the set grind amount (9 seconds for single cup and 13 seconds for double cup). Remove the portafilter from the portafilter bracket and softly tap it on the benchtop to evenly distribute the ground coffee.
- Page 12 Boil Hot Water Place a cup under the steam tube. Turn the knob to ‘Hot water’. The hot water indicator will flash, and hot water will flow out from the steam nozzle. Turn the knob back to the centre to stop the hot water. The hot water indicator will turn solid, and the coffee machine will enter standby mode.
- Page 13 Coffee Machine Settings Grind Time Ensure the hopper is installed correctly and filled with the appropriate amount of coffee beans. To adjust the single cup grinding amount, press and hold the ‘Grind’ button until the grind indicator starts to flash, and the grinder starts to work. Release the ‘Grind’...
- Page 14 Double cup: Press and hold the power button and the ‘Double’ button. The double cup indicator will flash twice, and other indicators will switch off. The buzzer will sound for approximately 1 second when the factory coffee amount is restored, and the coffee machine will enter standby mode. Standby Time Press and hold the ‘Grind’...
-
Page 15: Cleaning & Care
CLEANING & CARE WARNING: Unplug the coffee machine before cleaning to allow it to cool down sufficiently to prevent scalding. Do not immerse the coffee machine or the power cord in water or other liquids. • After each use, clean all detachable parts, including the portafilter, with water and detergent if necessary. - Page 16 Cleaning the Grinder Rotate the hopper anti-clockwise to remove it. Turn the grinding wheel anti-clockwise to remove it. Use the provided cleaning brush to clean the grinding wheel and remove any residual coffee grounds. Do not rinse the grinding wheel with water. Use the provided cleaning brush to clean the grinding chamber and the coffee- dispensing channel.
- Page 17 Descaling Preparation: Step 1: Add the chosen solution to the water tank. • Add the descaling tablets to the water tank and wait for them to dissolve. • Add half a cup of liquid descaler into the water tank. Then, add 1L of warm water to allow the solution to mix thoroughly.
- Page 18 Start Descaling: After completing the above steps, you can start the descaling process as follows: Step 1: Start the descaling program. In standby mode, press and hold the ‘Grind’, ‘Single’ and ‘Double’ buttons for 5 seconds to start the descaling process. The power indicator will flash, and the hot water and steam indicators will illuminate solidly, and the single cup and double cup indicator will turn off.
- Page 19 Step 3: Finish the descaling program. Turn the knob to ‘Hot water’. The hot water indicator will flash. The pump will start to operate and hot water will dispense from the coffee outlet and steam tube. When hot water dispensing stops, the power and hot water indicators will flash, the power and grind indicators will illuminate solidly, and the single cup and double cup indicators will turn off.
- Page 20 Toolbox • The coffee machine is equipped with a toolbox where the cleaning pin and cleaning brush are stored. The single cup and double cup filters can be stored in the toolbox as well. • The toolbox is located on the lower left corner of the coffee machine and can be seen by removing the drip tray.
- Page 21 Cleaning Brush: The cleaning brush is used for cleaning the grinding system. Clean the grinding chamber and the coffee-dispensing channel. The other end of cleaning brush can be used to remove the filter from the portafilter.
- Page 22 Coffee Tamper: The edge of the tamper will align to the edge Tamp the coffee grounds downwards. of portafilter when the correct amount of coffee grounds is in the portafilter.
-
Page 23: Troubleshooting
TROUBLESHOOTING Problem Possible Cause Solution Ensure the power plug is properly The indicators are not connected to the electrical outlet No power. illuminating. and the power button has been pressed. The grind indicator is The hopper is not Install hopper. flashing. - Page 24 After steaming is completed, the pressure The coffee machine will needs to be released to It takes 20-30 seconds to release not make coffee or hot reduce the temperature. the pressure and cool down. water immediately after During that time, other After the pressure is released and the steam dispenses operations cannot be...
-
Page 25: Notes
NOTES... - Page 28 Need more information? We hope that this user guide has given you the assistance needed for a simple set-up. For the most up-to-date guide for your product, as well as any additional assistance you may require, head online to help.kogan.com...
Need help?
Do you have a question about the KAESCOFFGRA and is the answer not in the manual?
Questions and answers