
Related Manuals for HIT FITNESS H4

Summary of Contents for HIT FITNESS H4
- Page 1 HIT FITNESS H4 HIT00695 Retain this owner’s manual for future reference Read and follow all instructions in this owner’s manual Version A...
- Page 3 THANK YOU Thank you for purchasing this product. This product will help you keep fitter and healthier in a simple way. User Guide 1. Always connect the power plug to a socket with a grounded circuit and the socket must have a special circuit to avoid sharing with other electrical equipment.
- Page 4 Ask your local distributor to handle any issue or provide service. Please do ◆ not attempt to dismantle the components. DANGER! To reduce accidents or harm, please check following rules. ◆ Ensure your clothes are zipped up before running. ◆ Do not wear clothes that could be easily hooked. ◆...
- Page 5 Artificial heart rhythm problem. (6) Malignant tumors. (7) Thrombosis. (8) Diabetes caused a perceptual disturbance. (9) Skin injury. (10) High fever above 38℃. (11) Bent back bone. (12) Pregnancy or in the (menstrual) period. (13) In the process of rehabilitation. (14)...
- Page 6 ◆ Only for one person at a time, tell people near to keep their distance - may fall down and cause injury. ◆ Do not attempt to disassemble or repair without seeking professional assistance. - may cause mechanical breakdown and injury. ◆...
- Page 7 Ground connection instruction! ◆ the product must have a grounded connection. The grounded connection can provide a channel with the least resistance for the current when the product is malfunctioning, thus can reduce the danger of electric shock. ◆ The product is equipped with an electric wire for grounding conductor and grounding plug. The plug must be inserted into a socket that conforms with local regulations.
-
Page 8: Packing List
PACKING LIST Manual Manual Main frame Main frame M8X15 M8X15 Silicon oil Hardware bag Safety key Silicon oil Hardware bag Safety key Hardware bag Hardware bag list T Wrench 1PCS Allen C.K.S. half thread screw Allen C.K.S. full thread screw (M8*50*20)2PCS (M8*15)4PCS T Wrench 1PCS... -
Page 9: Treadmill Instruction
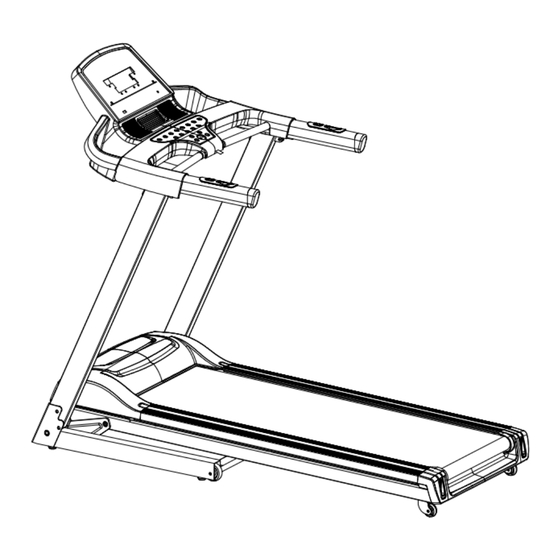
Treadmill Instruction Safety key Handle bar Console Upright post Motor cover Running belt Rear cover Side rail Technical information Folding size:1140 x 731 x 1500 mm Size Size Open size:1745 x 731 x 1300 mm 1400 x 450 mm Running size 1-18 km/h Speed *WE RESERVE THE RIGHT TO AMEND THE PRODUCT WITHOUT PRIOR NOTICE. - Page 10 ASSEMBLY INSTRUCTIONS ASSEMBLY INSTRUCTIONS Step 1: Take out the machine from box and put it on the flat floor. Raise up the upright post, use two M8*50*20 Allen C.K.S. half thread screw and two M8*15 Allen C.K.S. full thread screw to lock the left and right upright post frame with the upright post clamping rings on both sides of the base respectively, and do not lock the screws for the time being;...
- Page 11 Step 3: Lock all screws, assembling finished.
-
Page 12: Usage Instructions
Usage instructions: Treadmill folding and moving: FOLDING 1. Restore the incline to flat (0) position. 2. Unplug from power point before folding. 3. Lift deck until it's parallel to the upright post and cylinder locks into position. 4. Caution: make sure that the cylinder locking device is engaged. Cylinder Wheels UNFOLDING... - Page 13 MOVING 1: the power is off 2:the plug has been pulled out from the socket 3:the treadmill has been folded Then you can catch the end of treadmill with one hand, and catch the handlebar at the same side with another hand, tilt 40~50° up to chest to move the treadmill slowly, as shown in picture below: Grounding Guide: This product must be grounded.
- Page 14 Using instruction of treadmill Power on, the treadmill will start to the lowest position, check the machine is normal. Attach the safety lock clip to the fabric of sportswear at chest level. 3. Before running, check the stability of the treadmill and it is functioning normally. Do not stand on the run belt at the start, should stand on the sidebar, handlebar, and once is working correctly then start running.
-
Page 15: Key Definition
Key Definition Window Window Incline“+”“-” Incline“+”“-” Quick incline Quick speed key Quick incline Quick speed key Speed“-” “+”key Start key Stop key Program key Speed“-” “+”key Mode key Stop key Start key Stop key Program key Mode key Stop key Computer function Instruction: 1: P0: USER training program;... - Page 16 Button instruction: PROG: Program select key, when the treadmill is stopped, cycle select from the U01~U03 program to “P1-P50 → →HRC1-HRC3→ FAT”as you prefer. MODE:mode select key : When the treadmill is stopped, set the Mode as you prefer to. You can cycle select the Time count down →calories count down→...
-
Page 17: User Mode
Safety key function: In any state, pull-out safety locks, window displays:”E7” and sound buzzer “DI-DI-DI”. Then put well the safety lock, all show that the full light for 2 seconds, then go to manual start mode (the equivalent of clearing reset). Safe use instruction: 1. - Page 18 7. Training mode 3: Calories Countdown. Under selecting, calories window flicker, press “+””-“to modify the value. The range is 20-990CAL. Default is 50CAL 8.Training mode 4: Distance Countdown. Under selecting, Distance window flash, press “+””-“to modify the value. The range is1.0-99.0km. Default is1.0KM. “...
- Page 19 22.F5 , mean BMI, show you have finished the set item , and enter into body fat function. Put two hands on the handle bar, wait for 8 seconds, and the window will show the BMI. Take the Asian people for example, BMI under 18 is under weight;...
- Page 20 Program Speed Table PROG SPEED INCLINE SPEED INCLINE SPEED INCLINE SPEED INCLINE SPEED 10.0 10.0 10.0 INCLINE SPEED 10.0 INCLINE SPEED 10.0 11.0 INCLINE SPEED 11.0 INCLINE SPEED 10.0 11.0 12.0 INCLINE SPEED 10.0 11.0 INCLINE SPEED 11.0 11.0 INCLINE SPEED 10.0 10.0...
- Page 21 INCLINE SPEED 10.0 11.0 10.0 12.0 INCLINE SPEED 12.0 10.0 10.0 12.0 INCLINE SPEED 11.0 11.0 11.0 11.0 INCLINE SPEED INCLINE SPEED 10.0 10.0 INCLINE SPEED 10.0 10.0 INCLINE SPEED 10.0 10.0 10.0 10.0 INCLINE SPEED 10.0 11.0 12.0 12.0 12.0 INCLINE SPEED...
- Page 22 INCLINE SPEED INCLINE SPEED INCLINE SPEED INCLINE SPEED INCLINE SPEED INCLINE SPEED INCLINE E R R O R M E S S A G E A N D S O L U T I O N : Problem Reason Solution A、Disconnect of power or Connect the power, and turn on the switch.
- Page 23 Incline self study Check whether the iincline motorr is plugged in correctly or condition not , replug the connector to make it reliable;Check Incline self study Check whether the iincline motorr is plugged in correctly or whether the AC wire of the incline motor is plugged in condition not , replug the connector to make it reliable;Check whether the AC wire of the incline motor is plugged in...
- Page 24 Decide on the amount of exercise according to individual physical condition then according to the principle of asymptotic load to practice. Muscle soreness is anormal phenomenon during the initial training, so as long as the practice continues, the pain can be eliminated. Relax After practice, you should do 5 minutes warm-down action, especially the stretching of the foot muscles, so as to avoid...
- Page 25 Quadriceps stretch Hold the wall or table with your left hand to keep balance, then reach back with your right hand and hold your right ankle slowly toward the hip until you feel a tense muscle in front of your thigh. Hold for 10 to 15 seconds, then relax. Repeat with each leg 3 times (see figure 4).
- Page 27 Part list Description Description Rocker switch Base frame Main frame Fuse holder(with wire) Incline frame Speed handle pulse Power cord Upright post(L & R) Console frame Front roller Rear roller Ezfit linking parts Cylinder Motor base frame Top motor bolt welding Motor parts-1M8×65 Hex head full thread screw...
- Page 28 Phillips countersunk Cable clamp self-tapping screw ST3×10 Flat washerΦ8 Cord Strain Relief Bushing Flat washerΦ10 Panel Spring washer Φ8 Keyboard Serrated lock washersΦ5 Air outlet Hex locked nut M8 Flat washer Hex locked nut 母 M10 Motor cover limitator Incline bushing Φ25×Φ17× IPAD holder Φ10×6×1 Washer-1...
- Page 29 LUBRICATION The treadmill is factory-lubricated. However, it is recommended to check the lubrication of the treadmill regularly to ensure an optimal operation of the treadmill. Suggestions: Using time less than 3 hours every week lubrication once every 5 months Using time equal to 4-7 hours every week lubrication once every 2 months Using time more than 7 hours every week lubrication once every month...
- Page 30 STORAGE: Store your treadmill in a clean and dry environment. Ensure the master power switch is off and is un-plugged from the electrical wall outlet. ADJUSTING THE BELT DEVATION: All running belts are properly set at the factory and after assembly. But after a period, the belt may move or deviate from standard position.
- Page 31 Adjustment of the motor’s belt The motor belt of treadmill must be adjusted in the factory and after assembly. However, after a period of use, there may be slackening or slipping. The step of adjustment: 1.Turn the adjusting screw counterclockwise with wrench. 2.The adjustment range shall be subject to the belt load not slipping.
Need help?
Do you have a question about the H4 and is the answer not in the manual?
Questions and answers