
Related Manuals for Renogy DCAC14


Summary of Contents for Renogy DCAC14
- Page 1 Portable Air Conditioner 14,000 BTU (ASHRAE) / 10,000 BTU (SACC) VERSION A0 DCAC14 USER MANUAL...
-
Page 3: Table Of Contents
Table of Contents Important Safety Information ....................... 03 For Indoor Use Only ......................... 03 Safety Guidelines for R32 Refrigerant ..................... 04 Operation Precautions ..........................05 ........................... 06 Safety Precautions for Servicing Product Overview ....................... 09 ........................09 Product Diagram ........................09 Mounting Accessories .......................... - Page 4 Table of Contents Use And Operation ....................20 ..................20 Power On & Off ..........................20 Operation Modes Timer Setting ........................21 Automatic Defrost ..........................21 Draining ........................22 Overload Protection ........................23 Cleaning & Maintenance ....................... 24 Cleaning The Air Filter ......................... 24 Cleaning The Cabinet .....................
-
Page 5: Important Safety Information
Important Safety Information Symbols Used For Indoor Use Only Important Safety Information Your safety is our top priority. Please read this manual thoroughly and ensure full comprehension before operating your appliance. WARNING Symbols Used This unit operates with a flammable refrigerant. In the event of a refrigerant leak in proximity to fire or heated components, it may generate hazardous gas and pose a fire risk. -
Page 6: Safety Guidelines For R32 Refrigerant
Important Safety Information Safety Guidelines for R32 Refrigerant Safety Guidelines for R32 Refrigerant This appliance utilizes the environmentally-friendly R32 refrigerant. R32 has no adverse impact on the ozone layer (ODP), minimal greenhouse effect (GWP), and global availability. Its efficient energy properties make it an excellent choice for cooling in this application. However, due to its high flammability, specific precautions must be observed. -
Page 7: Operation Precautions
Important Safety Information Operation Precautions Operation Precautions WARNING: To minimize the risk of fire, electric shock, or harm to individuals and property. If the supply cord is damaged, it must be replaced by the manufacturer, its authorized service personnel, or individuals with equivalent qualifications to prevent potential hazards. The appliance must be disconnected from its power source during servicing. -
Page 8: Safety Precautions For Servicing
Important Safety Information Operation Precautions Safety Precautions for Servicing Do not puncture or burn, even after use. Note that refrigerants may lack a noticeable odor. Ensure pipe-work is safeguarded from physical harm and not installed within an unventilated space smaller than 43 sq. ft. (4 sq. m). Adhere to national gas regulations. - Page 9 Important Safety Information Safety Precautions for Servicing General Work Area All maintenance personnel and other individuals in the vicinity must be informed about the type of work being conducted. Working within confined spaces should be avoided. The area surrounding the work space must be cordoned off. Confirm that the conditions within the area have been made safe through the management of flammable materials.
- Page 10 Important Safety Information Safety Precautions for Servicing For installations involving flammable refrigerants, conduct the following checks: Confirm that the charge size matches the room size in which the refrigerant-containing components are installed. Ensure that ventilation machinery and outlets are functioning adequately and free from obstruction.
-
Page 11: Product Overview
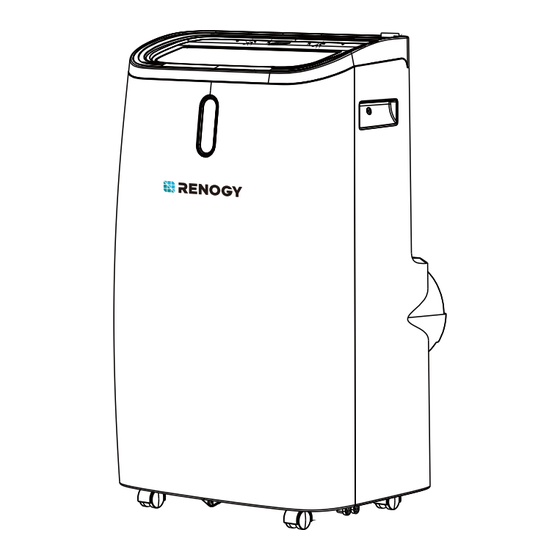
Product Overview Product Diagram Mounting Accessories Product Diagram Control panel Portable handle (2) Air outlet with adjustable shutter Air inlet with air filter Front panel Continuous drain hole (middle) Air exhaust outlet Castors (4) Drain hole (bottom) Mounting Accessories Window bracket kit Hose connector Hose connector Air exhaust hose... -
Page 12: Features
Product Overview Features Specifications Package List Features 3-in-1 portable air conditioner offering effective cooling, dehumidification, and fan features. 3 control options: touch control panel, remote control, and smart Wi-Fi app. LED temperature display for easy reading. Thoughtful timer setting and sleep mode. Auto defrost in low ambient temperatures. -
Page 13: Installation Guide
Installation Guide Unboxing Before Using It for The First Time Choose The Installation Location Unboxing Unbox the carton and remove the appliance along with the included mounting accessories. Inspect the appliance for any signs of damage or scratches that might have occurred during transit. -
Page 14: Installation Steps
Installation Guide Choose The Installation Location Installation Steps Do not install the appliance in locations where it might be exposed to: Heat sources like radiators, heat registers, stoves, or other heat-producing devices. Direct sunlight. Mechanical vibration or impact. Excessive dust. Poor ventilation, such as within a cabinet or bookcase. - Page 15 Installation Guide Installation Steps Step 2: Use the hose connector (for attaching to window bracket kit). Connect it to another end of the air exhaust hose, turning the connector clockwise to secure it in place. Step 3: Customize the length of the window bracket kit to match your window size using the thumb screw on the kit.
- Page 16 Specifications and Troubleshooting Installation Guide Installation Steps Step 5: Connect the hose connector to the exhaust air outlet of the appliance. Slide the hose connector in from up to down. Step 6: Adjust the length of the flexible air exhaust hose to ensure that the distance between the appli- ance and the window is greater than 28 inches (70 cm), and the height from the air exhaust hose to the floor is more than 35 inches (90 cm).
-
Page 17: Control Methods
Specifications and Troubleshooting Control Methods Control Panel Control Panel Power Press to turn on or off the machine. Press to switch the operation mode between cooling, dehumidifi- Mode cation, and fan. Mode Indicators Cooling, dehumidification, and fan modes. Press to turn on or off. Sleep Mode Note: For cooling mode only. -
Page 18: Remote Control
Control Methods Remote Control Remote Control The remote control requires two AAA batteries. Please note that batteries are not included in the package, so you will need to purchase them separately. Remove the batteries if the remote control is not in use for a month or longer. Do not mix alkaline, standard (carbon-zinc), or rechargeable (nickel-cadmium) batteries. -
Page 19: Smart Wi-Fi App Control
Control Methods Smart Wi-Fi APP Control Smart Wi-Fi APP Control This appliance enables remote control through your home network. A prerequisite is a steady Wi-Fi connection to your router and the free "Smart Life" app. Download the app Scan the QR code (both for iOS and Android) below to download the "Smart Life" app for remote control. - Page 20 Control Methods Smart Wi-Fi APP Control When the appliance's Wi-Fi indicator is flashing, select "Add Device" – agree “Location” access permissions, tap “Continue” – add the device with an air conditioner icon, enter your Wi-Fi password, and then follow the instructions on your smartphone to complete the setup. Add Device Continue...
- Page 21 Control Methods Connection & disconnection Warm reminder Connection & disconnection Once the appliance is successfully connected, the Wi-Fi indicator will illuminate. You can now control the appliance using the app. Press and hold the Timer button on the appliance for approximately 5 seconds to disconnect it.
-
Page 22: Use And Operation
Use And Operation Power On & Off Operation Modes Power On & Off Press the Power button to turn it on or off. Operation Modes The appliance runs in Fan mode as default. The appliance offers four operation modes: Cooling, Dehumidification, Fan, and Sleep. Please be aware that you can activate Sleep mode during cooling mode only. -
Page 23: Timer Setting
Use And Operation Timer Setting Automatic Defrost Timer Setting The timer setting is available for 1-24 hours. You can configure an auto shut down timer while the appliance is powered on. Press Timer button Press Up / Down Auto shut down once to turn on the button to set the delay (Appliance is powered on) -
Page 24: Draining
Use And Operation Draining Draining Manual Draining (for the bottom drain hole): The appliance will stop automatically when the water tank is full. Unplug the power cord first. Note: Handle the appliance with care to avoid spilling the water from the bottom water pan. Place a shallow pan (not included) beneath the bottom drain hole. -
Page 25: Overload Protection
Use And Operation Draining Overload Protection 2. Dehumidification Mode: For continuous, unattended dehumidification, attach the drain hose to the appliance's middle con- tinuous drain hole. Condensate water will flow into a bucket or drain by gravity. Ensure the appliance is turned off. Remove the water plug from the drain hole and keep it in a safe place if you intend to reinsert it later. -
Page 26: Cleaning & Maintenance
Cleaning & Maintenance Cleaning The Air Filter Cleaning The Cabinet Cleaning The Air Filter (recommended every two weeks) Dust accumulating on the filter can impede airflow, leading to reduced system efficiency. If the airflow is significantly blocked, it may even cause damage to the unit. Regular cleaning of the air filter is essential. -
Page 27: Refrigerant Cleanup Procedure
Cleaning & Maintenance Refrigerant Cleanup Procedure Storage Refrigerant Cleanup Procedure General Measures: As gas/vapor is heavier than air, it can accumulate in confined spaces, especially at or below ground level. Ensure elimination of any potential sources of ignition. Wear appropriate personal protective equipment (PPE). Evacuate unnecessary personnel, isolate the area, and ensure proper ventilation. -
Page 28: Disposal
Disposal Disposal Troubleshooting Disposal It is strictly prohibited to release refrigerant into the atmosphere. WARNING Do not treat electrical appliances as regular municipal waste; use designated collection facilities. Contact your local government to learn about available collection systems. Improper disposal of electrical appliances in landfills can lead to the leakage of hazardous substances into groundwater, potentially harming the environ- ment and public health. -
Page 29: Troubleshooting
Troubleshooting Troubleshooting Troubleshooting Problems Inspections Solutions Make sure the power cord is properly inserted Ensure the power connection is secure. into the wall outlet. Check if the display shows the 'FT' Empty the drain pan by removing the rubber The appliance is error code. -
Page 30: Warranty Information
IF NONE OF THE ABOVE RESOLVES THE ISSUE, PLEASE CONTACT A QUALIFIED TECH- NICIAN. AVOID ATTEMPTING TO ADJUST OR REPAIR THE AIR CONDITIONER ON YOUR OWN. Customer Service Information If you have any problem with this unit, please contact us via renogy.com/contact-us... - Page 32 RENOGY.COM Renogy reserves the right to change the contents of this manual without prior notice. Renogy | renogy.com | renogy.com/contact-us FCC ID: 2ANDL-WBR3...
Need help?
Do you have a question about the DCAC14 and is the answer not in the manual?
Questions and answers