Table of Contents
Advertisement
Quick Links
Advertisement
Table of Contents

Related Manuals for Engcon SS9-2

Summary of Contents for Engcon SS9-2
- Page 1 User manual SS9-2 Article | 9000042 Original Instructions...
- Page 2 Dear Customer, Thank you for choosing a product from engcon. engcon is the market leader in tiltrotators and tools for excavators. We represent innovation, knowledge and experience, and we develop our products with a focus on the customer's needs. Please visit our website for contact information and details about the rest of our product range.
-
Page 3: Table Of Contents
4.1.7. Program selection 7.................16 4.2. Operating the quick hitch lock.................17 4.3. Program selection....................17 5. Troubleshooting 5.1. Alarm list......................19 5.2. Description of SS9-2 electronics unit.............. 21 6. Decals 6.1. Decal disposition..................... 24 6.1.1. 8000067....................24 6.1.2. 8000065....................24 7. Installation checklist... -
Page 4: Introduction
- Packaging to be sorted at source and recycled for materials. - Paper to be sorted at source and recycled for materials. If in doubt, contact the environmental manager at engcon. 1.3. Technical support and spare parts Contact information for support and spare parts can be found at www.engcon.com. -
Page 5: Safety
2 Safety 2. Safety REMARKS The specified safety information is independent of the base machine and is directly concerned with the SS9-2. REMARKS Other safety instructions can be found in the tiltrotator user manual. 2.1. General It is important that you read and understand all warnings prior to installation work on this product or before you use it and any accessories supplied. -
Page 6: Design And Function
3.1. Symbols Button number 1 to SS9-2 Button number 2 to SS9-2 Button number 3 to SS9-2 Button number 1 and quick hitch lock button to SS9-2 Quick hitch lock button to SS9-2 Quick hitch lock valve Integrated grab on tiltrotator... -
Page 7: Information About Quick Hitch Lock
3 Design and function 3.2. Information about quick hitch lock The following describes two different lock functions: IQ and SQ. 3.2.1. IQ = integrated lock Position Description Integrated locking hydraulics in the tiltrotator. 3.2.2. SQ = separate lock Position Description Separate locking hydraulics that are controlled via the original function in the base machine. -
Page 8: Operation
4 Operation 4. Operation 4.1. Manoeuvring 4.1.1. Program selection 1 The active program is displayed at start-up. Tilt and Extra 1+2 are switched bistably with button 1. Both extra outputs are always run in parallel. Use the machine decal and user manual to see the location of When EC1 and the quick hitch lock button are combined. -
Page 9: Program Selection 2
4 Operation Position Description Remarks Right grip Display See display for function Rotation Momentary (monostable) HOLD Hold function (bistable) 4.1.2. Program selection 2 The active program is displayed at start-up. Extra 1-2 are switched in monostably when the operator presses and holds down button 1. -
Page 10: Program Selection 3
4 Operation Position Description Remarks Right grip Display See display for function Rotation Momentary (monostable) HOLD Hold function (bistable) 4.1.3. Program selection 3 The active program is displayed at start-up. Three buttons are used for bistable switching between Tilt, Extra1 and Extra2. - Page 11 4 Operation HOLD HOLD HOLD EXTRA1 & EXTRA2 Position Description Remarks Left grip Right grip Display See display for function Rotation Momentary (monostable) HOLD Hold function (bistable)
-
Page 12: Program Selection 4
4 Operation 4.1.4. Program selection 4 The active program is displayed at start-up. Two buttons are used for monostable switching. Use the machine decal and user manual to see the location of ec1 ec2 ec3 When EC1 and the quick hitch lock button are combined. EXTRA1 &... -
Page 13: Program Selection 5
4 Operation 4.1.5. Program selection 5 The active program is displayed at start-up. Button 1 is used to step bistably between Tilt, Extra1 and Extra2. Use the machine decal and user manual to see the location of ec1 ec2 ec3 When EC1 and the quick hitch lock button are combined. -
Page 14: Program Selection 6
4 Operation Position Description Remarks Right grip Display See display for function Rotation Momentary (monostable) HOLD Hold function (bistable) 4.1.6. Program selection 6 The active program is displayed at start-up. Tilt and Extra1 are switched bistably with button 1. Extra2 is never activated. - Page 15 4 Operation HOLD EXTRA1/ HOLD EXTRA1/ Position Description Remarks Left grip Right grip Display See display for function Rotation Momentary (monostable) HOLD Hold function (bistable)
-
Page 16: Program Selection 7
4 Operation 4.1.7. Program selection 7 The active program is displayed at start-up. Tilt and Extra1 are switched monostably with button 1. Extra2 is never activated. Use the machine decal and user manual to see the location of ec1 ec2 ec3 When EC1 and the quick hitch lock button are combined. -
Page 17: Operating The Quick Hitch Lock
4 Operation 4.2. Operating the quick hitch lock For further information on bucket connection/disconnection, see the tiltrotator user manual. For tiltrotators with SS9 SQ, see the base machine's user manual. For tiltrotators with SS9 IQ, see section 4.1. Manoeuvring 4.3. Program selection This section describes how to change program selections. - Page 18 4 Operation Program 5 Button 1 is used to step bistably between Tilt, Extra1 and Extra2. Program 6 Tilt and Extra1 are switched bistably with button 1. Extra2 is never activated. Program 7 Tilt and Extra1 are switched monostably with button 1. Extra2 is never activated.
-
Page 19: Troubleshooting
5 Troubleshooting 5. Troubleshooting 5.1. Alarm list The flashes resemble Morse code. Symbol Number of Name Description Action flashes Buzzer fault. Break or short Troubleshoot circuit on buzzer cabling. output (X1:9). Quick hitch lock Actuated at start Release the button button fault. - Page 20 5 Troubleshooting Symbol Number of Name Description Action flashes Quick hitch lock Quick hitch lock Restart the button timeout. button not actuated quick hitch lock’s within the time activation frame. sequence by deactivating the quick hitch lock switch. Internal fault. Internal system Replace unit.
-
Page 21: Description Of Ss9-2 Electronics Unit
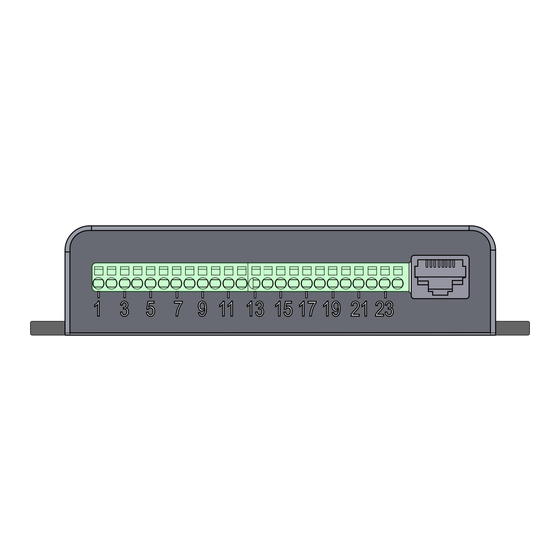
If you encounter errors not listed above, please check the power supply to the cab module. 5.2. Description of SS9-2 electronics unit 1 3 5 7 9 11 13 15 17 19 21 23 Connection Name... - Page 22 5 Troubleshooting Connection Name Description X1:8 Quick hitch lock switch, negative X1:9 DO1 (200 mA) Buzzer X1:10 12/24 VDC Supply, buttons X1:11 Button input (GND/12/24 V) X1:12 Button input (GND/12/24 V) X1:13 Button input (GND/12/24 V) X1:14 Button input (GND/12/24 V) X1:15 Quick hitch lock button (QH)
-
Page 23: Decals
6 Decals 6. Decals WARNING Replace damaged or illegible signs and decals before using the machine. Risk of personal injury and damage to property. The decals are usually placed to the right of the operator in clearly visible locations. -
Page 24: Decal Disposition
6 Decals 6.1. Decal disposition 6.1.1. 8000067 8000067 6.1.2. 8000065... -
Page 25: Installation Checklist
7 Installation checklist 7. Installation checklist Delivery contents checked. Checked: hoses and cables are not at risk of pinching, cutting or stretch damage. Function check completed. Document check completed. Machine model: Machine serial number: Tiltrotator serial number: Machine hitch serial number: Part number, machine electrical kit:... - Page 26 7 Installation checklist Machine owner, company: Date: Company installing equipment on the machine: Place: Date: Other remarks:...
- Page 27 Notes ..................................................................................................................................................................................................................................................................................................................................................................................................................................................................................................................................................................................................................................................
- Page 28 Uk Ltd 200B Ashchurch Business Centre, Tewkesbury GL20 8TD +44 1684 297168, uk@engcon.com www.engcon.com...
Need help?
Do you have a question about the SS9-2 and is the answer not in the manual?
Questions and answers