Table of Contents
Advertisement
Quick Links
Advertisement
Table of Contents

Related Manuals for Trister TS 320BPEC

Summary of Contents for Trister TS 320BPEC
-
Page 2: Table Of Contents
TABLE OF CONTENTS General Notes APP Download Signs and Symbols Cleaning and Maintenance Important Safety Notes Messages Product Description Trouble Shooting Main Features Warranty Information Package Contents Technical Specifications Hardware Description LCD Display EMC Information Preparation Before Taking Measurement Battery Installation Battery Life and Replacement Date and Time Setting Alarm Setting... -
Page 3: General Notes
General Notes Signs and Symbols This Instruction for Use is for TS 320BPEC. Following signs and symbols are used in the Instruction for Use, on the packaging and label of the device and accessories : Please read the Instruction for Use before use and follow the instructions to operate the device. -
Page 4: Important Safety Notes
Important Safety Notes Do not leave this device unattended with infants or persons who cannot Do not splash water on the arm cuff or immerse it in water. express their consent. Do not use this device on people with sensitive skin or allergies. Do not use this device for children weighing less than 10 kgs. -
Page 5: Product Description
Product Description Main Features Main Features TS 320BPEC is intended to be used in measuring pulse, systolic and Alarm Function diastolic blood pressure and recording personal electrocardiogram (ECG) Reminder of regularly monitoring on blood pressure and heart conditions for approximately 30 seconds. -
Page 6: Package Contents
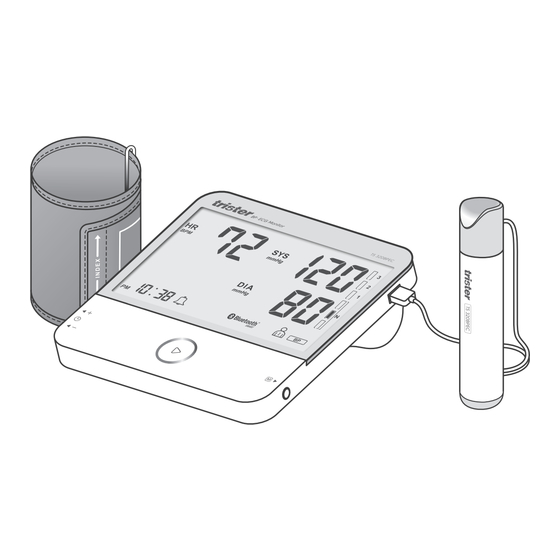
Product Description Package Contents Hardware Description Your package should include the following items. Main Unit Main Unit TS 320BPEC ECG Pen Arm Cuff Instruction for Use Accessories 4 x AAA batteries (trial use) Storage Case Air Jack : Connect air tube of arm cuff. -
Page 7: Lcd Display
Product Description Hardware Description LCD Display ECG Pen Heartbeat Indicator : Flashes in sync with heartbeats during measurement. Heart Rate : Top Electrode During recording: Displays the real-time heartbeat. During reviewing: Displays the average heart rate of each measurement. Bottom Electrodes ECG Result Display : Displays the results of ECG measurements. -
Page 8: Preparation Before Taking Measurement
Product Description Preparation Before Taking Measurement LCD Display Battery Installation Turn the main unit upside down. WHO Classification Indicator : Displays WHO classification of your blood pressure readings. Slide the battery cover in the direction of arrow while pressing the ribbed part of the cover. -
Page 9: Battery Life And Replacement
Preparation Before Taking Measurement Battery Life and Replacement Date and Time Setting After installing batteries, please set the correct date and time. Install or replace the batteries by following the + (positive) and This device will automatically store measurement result and its measuring - (negative) polarities indicated on the battery compartment. - Page 10 Preparation Before Taking Measurement Date and Time Setting Date and Time Setting Press the button on the right side to apply the setting of year. Press the button to apply the setting of date. After completing the After completing the setting of year, the month digits will flash on the display. setting of date, the hour digits will flash on the display.
-
Page 11: Alarm Setting
Preparation Before Taking Measurement Date and Time Setting Alarm Setting Press the button to apply the setting of minute. Setting of year appears Press and hold the button on the left side for more than 3 seconds to again on the display, press the button to complete the Date and Time enter Alarm setting mode. -
Page 12: Selecting User Account
Preparation Before Taking Measurement Alarm Setting Selecting User Account This device provides two user accounts represented by , and each Press the button to apply the setting of hour. After completing the account can store up to 64 measurement records. setting of hour, the minute digits will flash on the display. -
Page 13: Taking Blood Pressure Measurement
Taking Blood Pressure Measurement Cautions before Taking Measurement Applying the Arm Cuff Please follow the cautions below when using this device for blood Please make sure the arm cuff is applied correctly in order to obtain pressure measurement: correct measurement results. You can wear light clothing when taking blood pressure measurement, however, Please take the measurement in a quiet place and under appropriate the heavy clothing such as sweaters should be taken off. -
Page 14: Operation Procedure
Taking Blood Pressure Measurement Applying the Arm Cuff Operation Procedure Make sure the cuff is 1 to 2 cm Selecting user account (refer to page 20). above your elbow and attach it firmly around your upper arm. Press the button to start measurement. 1~2 cm symbol appears on the display when starting the inflation. -
Page 15: Who Classification Indicator
Taking Blood Pressure Measurement Operation Procedure WHO Classification Indicator In accordance to the classification developed by World Health Organization : You may turn off the device by pressing the button or wait for 2 minutes until the device automatically switches off. Classification Systolic Diastolic... -
Page 16: Reviewing & Deleting Previous Results
Taking Blood Pressure Measurement Taking ECG Measurement Reviewing & Deleting Previous Results Cautions before Taking Measurement This device will automatically store the measurement result. You may Please read the cautions below to correctly measure your personal ECG : review the records in cyclic order. The latest measurement will replace the Do not attempt to use this ECG Pen over or through clothing. -
Page 17: Operation Procedure
Taking ECG Measurement Operation Procedure Operation Procedure Connect the cable connector of ECG Pen to the port on the right side of the The measurement will start automatically. The symbol will flash on device. the display and you will hear “beep” sounds for noticing the initiation of measurement. -
Page 18: Common Wrong Operations
Taking ECG Measurement Operation Procedure Common Wrong Operations Please avoid the following operations : Result will be displayed after Averaged Heart Rate the measurement is completed. The right index finger is not in Measuring over or through Measuement result sufficient contact with top electrode. clothing. -
Page 19: Results Display
Taking ECG Measurement Results Display Reviewing & Deleting Previous Results The ECG measurement result will display as follows : This device will automatically store the measurement result. You may review the records in cyclic order. The latest measurement will replace the oldest one when the memory is full (each account for 64 measurements). -
Page 20: App Download
APP Download Cleaning and Maintenance System Requirements : Main Unit Smartphones or Tablets which support Bluetooth4.0 (BLE) Please clean the surface of the unit with a soft cloth dampened with water. Please remove all batteries if you expected of not using the unit for a long period of time. -
Page 21: Messages
Messages Message Displayed Possible Cause Suggestion Message Displayed Possible Cause Suggestion The measurement result of Unstable or weak Please follow the The Blood Pressure 1. Inflating too slow 1. Apply the arm cuff averaged heart rate keeps ECG signals. instructions on page measurement result shows or cannot inflate correctly and retake... -
Page 22: Trouble Shooting
Messages Trouble Shooting Message Displayed Possible Cause Suggestion Problem Possible Cause Suggestion The Blood Pressure Low battery. Follow the instructions The device 1. Battery power is low. 1. Please replace with new measurement result shows on page 12~13 to cannot be turned batteries. -
Page 23: Warranty Information
Trouble Shooting Warranty Information Trister warrants your Blood Pressure ECG Monitor TS 320BPEC to be free from Problem Possible Cause Suggestion defects in workmanship and materials within 3 (three) year from the date of the purchase receipt under normal usage according to the Instruction for Use. This... -
Page 24: Technical Specifications
Warranty Information Technical Specifications Trister shall not be liable for loss of use or any other incidental, consequential or TS 320BPEC - Main Unit indirect costs, expenses or damages in any way linked with the device or use of the device. - Page 25 22 ~ 42 cm Dimensions Approximately L570 x W140 mm Weight Approximately 130g TS 320BPEC - ECG Pen Induction System Single channel, Bipolar 1. Technical information is subject to change without notification to allow for updates. Heart Rate Range 5 ~ 199 beats /min 2.
- Page 26 Guidance and manufacturer’s declaration - electromagnetic emissions Guidance and manufacturer’s declaration - electromagnetic immunity This device is intended for use in the electromagnetic environment This device is intended for use in the electromagnetic environment specified below. The customer or the user of this device should assure that specified below.
- Page 27 Voltage dips, <5% U <5% U Mains power quality Guidance and manufacturer’s declaration - electromagnetic immunity short (>95% dip in U (>95% dip in U should be that of a interruptions and This device is intended for use in the electromagnetic environment for 0,5 cycle for 0,5 cycle typical commercial...
- Page 28 Recommended separation distances between portable and mobile RF where P is the maximum communications equipment and this device output power rating of the transmitter in watts (W) This device is intended for use in an electromagnetic environment in which according to the transmitter radiated RF disturbances are controlled.
- Page 29 For transmitters rated at a maximum output power not listed above, the recommended separation distance d in meters (m) can be estimated using the equation applicable to the frequency of the transmitter, where P is the maximum output power rating of the transmitter in watts (W) according to the transmitter manufacturer.
Need help?
Do you have a question about the TS 320BPEC and is the answer not in the manual?
Questions and answers