Advertisement
Available languages
Available languages
Quick Links
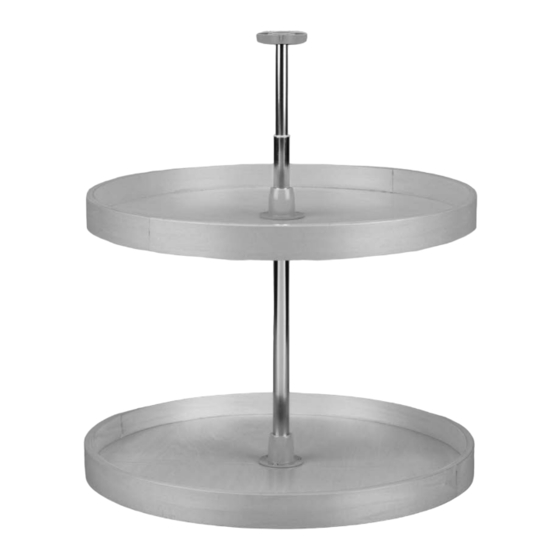
BANDED WOOD LAZY SUSAN
TOOLS REQUIRED:
#2
#2
#3
3
32
#2
#2
#2
ESTIMATED ASSEMBLY TIME:
25 MIN
CARE AND MAINTENANCE:
Clean with a damp cloth and
wipe parts dry.
WATCH TUTORIALS OF OUR
PRODUCTS BEING INSTALLED
WWW.REV-A-SHELF.COM/VIDEOS
Parts List
No.
Description
A
Positioner Base with Set Screw
B
Universal Brackets
C
3/4" x #8 Oval Head Screws
D
Bottom Hubs
E
Shelf Support Tops with Bushing
F
1-1/4" x #8 Flat Head Self-Tapping Screws
G
Ring Bushings
A.
B.
F.
G.
INSTALLATION INSTRUCTIONS: BANDED WOOD LAZY SUSAN
12400 Earl Jones Way
Louisville, KY 40299
rev-a-shelf.com
Customer Service: 800-626-1126
Qty
1
2
8
2
2
6
2
C.
D.
E.
I-LD-4BW-062-0921
Advertisement

Related Manuals for Rev-A-Shelf BANDED WOOD LAZY SUSAN


Summary of Contents for Rev-A-Shelf BANDED WOOD LAZY SUSAN
- Page 1 Shelf Support Tops with Bushing 1-1/4” x #8 Flat Head Self-Tapping Screws CARE AND MAINTENANCE: Ring Bushings Clean with a damp cloth and wipe parts dry. WATCH TUTORIALS OF OUR PRODUCTS BEING INSTALLED WWW.REV-A-SHELF.COM/VIDEOS INSTALLATION INSTRUCTIONS: BANDED WOOD LAZY SUSAN I-LD-4BW-062-0921...
- Page 2 Using the tape measure, mark the center of the opening of the cabinet, then use a combination square to determine your hub location. The enclosed template will determine the depth location of the bottom positioning hub. (See Figure 3). Customer Service: 800-626-1126 | rev-a-shelf.com...
- Page 3 STEP 5 FIG. 4 Using the paper template, use your 3/32” drill bit to pre-drill your screw locations (See Figure 4). STEP 6 Remove the paper template and use (4) 3/4” x #8 oval head FIG. 5 FIG. 6 screws to attach the universal bracket to the bottom of the cabinet (See Figure 5).
- Page 4 (See Figure 11). FIG. 12 STEP 13 Once completed, raise the shelf to the desired height along with the positioner base w/set screw, then tighten the set screw (See Figure 12). Customer Service: 800-626-1126 | rev-a-shelf.com...
- Page 5 12400 Earl Jones Way Louisville, KY 40299 rev-a-shelf.com Customer Service: 800-626-1126 INSTRUCCIONES DE INSTALACIÓN / LES INSTRUCTIONS D’INSTALLATION BANDEJA DE MADERA LAZY SUSAN / PLATEAU TOURNANT EN BOIS AVEC BAGUE TOOLS REQUIRED: LISTA DE COMPONENTES / LISTE DE PIÈCES Descripción / Description Base de posicionamiento con tornillo de fijación...
- Page 6 À l’aide du ruban à mesurer, marquez le centre de l’ouverture du meuble, puis utilisez une équerre combinée pour déterminer l’emplacement de votre moyeu. Le gabarit fourni permettra de déterminer la profondeur de l’emplacement du moyeu de positionnement inférieur (voir figure 3). Customer Service: 800-626-1126 | rev-a-shelf.com...
- Page 7 PASO 5 / ÉTAPE 5 FIG. 4 Utilizando la plantilla de papel, use su broca de 3/32” para pretaladrar las ubicaciones de los tornillos. (Ver figura 4). À l’aide du gabarit en papier, utilisez une mèche de 3/32 po pour prépercer les emplacements des vis (voir figure 4).
- Page 8 (Ver figura 12). Une fois l’opération terminée, montez la tablette à la hauteur souhaitée avec la base du positionneur et la vis de réglage, puis serrez la vis de réglage (voir figure 12). Customer Service: 800-626-1126 | rev-a-shelf.com...
Need help?
Do you have a question about the BANDED WOOD LAZY SUSAN and is the answer not in the manual?
Questions and answers