Advertisement
- 1 Introduction
- 2 What's in the Box
- 3 Radio Overview
- 4 Main Features
- 5 Installation of Accessories
- 6 Basic Operations
- 7 Working the MENU System
- 8 Technical Specifications
- 9 Trouble shooting guide
- 10 FRS Frequency Chart (MHz)
- 11 NOAA Weather Radio Frequency List (US, CAN, AND INTL)
- 12 Appendix E. - DCS Table
- 13 CTCSS Table
- 14 Precautions for Portable Terminals
- 15 Precautions for Batteries
- 16 Documents / Resources
Introduction
 ATTENTION
The radio is a multitask FRS transceiver. Combining the latest technology in radio communication along with a sturdy mechanical frame, the radio is the ideal and effective solution for the professionals who need to stay in touch with the working team (in construction sites, buildings, shows, trade fairs or hotels),or for leisure users that just want to keep up with friends and family.
To help you ward off bodily injury or property loss that may arise from improper operation, please read all the information carefully before using our products.
Before operating the radio, please read all safety and operating instructions. Save all instructions in a safe place for future reference.
What's in the Box
| Package Content | Quantity |
| Radio | 3 |
| Belt Clip | 3 |
| Lanyard | 3 |
| User Manual | 1 |
| Headset | 0 |
| Li-ion Battery | 0 |
| Power Adapter | 0 |
| Desktop Charger | 0 |
| Six-unit Desktop Charger | 0 |
Note: The number of the above materials may be depending on the number of packages.
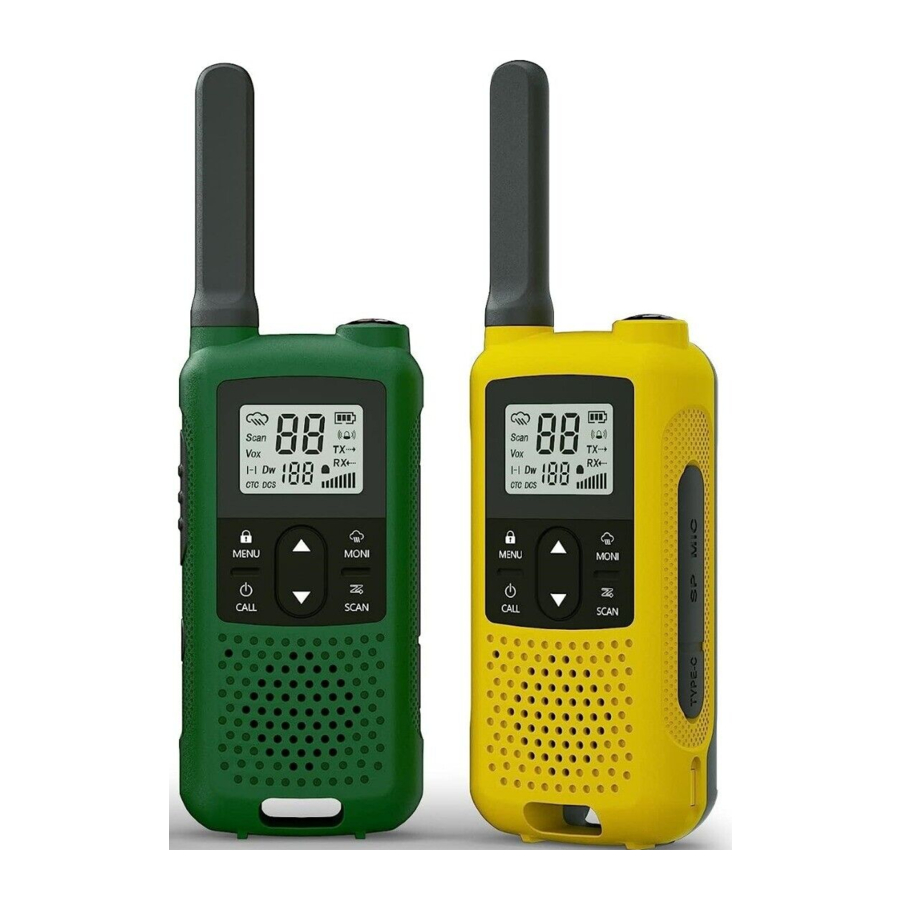
Radio Overview

- NOAA Weather Band Indicator
- Scan Indicator
- VOX Indicator
- Dual Watch Indicator
- CTC Indicator
- DCS Indicator
- Channel Indicator
- Emergency Alert Indicator
- Transmit Status Indicator
- Receive Status Indicator
- Keypad Lock Indicator
- Volume level Indicator
- DCS / GTCSS Privacy Code Numbers
- Antenna
- Backlit LCD Display
- UP Button
- Menu/Lock Button
- Power/Call Button
- DOWN Button
- Speaker
- Flashlight
- Belt Clip Lock Tab
- Weather/Monitor Button
- Belt Clip
- Accessory Port
- Scan Button
- Type-C USB Charging Port
- Battery Release Latch
- PTT (Push-To-Talk) Button
- Flashlight/Emergency Button
Main Features
- 22 FRS Channels
- Output power: ≤2W (channels 1-7and 15-22)
- 12 NOAA Weather Channels
- NOAA Weather Scan
- 2 Channels Watch
- Privacy Codes Scan and Store
- Channel Monitor
- Channel Scan Function
- 155 Privacy Codes (50 CTCSS codes/ 105 DCS codes)
- 10 Selectable Call Alerts
- Hands-Free Operation (VOX)
- Call Alert
- Roger Beep Tone
- Keypad Lock
- Battery Level Meter
- Emergency Strobe Light
- Battery/Power Saver
- Backlit LCD Display
- Low Battery Audible Alert
- TOT (Time out timer)
- 2pin Kenwood Headset Jack
- Type-C USB Connector for Charging
- Keystroke Tones
*Range may vary depending on environmental and/or topographical conditions.
Installation of Accessories
Install three AA Ni-MH Batteries (rechargeable)

Ni-MH batteries are rechargeable batteries and cannot be used with alkaline batteries.
- Turn off the radio.
- With the back of the radio facing you, lift up the battery cover latch, and then remove the battery cover.
- As shown in the figure, insert three AA Ni-MH batteries with + and - polarity (the wrong installation of the batteries will cause the unit to fail or damage the unit).
- Close the battery cover. Replace the belt clip and make sure it locks in place.
Installing the Three AA Alkaline Batteries (non-rechargeable)
Alkaline batteries can only be used in emergency situations and cannot be charged. There is a danger of explosion when charging alkaline batteries.
- Turn the radio off.
- With the back Of the radio facing you, lift the battery cover latch-up and remove the cover,
![]()
- Insert the three AA Alkaline batteries With + and - polarity as shown inside (Installing the batteries incorrectly will prevent the unit from operating or may damage the unit).
- Close the battery cover. Replace the belt clip, making sure it locks into place.
Installing the Belt Clip
To install the Belt Clip, slide the clip down into the slot on the back of the radio until the Belt Clip-latch clicks, To remove the Belt Clip, press the Lock-tab down, and then gently pull the belt clip up toward the top of the radio,
External Speaker/Microphone Jack
Each radio can be used with an optional external speaker/microphone or headset, freeing your hands for other tasks. To use an optional speaker/microphone or headset!![]()
- Open the rubber cap on the side of the radio.
- Insert the plug(s) into the SPK/MIC jacks,
- Place the ear bud into your ear, and adjust the Microphone to your desired position.
![]()
Using a Headset
You can use a headset for more private communications. To use a headset lift the rubber cover from over the headset jack, and then plug in the headset.
Using the Radio Battery Level and Low Battery Alert
This radio has a Battery Level Meter  that shows the battery power level. The greater the number of bars visible, the stronger the battery level, When the battery level is low, the Battery Shell
  icon will flash in the display indicating your batteries should be replaced.
Basic Operations
In order to get the most out of your new radio, read this reference guide completely before attempting to operate the unit.
Turning the Radio On and Adjusting the Volume
- press and hold [
![]() /CALL] to turn the radio on.
/CALL] to turn the radio on. - To change the volume level, press
![]() or
or ![]() to increase or decrease the volume level.
to increase or decrease the volume level.![]()
- Press and hold [
![]() /CALL] to turn the radio off.
/CALL] to turn the radio off.
 /CALL] to turn the radio on.
Choosing a Channel
Your radio has 22 channels and 155 Privacy codes you can use to talk to others. In order to speak to someone, both your radios must be set to the same channel and Privacy code.![]()
Press the [MENU] button once, and then the  or
or  buttons to select one of the 22 FRS channels. To confirm the selection, press the [PTT] button or press the [MENU] button again to move to the next feature setting.
Note: You can check the FRS channel transmission activity status through the icon. On 1-7 and 15-22 channels, it is high-power transmission and  icon is displayed. On 8-14 channels, it is low-power transmission and icon is displayed.
Talking on Your Radio
To talk to others using the radio:
- Press and hold the [PTT] button and speak in a clear, normal voice about 2-3 inches away from the microphone. While you are transmitting, the TX
![]() icon appears on the display. To avoid cutting off the first part of your transmission, pause slightly after pressing the (PTT) button before you start talking.
icon appears on the display. To avoid cutting off the first part of your transmission, pause slightly after pressing the (PTT) button before you start talking. - When you have finished speaking, release the [PTT] button. You can now receive incoming calls. While receiving, RX
![]() displays.
displays.
 icon appears on the display. To avoid cutting off the first part of your transmission, pause slightly after pressing the (PTT) button before you start talking.
 displays.
Monitor Mode Feature
Your radio allows you to listen for weak signals on the current channel at the press of a key. To turn ON Monitor mode: Press the [ /MONI] button once. The receiver circuit stays open, and both noise and weak signals can be heard. The RX
  icon blinks. To turn OFF Monitor mode: press the [/MONI] button once to return to "Normal" mode. The RX icon stops blinking and disappears.
Channel Scanning
Your radio can scan all 22 channels for activity. To enter, quickly press the [SCAN] button. Repeat the same procedure to exit, Your radio will rapidly scan each of the 22 channels and stop on any active channel, Your radio will resume scanning after 5 seconds when the channel is no longer active. When you press the [PTT] button to transmit on an active channel, the scanning function will stop and remain on the active channel for 10 seconds before resuming scan when [PTT] button is no longer pressed. To resume scanning, quickly press the or button.
Scanning Privacy Codes
Press and hold [SCAN] button to enter the Privacy Codes scanning.
A flashing "CTC/DCS" will appear in the left status display to indicate that the radio is in Privacy Codes scanning mode,
In this mode, the lower display will cycle through the Privacy codes as they are being tested. Once the bits of the received Privacy code are determined, the "CTC/DCS" indicator will stop flashing. Press the [PTT] button to save the scanned tone into memory.
Using the Flashlight
You can use this radio in a critical situation. If you press  button, the radio turns on the high-intensity LED flashlight on your radio.
- When the SOS strobe is activated, your radio would work well as normal.
- Press
![]() button once, it will turn on continuously. (Always On mode)
button once, it will turn on continuously. (Always On mode) - And then, press
![]() button once, the Strobe Light emits the SOS signal, (Strobe SOS mode)
button once, the Strobe Light emits the SOS signal, (Strobe SOS mode) - And then, press
![]() button once, the light will be turned off.
button once, the light will be turned off.
- Press
Emergency Alert
Use Emergency Alert feature to send a signal to your team for help.
To activate the Emergency Alert function, press and hold the button for 3 seconds. The Emergency Alert  icon will appear on the display, the radio will send out a loud siren sound and the flashlight will flash, To deactivate the Emergency Alert function, please press and hold the button again for 3 seconds.
The Emergency Alert feature should only be used in critical situations.
Keypad Lock
To avoid accidentally changing the radio settings, press the [ /MENU] button for 2 seconds. The icon will
 ![]() appear on the display. [PTT] - [MONI] - [Flashlight] and [CALL] will still be active. Repeat the same procedure to unlock the keypad.
appear on the display. [PTT] - [MONI] - [Flashlight] and [CALL] will still be active. Repeat the same procedure to unlock the keypad.
Using the Weather Radio/Scan Weather Channel
Your radio has a NOAA Weather Radio function, to enable the user to receive weather reports from designated NOAA stations. Your radio also has a NOAA Weather Scan function, to enable the user to scan all 12 channels of the NOAA Weather Radio. While using the Weather Radio, you are not able to receive FRS communications.
- To turn the NOAA Weather Scan on, press and hold the [
![]() /MONI] button for 5 seconds while in FRS mode,
/MONI] button for 5 seconds while in FRS mode, ![]() icon appears. The radio will go to Weather band mode and start scanning all 12 channels and stop on any active channel. When the channel becomes inactive for 10 seconds the radio will resume scanning.
icon appears. The radio will go to Weather band mode and start scanning all 12 channels and stop on any active channel. When the channel becomes inactive for 10 seconds the radio will resume scanning. - To stop the NOAA WEATHER (WX) SCAN and set the channel manually on the Weather band, press the [SCAN] button during NOAA weather scan. The radio will stop scanning and the display will show the current Weather band channel setting and the
![]() icon.
icon. - While in Weather band mode\ press the MENU button, then press the
![]() or
or ![]() button to increase or decrease the number to the desired weather channel, and press the MENU button to confirm to select one of the 12 NOAA weather band channels.
button to increase or decrease the number to the desired weather channel, and press the MENU button to confirm to select one of the 12 NOAA weather band channels. - TO exit the Weather Radio broadcast mode, press and hold [
![]() /MONI] button.
/MONI] button. ![]() icon disappears.
icon disappears.
Working the MENU System
FRS Menu List

Privacy Codes
Your Radio incorporates two advanced coded squelch systems that can help to reduce interference from other users on any given channel, CTCSS (Continuous Tone Coded Squelch System) provides 50 privacy codes and DCS (Digitally Coded Squelch) provides 105 privacy codes. This provides a total of 155 Privacy Codes. Either system can be used on all channels, but both systems cannot be used on the same channel at the same time.![]()
To successfully communicate using a privacy code, both the sending and receiving radios must be tuned to the same channel and to the same privacy code system (CTCSS or DOS) and privacy code number. Each channel will remember the last privacy code system and number you select.
To select a Privacy Code for the current channel press the [MENU] button twice, and then the or buttons to select between "OF/CT/DC." Press the [MENU] button again and or buttons to select one of the 50 CTCSS Codes or one of the 105 DCS Codes. The Privacy Code icon on the display will indicate whether you set your Privacy Code in CTCSS or DCS mode. To confirm the selection, press the [PTT] button or press the [MENU] button again to move to the next feature setting.
NOTE: If you select a CTCSS Privacy Code, any pre-selected DCS Privacy Code will be canceled and vice-versa. Selecting a Privacy Code of "oF" will disable the Privacy feature. To communicate between two radios, all radios in your group must be set to the same channel and/or Privacy Code selections. The Privacy Code can only be set in channels 1~22.
VOX (Hands-Free Transmission)
Your radio has 3 VOX level settings: (oF/1/2/3).
To set VOX, press the [MENU] button until the display shows "VOX" blinking while on the right of the CHANNEL NUMBER display, an "oF" icon appears. Select "1", "2" or "3" by pressing the or buttons and push the [PTT] key, or press the [MENU] button again to move to the next feature setting.
VOX will be more sensitive on the "1" setting than on the "3" setting, To turn VOX off, press the [MENU] button until the display shows "VOX" blinking while on the right of the CHANNEL NUMBER display, a "1", "2" or "3" icon appears, Select by pressing the or buttons and push the [PTT] key, or press the [MENU] button again to move to the next feature setting.
Ten Call Tone Settings
Your radio has 10 selectable CALLALERTS.
To select, press the [MENU] button until a "CA" icon appears and to the right of the "CA" icon the current CALLALERT setting is displayed. Then press the or buttons to make the CALI-ALERT selections - the radio will emit a corresponding tone for each selection. To confirm, press the [PTT] button or press the [MENU) button to move to the next feature setting.
Emergency Alert Mode
This function can set the off alert/ site alert/ tone alert of the radio. Keep pressing the button for 3 seconds to start the alarm tone.![]()
To select, press the [MENU] button until a  icon appears and to the right of the icon the current Emergency Alert Model setting is displayed. Then press the or buttons to make the Emergency Alert Model selections. To confirm, press the [PTT] button or press the [MENU] button to move to the next feature setting.
NOTE: The following three options can be selected:
- OFF: means to close the alarm function;
- 1. Means local alarm, sounds alarm through your radio speaker only
- 2. Means broadcast alarm, transmits a cycling tone over-the air
Keypad Silent Operation
Your radio has a keypad silent operation mode. In this mode, all "keypad beeps" and "tones" are disabled. To set the keypad silent operation, press the [MENU] button until the display shows a "bP" icon. Select "on" or "oF" by pressing the or buttons and push the [PTT] key or [MENU] button.
Roger Beep (end of transmission) TONE
When the [PTT] button is released, the radio will beep to confirm to other users that your transmission has finished. To turn the ROGER BEEP tone on, press the [MENU) button until the display shows a "rb" icon while on the right of the "rb" display, an "oF" icon appears. Select "on" by pressing the or buttons and push the [PTT] key, or press the [MENU] button to move to the next feature setting. To turn the ROGER BEEP tone off, press the [MENU] button until the display shows a "rb" icon while on the right of the "rb" display, an "on" icon appears. Select "oF" by pressing the or buttons and push the [PTT] key, or press the [MENU] button to move to the next feature setting.
Dual Watch Function
Your radio has a DUAL WATCH function, to enable user to scan 2 channels for any activity. The first channel will be the current channel setting and the second channel will be the selected channel on the [MENU]. To turn the ![]() DUAL WATCH on, press the [MENU] button until the "oF" icon appears blinking on the left of the display, while the "dU" icon appears on the left. Select the second channel by pressing the or button. Press the [MENU] button again and the or buttons to choose the Privacy Code (oF/dc/ct). Then press the [MENU] button again and the or buttons to set the Privacy Code. PIs, note that the Privacy Code can be set only on Ch 1~22. To confirm, press the [PTT] button or the [MENU] button. The DW icon appears, the current channel and the watch channel flash alternately, indicating that the DUAL WATCH function is turned on, and the radio will start scanning the currently used channel/code and watch channel/code, and stop on any active channel. Your radio will resume scanning after 4 seconds when the channel is no longer active. When you press the [PTT] button to transmit on an active channel, the scanning function will stop and remain on the active channel for 10 seconds before resuming scan when the [PTT] button is no longer pressed. To turn the DUAL WATCH function off, press the [SCAN] button.
DUAL WATCH on, press the [MENU] button until the "oF" icon appears blinking on the left of the display, while the "dU" icon appears on the left. Select the second channel by pressing the or button. Press the [MENU] button again and the or buttons to choose the Privacy Code (oF/dc/ct). Then press the [MENU] button again and the or buttons to set the Privacy Code. PIs, note that the Privacy Code can be set only on Ch 1~22. To confirm, press the [PTT] button or the [MENU] button. The DW icon appears, the current channel and the watch channel flash alternately, indicating that the DUAL WATCH function is turned on, and the radio will start scanning the currently used channel/code and watch channel/code, and stop on any active channel. Your radio will resume scanning after 4 seconds when the channel is no longer active. When you press the [PTT] button to transmit on an active channel, the scanning function will stop and remain on the active channel for 10 seconds before resuming scan when the [PTT] button is no longer pressed. To turn the DUAL WATCH function off, press the [SCAN] button.
Technical Specifications
| Channels | 22 FRS/12 Weather |
| Sub-Codes | 50 CTCSS Tones/ 105 DCS Codes |
| Frequency Range | FRS |
| Operation Voltage | DC 3.7V ±10% |
| RF Output Power | 0.5W/2W (FRS) |
| FM Modulation | 11K0F3E@12.5KHz |
| Adjacent Channel Power | 60dB @ 12.5KHz |
| Transmission current | <1000mA |
NOTE: All specifications may be modified without prior notice or liability.
Trouble shooting guide
| Phenomena | Analysis | Solution |
| You cannot turn on the radio. | The battery may be installed improperly. | Remove and reattach the battery. |
| The battery power may run out. | Recharge or replace the battery. | |
| The battery may suffer from poor contact caused by dirty or damaged battery contacts. | Clean the battery contacts or replace the battery. | |
| During receiving, the voice is weak or intermittent. | The battery voltage maybe low. | Recharge or replace the battery. |
| The volume level may be low. | Increase the volume. | |
| The antenna maybe loose or maybe installed incorrectly. | Turn off the radio, and then remove and reattach the antenna. | |
| The speaker maybe blocked. | Clean the surface of the speaker. | |
| You cannot communicate with other group members. | The frequency or signaling type maybe inconsistent with that of other members. | Verify that your TX/RX frequency and signaling type are correct. |
| You may be too far away from other members, | Move towards other members. | |
| You hear unknown voces or nose. | You may be interrupted by radios using the same frequency. | Change the frequency, or adjust the squelch level. |
| The radio in analog mode maybe set with no signaling. | Request your dealer to set signaling for the current channel to avoid interference. | |
| You are unable to hear anyone because of too much noise and hiss. | You may be too fat away from other members. | Move towards other members. |
| Yau may be in an unfavorable position. For example, your communication may be blocked by high buildings Of blocked in an underground area. | Move to an open and flat area, restart the radio, and try again. | |
| It may be the result of external disturbance (such as electromagnetic interference}. | Stay away from equipment that may cause interference. | |
| The radio keeps transmitting. | VOX may be turned on or the headset is not installed in place. | Tum off the VOX function. Check that the headphones are in place. |
NOTE: If the above solutions cannot fix your problems, or you may have some other queries, please contact your dealer for more technical support.
FRS Frequency Chart (MHz)
")
NOAA Weather Radio Frequency List (US, CAN, AND INTL)
| Channel No. | RX Freq.(MHz) | Channel No. | RX Freq.(MHz) |
| 1 2 3 4 5 6 | 162.5500 162.4000 162.4750 162.4250 162.4500 162.5000 | 7 8 9 10 11 12 | 162.5250 161.6500 161.7750 161.7500 162.000 163.275 |
Appendix E. - DCS Table
DCS CODE LIST

Note: DCS codes can be programmed for use on Channels 1~22 only.
CTCSS Table
| Number | Frequency | Number | Frequency | Number | Frequency | Number | Frequency |
| 01 05 09 13 17 21 25 29 33 37 41 45 49 | 67.0 77.0 88.5 100.0 114.8 131.8 151.4 165.5 177.8 189.9 203.5 225.7 250.3 | 02 06 10 14 18 22 26 30 34 38 42 46 50 | 69.3 79.7 91.5 103.5 118,8 136.5 156.7 167.9 179.9 192.8 206.5 229.1 254.1 | 03 07 11 15 19 23 27 31 35 39 43 47 | 71.9 82.5 94,8 107.2 123 141.3 159,8 171.3 183.5 196.6 210.7 233.6 | 04 08 12 16 20 24 28 32 36 40 44 48 | 74.4 85.4 97.4 110.9 127.3 146.2 162.2 173.8 186.2 199.3 218.1 241.8 |
Note: CTCSS Chart can be programmed for use on Channels 1~22 only
Precautions for Portable Terminals
Operating Prohibitions
To protect you against any property loss, bodily injury or even death, be sure to observe the following safety instructions:
- Do not operate the product in a location containing fuels, chemicals, explosive atmospheres and other flammable or explosive materials. In such location, only an approved Ex-protection model is allowed for use, but any attempt to assemble of disassemble it is Strictly prohibited.
- Do not operate the product near or in any blasting area.
- Do not operate the product near any medical or electronic equipment that is vulnerable to RF signal.
- Do not hold the product while driving.
- Do not operate the product in any area where use of wireless communication equipment is completely prohibited.
Important Tips
To help you make better use of the product, be sure to observe the following instructions:
- Do not use any unauthorized or damaged accessory.
- Keep the product at least 2.5 centimeters away from your body during transmission.
- Do not keep the product receiving at high volume for a long time.
- For vehicles with an air bag, do not place the product in the area over the air bag or in the air bag deployment area.
- Keep the product and its accessories out of reach of children and pets.
- Please operate the product within the specified temperature range.
- Continuous transmission for a long time may lead to heat accumulation within the product. In this case, please keep it at a proper location for cooling.
- Handle the product with care.
- Do not disassemble, modify or repair the product and its accessories without authorization.
Hazardous Environments
Do not operate the radio in hazardous environments. Explosion or fire may result. Do not operate the radio near unshielded electrical blasting caps.
Under certain conditions, radios can interfere with blasting operations and may cause an explosion. Turn your radio OFF to prevent accidental transmission when in a blasting area or in areas posted: "Turn off two-way radio." Construction crews often use remote control RF devices to set off explosives.
Precautions for Batteries
Charging Prohibitions
To protect you against any property loss, bodily injury or even death, be sure to observe the following safety instructions:
- Do not charge or replace your battery in a location containing fuels, chemicals, explosive atmospheres and other flammable or explosive materials.
- Do not charge your battery that is wet. Please dry it with a soft and clean cloth prior to charge, 3-00 not charge your battery suffering deformation, leakage and overheat,
- Do not charge your battery With an unauthorized charger.
- Do not charge your battery in a location where strong radiation is present.
- Overcharge shall always be prohibited for it may shorten the life of your battery.
Maintenance Instructions
To help your battery work normally or prolong its life, be sure to observe the following instructions:
- Accumulated dust on charging connector may affect normal charging. Please use a clean and dry cloth to wipe it on a regular basis.
- It is recommended to charge the battery under 5ºC~40ºC. Violation of the said limit may cause battery life reduction or even battery leakage.
- To charge a battery attached to the product, turn it off to ensure a full charge.
- Do not remove the battery or unplug the power cord during charging to ensure a smooth charging process.
- Do not dispose of the battery in fire.
- Do not expose the battery to direct sunlight for a long time nor place it close to other heating sources.
- Do not squeeze and penetrate the battery, nor remove its housing.
Transportation Instructions
- Damaged batteries must not be transported.
- To avoid short circuit, separate the battery from metal pars or from each other if two or more batteries are transported in one packaging.
- The radio must be switched off and secured against switch-on, if the battery is attached.
The content of the shipment must be declared in the shipping documents and by a Battery Shipping Label on the packaging. Contact your hauler for the local regulations and further information.
SUPPORT AND MORE: www.baofengradio.com
 https://www.facebook.com/BaofengOfficial
Scan for details!

Documents / Resources
References
![www.baofengradio.com]() Baofeng -> The Official Baofeng Store | Get the Latest Baofeng News
Baofeng -> The Official Baofeng Store | Get the Latest Baofeng Newshttps://www.facebook.com/BaofengOfficial
Download manual
Here you can download full pdf version of manual, it may contain additional safety instructions, warranty information, FCC rules, etc.
Advertisement

Need help?
Do you have a question about the BF-33C and is the answer not in the manual?
Questions and answers