Table of Contents
Advertisement
Information
• The SEQTRAK functions described in this User Guide are for Ver. 1.1.
• All illustrations and screenshots (screenshots of the iOS app) included in this User Guide
are for the purpose of explanation. The actual specifications might differ.
Trademarks
• Windows is a registered trademark of Microsoft® Corporation in the United States and
other countries.
• Apple, iPhone, iPad, iPadOS, Lightning, Mac, and App Store are trademarks of Apple Inc.,
registered in the U.S. and other countries.
• IOS is a trademark or registered trademark of Cisco in the U.S. and other countries and is
used under license.
• Android and Google Play are trademarks of Google LLC.
• Wi-Fi and Wi-Fi CERTIFIED are registered trademarks or trademarks of Wi-Fi Alliance®.
• The Wi-Fi CERTIFIED™ Logo is a certification mark of Wi-Fi Alliance®.
• The Bluetooth® word mark and logos are registered trademarks owned by Bluetooth SIG,
Inc. and any user of such marks by Yamaha Corporation is under license.
• "USB Type-C" and "USB-C" are trademarks of USB Implementers Forum, registered in the
U.S. and other countries.
• MIDI is a registered trademark of the Association of Musical Electronics Industry (AMEI).
• All other company names and product names mentioned in this guide are the trademarks
or registered trademarks of their respective companies.
MUSIC PRODUCTION STUDIO
SEQTRAK User Guide
SEQTRAK User Guide
1
Advertisement
Table of Contents

Related Manuals for Yamaha SEQTRAK


Summary of Contents for Yamaha SEQTRAK
- Page 1 SEQTRAK User Guide Information • The SEQTRAK functions described in this User Guide are for Ver. 1.1. • All illustrations and screenshots (screenshots of the iOS app) included in this User Guide are for the purpose of explanation. The actual specifications might differ.
-
Page 2: Table Of Contents
1.3.4 Conceptual diagram of projects, tracks, and patterns ........12 1.4 About the SEQTRAK App ..................... 12 1.4.1 Obtaining the SEQTRAK app ................12 1.4.2 Connecting to the SEQTRAK app ..............12 2. Panel Sections and Main Functions ................13 a–f Left side ........................13 g–p Top Left (Drum section, Synth section) .............. - Page 3 7.4 Changing the Scale ...................... 41 7.5 Changing the Key ......................41 7.6 Playing Chords ......................42 7.7 Editing Chords ......................43 7.8 Switching to Keyboard Input Mode ................44 7.9 Entering Steps [Ver. 1.1] ....................44 SEQTRAK User Guide...
- Page 4 10.2.5 Effect parameters when SINGLE is selected ..........66 10.2.6 Example: Parameters when MASTER is selected and preset No. 1 [LPF - NO RESONANCE] of FILTER is selected ................66 10.3 Minimizing the Level of Effect Parameters (CLEAR FX) ......... 66 SEQTRAK User Guide...
- Page 5 12.5.1 Changing the combination of patterns in a scene ........74 12.5.2 Changing the length of a scene ..............74 13. SEQTRAK App ......................76 13.1 GUI Functions [GUI EDITOR] ..................76 13.2 Content Management Function [PROJECT/SOUND MANAGER] ......77 13.3 Visualizer Function [VISUALIZER] ................
- Page 6 16.1 Using a USB Flash Drive .................... 85 16.1.1 Formatting a USB flash drive ................86 16.1.2 Updating the firmware ..................86 16.2 Using the SEQTRAK App (for a Wired Connection) ..........87 16.3 Using the SEQTRAK App (for a Wireless Connection) ..........87 SEQTRAK User Guide...
- Page 7 17.5.6 MODULATION ....................96 17.5.7 DUCKER ......................97 17.5.8 OTHER ......................97 17.6 SEND EFFECT Presets ....................97 17.6.1 REVERB ......................97 17.6.2 DELAY ....................... 98 17.7 Description of Sound Parameters................98 17.8 Open-source Software ....................99 SEQTRAK User Guide...
-
Page 8: What Is Seqtrak
To get the most out of SEQTRAK, please read this User Guide for more information about advanced features and operations. - Page 9 The various operations of SEQTRAK are indicated as shown below. ・ Pressing a button, knob, or key ・ Pressing and holding a button, knob, or key ・ Pressing and holding a button, knob, or key for N seconds or longer ・...
-
Page 10: Seqtrak Configuration
1.2 SEQTRAK Configuration SEQTRAK is made up of three sections. 1.2.1 Drum section This section is used to produce rhythm parts. The Track knobs and Drum keys are used to control the seven Drum tracks (KICK, SNARE, CLAP, HAT 1, HAT 2, PERC 1, PERC 2). The most basic method of producing a rhythm part is to use the Drum keys to enter steps. -
Page 11: Synth Section
SEQTRAK manages the data of a single song in units called “projects.” Up to eight projects can be stored in SEQTRAK, and one project can be used at a single time. A project consists of 11 tracks, and up to 6 patterns can be created on each track. A project also includes settings and states such as tempo and track volume. -
Page 12: Patterns
: Selected pattern : Pattern not selected 1.4 About the SEQTRAK App Using the dedicated SEQTRAK app, you can edit sounds in more detail, produce images linked to performances SEQTRAK, and manage your content. See “13. SEQTRAK App” for an overview of the functions in the SEQTRAK app. -
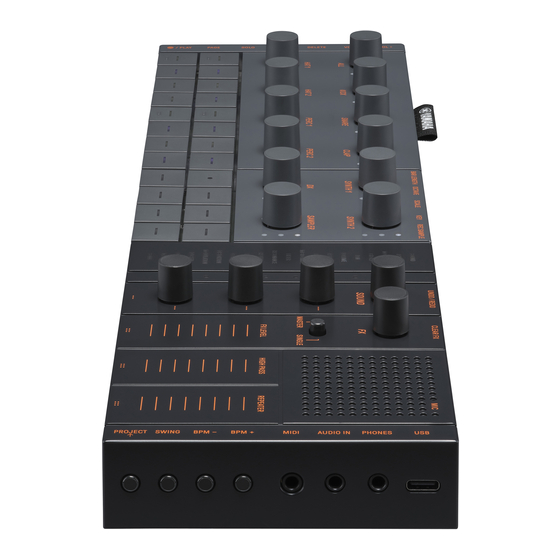
Page 13: Panel Sections And Main Functions
Used to adjust the volume of sound coming from the built-in speaker or headphones connected to the [PHONES] jack. [DELETE] button Used to delete a pattern or project. [MUTE] button Used to mute a specific track. [SOLO] button Used to solo a specific track. SEQTRAK User Guide... -
Page 14: G-P Top Left (Drum Section, Synth Section)
Press to play the selected Synth track (SYNTH 1, SYNTH 2, or DX) or SAMPLER track. [BAR LENGTH] button Used to change the length of the pattern in the currently selected Synth track (SYNTH 1, SYNTH 2, DX) and SAMPLER track. SEQTRAK User Guide... -
Page 15: Q-A Top Right (Sound Design & Fx Section)
Used to UNDO/REDO sound and effect parameter changes. Sound Design knobs 1–4 Turn these knobs to change the sound of a track or adjust parameters. Sound Design Page button Press to switch between the sound parameters controlled by the Sound Design knobs. SEQTRAK User Guide... -
Page 16: B-H Right Side
USB Type-C terminal. The included USB-C to USB-C cable can be used to charge the unit and to connect to computers and MIDI devices. NOTICE ・ After disconnecting the USB cable, wait at least 6 seconds before connecting it again. Quickly disconnecting and connecting the cable could cause the unit to malfunction. SEQTRAK User Guide... - Page 17 The number of lights on the Global Meter gives a rough indication of the current tempo. [SWING] button Press this button to apply a swing feeling to the entire project. [PROJECT↑] button Used to switch between projects. SEQTRAK User Guide...
-
Page 18: Charging And Power Supply
3. Charging and Power Supply 3.1 Charging SEQTRAK can be charged with a USB power adapter / USB mobile battery by using the included USB-C to USB-C cable. (When using a USB mobile battery for smartphones, make sure that it meets the requirements in USB power adapter / USB mobile battery requirements.) Connect the power supply and the included USB-C to USB-C cable in the order... -
Page 19: Usb Power Adapter / Usb Mobile Battery Requirements
USB device might not meet the requirements or might be damaged. Try using another USB device that meets the requirements, etc. If the product appears to be malfunctioning, consult Yamaha service personnel. 3.1.1 Charge status (when the power is on) Hold down both the [ALL] knob and the [ /PLAY] button. -
Page 20: Charge Status (When The Power Is Off)
LED lamp will turn off. The battery level is not indicated when the power is off. If SEQTRAK cannot be charged due to battery failure or other reasons, the top LED lamp of the Global Meter flashes in red. -
Page 21: Power Supply
You can disable and enable (30 minutes) the Auto Power Off function by turning on SEQTRAK while pressing the lower left Drum key. NOTE ・ You can use the SEQTRAK app to change the time for the Auto Power Off function. SEQTRAK User Guide... -
Page 22: Projects
SEQTRAK manages the data of a single song in units called “projects.” Up to eight projects can be stored in SEQTRAK, and one project can be used at a single time. A project consists of 11 tracks, and up to 6 patterns can be created on each track. A project also includes settings and states such as tempo and track volume. -
Page 23: Deleting A Project
5 and 300 BPM. Press and hold the [BPM+] or [BPM−] button to scroll through the values continuously. Press both buttons at the same time to set the tempo to the starting value for the recently opened project. SEQTRAK User Guide... -
Page 24: Applying A Swing Feeling To A Project
4.5.3 Turning the metronome on/off To turn the metronome on/off, hold down the [ALL] knob and press the [BPM+] button. The Global Meter lights up white when the metronome is on and turns off when the metronome is off. SEQTRAK User Guide... -
Page 25: Temporarily Saving A Project [Ver. 1.1]
NOTE ・ You can use the SEQTRAK app to change the sound and volume of the metronome. There are 5 metronome sounds to choose from. The volume can be adjusted between 0 and 127. ・ The metronome clicks in 4-step intervals, with an accented note occurring at the... -
Page 26: Tracks And Patterns
[ALL] knob to enable reserved switching on all 11 tracks. 5.1.2 Using a Drum key to switch patterns Hold down a Track knob and press the Drum key that is lit for reserved switching. Drum keys 1–6 correspond to patterns 1–6. SEQTRAK User Guide... -
Page 27: Changing Launch Quantize
Quantize steps. Press and turn the [ALL] knob to change the value in increments of one measure (16 steps). The number of measures is displayed on the Global Meter, and the number of steps is displayed on the Drum keys. SEQTRAK User Guide... -
Page 28: Changing The Length Of A Pattern
5.2.2 Synth tracks (SYNTH 1, SYNTH 2, DX), SAMPLER track Press the [BAR LENGTH] button to change the length of a pattern on a Synth or SAMPLER track. The pattern length can be set to 1, 2, 4, or 8 bars. SEQTRAK User Guide... -
Page 29: Changing The Number Of Patterns (3 Patterns ⇔ 6 Patterns)
To reduce the number of track patterns from six to three, hold down a Track knob and press Drum keys 4–6 simultaneously. When the number of patterns reaches three, Drum keys 4–6 light in blue. SEQTRAK User Guide... -
Page 30: Deleting A Pattern
To paste a copied pattern, hold down the Track knob or [ALL] knob together with the [Page] button and press a Drum key. If pasting is successful, the Drum key that is the paste destination will flash for 1 second. SEQTRAK User Guide... -
Page 31: Selecting And Auditioning Tracks
The SAMPLER track has samples assigned to each of the seven Synth keys. To change the sound of a sample, press the [SAMPLER] knob to select the SAMPLER track. Next, press a Synth key to select a sample, and then turn Sound Design knob 1 on Sound Design Page 1. SEQTRAK User Guide... -
Page 32: Selecting A Sound Category (Category Jump)
・ If a sound registered as a favorite does not exist, FAVORITE will not light up. 5.7.2 Drum track sound categories 5.7.3 Synth track (SYNTH 1, SYNTH 2, and DX) sound categories 5.7.4 SAMPLER track sound categories SEQTRAK User Guide... -
Page 33: Muting And Soloing A Track
NOTE ・ Mute and Solo can also be used in Mixer mode Song mode. ・ If a track is soloed while it is muted, solo takes precedence. When the track is un-soloed, the mute status is restored. SEQTRAK User Guide... -
Page 34: Copying And Pasting Track Steps [Ver. 1.1]
(SYNTH1, SYNTH2, and DX). NOTE ・ All parameters, including Parameter Locks and Motion Recording, can be copied and pasted as is. However, if the effect type differs between tracks, the effect parameters will not be pasted. SEQTRAK User Guide... -
Page 35: Drum Tracks
Press the [PAGE] button to switch pages. The current page is indicated by a flashing cyan blue on the Global Meter. NOTE ・ To change the length of a pattern, see “5.2 Changing the Length of a Pattern.” SEQTRAK User Guide... -
Page 36: Fine-Tuning The Rhythmic Timing Of A Step (Micro Timing)
・ If the Drum key for which you want to set a Substep is on the upper row, five Drum keys on the lower row will light. If it is on the lower row, five Drum keys on the upper row will light. SEQTRAK User Guide... -
Page 37: Real-Time Input
(note) of the Drum tracks for the Synth keys you press. While recording, the Record key flashes in red and the pattern is displayed on the Drum keys. NOTE ・ When the power is turned off, Real-time Input mode is automatically disabled. SEQTRAK User Guide... -
Page 38: Changing The Probability Of Triggering A Step [Ver. 1.1]
・ If the probability for triggering a step is changed when it is at the minimum level, it moves to the maximum level. ・ When multiple steps are changed at the same time, the Global Meter indicates the highest probability level. SEQTRAK User Guide... -
Page 39: Synth Tracks (Synth 1, Synth 2, Dx)
・ You can record overdubs while leaving previously recorded notes in place. However, if you record a note with the same pitch as a previously recorded note, the length of the previously recorded note will be rewritten. SEQTRAK User Guide... -
Page 40: Turning Quantize On/Off
Quantize does not affect previously recorded data. NOTE ・ Use the SEQTRAK app to make advanced quantize settings. Quantize can be set to 1/32, 1/16T, 1/16 (default), 1/8T, 1/8, or OFF. ・ Quantize settings are also applied during real-time input for Drum tracks. -
Page 41: Changing The Scale
This operation does not affect previously recorded data. NOTE ・ You can use the SEQTRAK app to edit the scale of the currently selected project. 7.5 Changing the Key Press the [KEY] button to change in half steps the key that is used when the Synth keys are pressed. -
Page 42: Playing Chords
Turn Sound Design knob 2 on Sound Design Page 1 to switch between the MONO, POLY, and CHORD settings. For the CHORD setting, seven chords have been assigned. The MONO/POLY/CHORD settings can be enabled for the SYNTH 1, SYNTH 2, and DX tracks. SEQTRAK User Guide... -
Page 43: Editing Chords
This operation does not affect previously recorded data. NOTE ・ The notes that make up a chord can also be edited in the SEQTRAK app. ・ Chords can be set for each track, and they are linked to the scale for that project. -
Page 44: Switching To Keyboard Input Mode
Press a Drum key to turn the corresponding step on/off. The step contains the last note played via Synth key/keyboard input mode/external MIDI device for the currently selected track. If multiple notes are played simultaneously, such as when MONO/POLY/CHORD is set to CHORD, all selected notes are entered for that step. SEQTRAK User Guide... - Page 45 The length of the note is indicated by the Drum keys and the Global Meter. NOTE ・ When the power is turned off, Step Input mode is automatically disabled. ・ In Step Input mode, you can change the Micro Timing of notes. SEQTRAK User Guide...
-
Page 46: Sampler Track
If a cable is connected to the [AUDIO IN] jack, sampling is performed for the AUDIO IN input. If the sampling source is USB audio input, audio that is input via the USB connection will be sampled. SEQTRAK User Guide... -
Page 47: Changing The Sampling Source
2 seconds and press the Drum key that is lit in white. 8.4 Resampling Resampling is the process of sampling audio directly from the SEQTRAK as it is being played by the device. Use the following procedure for resampling. -
Page 48: Setting The Count-In To Start Sampling
Use the same procedure to exit Monitoring mode. 8.8 Turning Auto-Normalize On/Off The auto-normalize function automatically maximizes the volume of sampled audio. This is set to on by default. You can use the SEQTRAK app to turn auto-normalize on/off. SEQTRAK User Guide... -
Page 49: Deleting Patterns For Each Sample [Ver. 1.1]
Press the [SAMPLER] knob to select the SAMPLER track. Press a Synth key to select the sample to be edited. Press a Drum key to turn that step on/off. The Drum key displays only the data for the selected sample. SEQTRAK User Guide... - Page 50 The length of the note is indicated by the Drum keys and the Global Meter. NOTE ・ When the power is turned off, Step Input mode is automatically disabled. ・ In Step Input mode, you can change the Micro Timing of notes. SEQTRAK User Guide...
-
Page 51: Sound Design
Turn Sound Design knobs to adjust the sound parameters of the selected track. To make greater changes to the parameters, simultaneously press and turn the Sound Design knobs. The sound parameters to be adjusted are displayed in the index. SEQTRAK User Guide... -
Page 52: Switching Between The Sound Parameter Operation
✓ AEG ATTACK ATTACK ✓ AEG DECAY DECAY ✓ LP-HP FILTER CUTOFF FILTER ✓ LP-HP FILTER RESONANCE RESONANCE ✓ REVERB SEND REVERB ✓ DELAY SEND DELAY ✓ EQ HIGH GAIN OTHER (ADVANCED) ✓ EQ LOW GAIN OTHER SEQTRAK User Guide... -
Page 53: Synth Track (Synth 1 And Synth 2) Sound Parameter Adjustment Items
・ If a Synth track is in Step Input mode Parameter Lock is enabled, [PITCH] will light up instead of [MONO/POLY] and [CHORD]. At this time, you can change the pitch (note number) of the note for the selected step in half steps. SEQTRAK User Guide... -
Page 54: Synth Track (Dx) Sound Parameter Adjustment Items
・ If a Synth track is in Step Input mode Parameter Lock is enabled, [PITCH] will light up instead of [MONO/POLY] and [CHORD]. At this time, you can change the pitch (note number) of the note for the selected step in half steps. SEQTRAK User Guide... -
Page 55: Sampler Track Sound Parameter Adjustment Items
OTHER START POINT OTHER END POINT OTHER ✓ PEG ATTACK LEVEL OTHER (ADVANCED) ✓ PEG DECAY TIME OTHER NOTE ・ For a description of each sound parameter adjustment item, see “17.7 Description of Sound Parameter Adjustment Items.” SEQTRAK User Guide... -
Page 56: Setting Sound And Effect Parameters For Each Step (Parameter Lock)
Hold down a Drum key that is on and turn Sound Design knobs 1–4 or sliding the [FX LEVEL] touch slider to enable Parameter Lock for that step. Steps for which Parameter Lock is enabled are lit in purple. For details about parameters for which Parameter Lock can be enabled, see “9.1 Adjusting Sound Parameters.” SEQTRAK User Guide... -
Page 57: Deleting A Parameter Lock
9.2.1 Deleting a Parameter Lock To delete the Parameter Lock of the selected pattern, hold down the [DELETE] button and press the Sound Design knob or the [FX] knob. The parameter for the corresponding knob is deleted. SEQTRAK User Guide... - Page 58 [DELETE] button and simultaneously press the Sound Design knob or the [FX] knob. The parameter for the corresponding knob is deleted for only the selected step. [Ver. 1.1] Turning a step off removes all Parameter Locks for the selected step. SEQTRAK User Guide...
-
Page 59: Recording The Movement Of Sound And Effect Parameters In Steps (Motion Recording)
Recording is executed while Parameter Lock is applied to data, that data will be overwritten. 9.3.1 Deleting a Motion To delete a Motion, hold down the [DELETE] button and press the Sound Design knob or the [FX] knob. SEQTRAK User Guide... -
Page 60: Undoing/Redoing Sound And Effect Parameters
NOTE ・ You can use the SEQTRAK app to add and remove your favorite sounds. ・ When a sound is saved from SEQTRAK, “_editNN” (NN: number) is appended to the end of the name of the original sound. [Ver. 1.1] 9.6 Deleting a Sound... -
Page 61: Importing A Sound
The SEQTRAK app provides additional content, including various types of sounds. You can use the content management function in the SEQTRAK app to import this additional content. You can also use the desktop version of the SEQTRAK app to import your own samples into SEQTRAK. -
Page 62: Effects
There are three types of effects: track effects, send effects, and master effects. You can use the touch sliders to adjust the effect parameters. More advanced settings are also available on the SEQTRAK app. 10.1.1 Track effects Track effects set on a track-by-track basis. Track effect parameters are recorded for each sound. -
Page 63: Send Effects
In Mixer mode, you can change the type of delay and adjust the parameters. SEND LEVEL can be adjusted by turning Sound Design knob 1 on Sound Design Page 3, or by pressing Sound Design knob 3 in Mixer mode and turning each Track knob. SEQTRAK User Guide... -
Page 64: Master Effects
You can use the SEQTRAK app to change the effect type. 3. REPEATER Use the [REPEATER] touch slider to adjust the parameters. The default setting is BEAT REPEAT, which repeats the input sound. You can use the SEQTRAK app to change the effect type. 4. COMPRESSOR This effect compresses loud voices and lifts quiet voices to create a more dynamically consistent and powerful sound. -
Page 65: Changing And Adjusting Effects
10.2.3 Adjusting effect parameters Slide the [FX LEVEL]/[HIGH PASS]/[REPEATER] touch sliders to adjust the effect parameters. Each touch slider has different effect parameters for adjusting assigned to each page. Press the FX Page button to switch between effect pages. SEQTRAK User Guide... -
Page 66: Effect Parameters When Master Is Selected
・ For a list of presets, see “17.4 MASTER EFFECT Presets” and “17.5 SINGLE EFFECT Presets.” 10.3 Minimizing the Level of Effect Parameters (CLEAR FX) Press the [CLEAR FX] button to minimize the level of the currently selected effect parameter. SEQTRAK User Guide... -
Page 67: Mixer Mode
Press Sound Design knobs 1–4 to select the sound parameters to be adjusted. The sound parameters correspond to Sound Design knobs 1–4. From the top, they are set to PAN, VOLUME, REVERB SEND, and DELAY SEND. The index of the selected parameter lights up. SEQTRAK User Guide... -
Page 68: Changing And Adjusting Send Effects (Reverb, Delay)
11.3.2 Adjusting send effect (REVERB, DELAY) parameters Slide the [FX LEVEL]/[HIGH PASS]/[REPEATER] touch sliders to adjust the parameters. Different send effect parameters for adjusting are assigned to each page. To switch pages, press the FX Page button. SEQTRAK User Guide... -
Page 69: Send Effect (Reverb, Delay) Parameters
FX LEVEL REVERB TIME HIGH PASS HIGH PASS FILTER CUTOFF REPEATER BEAT REPEAT LENGTH FX LEVEL REVERB TIME HIGH PASS ROOM SIZE REPEATER HIGH DAMP FREQUENCY NOTE ・ For a list of presets, see “17.6 SEND EFFECT Presets.” SEQTRAK User Guide... -
Page 70: Song Mode
Use the same procedure to exit scene mode. NOTE ・ Exiting song or scene mode does not stop playback. Pattern combinations and mute/solo status are maintained when you exit Song mode and scene mode. SEQTRAK User Guide... -
Page 71: Playing/Stopping A Scene
In Song mode, if you make this change while a scene is playing, the selected scene will start when the currently playing scene plays to the end. In scene mode, the selected scene will start at the Launch Quantize timing. SEQTRAK User Guide... -
Page 72: Repeating A Scene (Loop Playback)
To cancel loop playback, press the Drum key or select another scene. 12.2.3 Repeating an entire song (Loop Playback) You can use the SEQTRAK app to loop an entire song. The default setting is off, which means that song playback stops when the last scene finishes playing. -
Page 73: Adding Scenes
To delete a scene, hold down the [DELETE] button and press the Drum key that is lit in red. Scenes behind the deleted scene will be moved forward in order. NOTE ・ The scene being played back will not be deleted. SEQTRAK User Guide... -
Page 74: Editing A Scene
Press and turn the [ALL] knob to change the scene length in increments of one measure (16 steps). The number of measures is displayed on the Global Meter, and the number of steps is displayed on the Drum keys. SEQTRAK User Guide... - Page 75 ・ If you turn the [ALL] knob fully left, all Drum keys light in cyan blue and the scene length is set to AUTO. This will automatically set the length of the scene to the length of the longest pattern in the scene. SEQTRAK User Guide...
-
Page 76: Seqtrak App
13. SEQTRAK App The four main functions of the SEQTRAK app are described below. For details about how to obtain the SEQTRAK app, see “1.4.1 Obtaining the SEQTRAK app.” For details about how to connect the SEQTRAK app to SEQTRAK, see “14.1 Connecting to the SEQTRAK... -
Page 77: Content Management Function [Project/Sound Manager]
SEQTRAK lights up red and SEQTRAK enters content mode. If the connection to the SEQTRAK app is lost, you can press the [ALL] knob to exit content mode. ・ In content mode, SEQTRAK can perform only two operations: turning off the power and exiting content mode. -
Page 78: Visualizer Function [Visualizer]
Use this function to create 3D objects and visual effects that respond in real time to your performance on SEQTRAK. You can use it for live performances, or to record and publish the visuals you create on the Internet or other media. There is also an AR mode that uses your smart device’s camera to overlay 3D objects and visual effects on real images. -
Page 79: Dynamic Tutorial Function [Dynamic Tutorial]
The operations that are being executed on SEQTRAK are displayed on the app’s screen. You can use this function to get a better understanding of SEQTRAK as you use it. Information related to the operation of SEQTRAK can be found under [RELATED INFORMATION]. -
Page 80: Connections
14. Connections 14.1 Connecting to the SEQTRAK App There are two ways to connect to the SEQTRAK app: wired and wireless (Bluetooth and Wi- Fi). *The availability of wireless functionality in SEQTRAK varies from country to country. *The SEQTRAK app for Windows does not support wireless functionality. -
Page 81: Wireless Connection (Bluetooth)
14.1.2 Wireless connection (Bluetooth) Open [DEVICE CONNECTION] in the SEQTRAK app. Hold down the [ALL] knob on SEQTRAK and press the [SWING] button. The Global Meter will light in white for 2 seconds and then SEQTRAK will wait 30 seconds for a Bluetooth connection. From [DEVICE CONNECTION] in the SEQTRAK app, select [SEQTRAK_6 alphanumeric characters specific to the device] to complete the connection. -
Page 82: Connecting To Midi Devices
MIDI signals can be exchanged by connecting SEQTRAK to a MIDI device. 14.2.1 Using a USB-C to USB-C cable Use the included USB-C to USB-C cable to connect SEQTRAK to a MIDI device. If the MIDI device requires power, SEQTRAK can supply up to 500 mA of current. However, current cannot be supplied to the MIDI device if the battery power of SEQTRAK is too low (Global Meter at 2 LEDs or less). -
Page 83: Using A Midi Conversion Cable
・ The current supplied by a computer is limited to 500 mA. Therefore, under certain usage conditions, the internal battery could be drained. ・ If you want to use SEQTRAK while charging the built-in battery, use the included USB-C to USB-C cable to connect the unit to a computer with a USB Type-C port. -
Page 84: Settings
You can use the SEQTRAK app to set the MIDI clock. 15.3.2 Setting MIDI output filters The output of a variety of MIDI data from SEQTRAK can be selectively turned on and off. You can use the SEQTRAK app to set MIDI output filters. -
Page 85: Firmware Updates
16. Firmware Updates The firmware can be updated to improve the functionality and operability of SEQTRAK. We recommend that you update your firmware to the latest version in order to enjoy the full functionality of SEQTRAK. You can choose from the following three methods of updating the firmware. -
Page 86: Formatting A Usb Flash Drive
16.1.1 Formatting a USB flash drive Hold down the [DX] knob and the [UNDO/REDO] button and turn on SEQTRAK to format the connected USB flash drive. When formatting is complete, all index light in white. When formatting is complete, press the [ /PLAY] button to turn off the power. -
Page 87: Using The Seqtrak App (For A Wired Connection)
SEQTRAK. 2. Open the SEQTRAK app on your smart device or computer. 3. Follow the onscreen instructions in the SEQTRAK app to perform the update. If the update fails, try updating again. 16.3 Using the SEQTRAK App (for a Wireless Connection) Update procedure 1. -
Page 88: Documentation
Preset sounds: 2032; Preset Sampler sounds: 392 * Can be added from the SEQTRAK app Project Number of Projects 8 * Can be saved to the SEQTRAK app Connectivity Connectors USB Type-C (power, MIDI to host, MIDI to device, audio) -
Page 89: Midi Channels
Sequencer Block Maximum Steps 128 NOTICE ・ On Android devices, the USB audio interface function might not work properly when using an app other than the SEQTRAK app. ・ Bluetooth and Wi-Fi are not supported for Windows. 17.2 MIDI Channels... -
Page 90: Midi Control Change Parameters
8-10 SYNTH, DX 1=ON 0-16 ARP TYPE 8-10 SYNTH, DX (0=OFF) ARP GATE 8-10 0-127 SYNTH, DX ARP SPEED 8-10 SYNTH, DX FM ALGORITHM 0-127 FM MODULATION 0-127 AMOUNT FM MODULATOR 0-127 FREQUENCY FM MODULATOR 0-127 FEEDBACK SEQTRAK User Guide... -
Page 91: Effect Parameters
-ASSIGNED PARAMETER 3 17.3.3 Mute/Solo PARAMETER CHANNEL RANGE AVAILABLE ON 0-63=OFF MUTE 1-11 DRUM, SYNTH, DX, SAMPLER 64-127=ON 0-11 (0=OFF SOLO 1-11 1=TRACK1 DRUM, SYNTH, DX, SAMPLER 2=TRACK2… 11=TRACK11) NOTE ・ MUTE and SOLO are receive only. SEQTRAK User Guide... -
Page 92: Other
SMALL ROOM 2 SPX ROOM MID ROOM SPX ROOM REVERB TIME SMALL HALL SPX HALL LPF CUTOFF - DRY/WET FREQUENCY MID HALL SPX HALL STAGE SPX STAGE GATED REVERB GATED REVERB ROOM SIZE REVERSE REVERB REVERSE REVERB SEQTRAK User Guide... -
Page 93: Delay
PRESENCE AMP SIMULATOR 2 - LPF CUTOFF - AMP SIMULATOR 2 DRY/WET OVERDRIVE SETTING 2 FREQUENCY BIT CRUSHER BIT CRUSHER DRY/WET SAMPLE RATE DIGITAL - DRY SEND TO - DIGITAL TURNTABLE CLICK LEVEL NOISE LEVEL TURNTABLE NOISE SEQTRAK User Guide... -
Page 94: Modulation
HARMONIC - HPF CUTOFF - HARMONIC ENHANCER DRIVE MIX LEVEL ENHANCER FREQUENCY AUTO SYNTH AUTO SYNTH AM DEPTH MOD DEPTH DELAY LEVEL SLICE SLICE GATE TIME DRY/WET DIVIDE TYPE VINYL BREAK VINYL BREAK SPEED BREAK SPEED ADJUST SEQTRAK User Guide... -
Page 95: Single Effect Presets
DELAY TIME L>R & PING PONG DELAY 8TH DELAY DELAY TIME R>L TEMPO DELAY - TEMPO DELAY 16TH DELAY TIME STEREO ANALOG DELAY - ANALOG DELAY - DELAY TIME MODERN MODERN ANALOG DELAY - ANALOG DELAY RETRO DELAY TIME RETRO SEQTRAK User Guide... -
Page 96: Compressor
AUTO PAN AUTO PAN LFO SPEED L/R DEPTH LFO WAVE TREMOLO TREMOLO LFO SPEED AM DEPTH PM DEPTH RESONANCE – VCM AUTO WAH VCM AUTO WAH SPEED OUTPUT OFFSET RING MODULATOR RING MODULATOR DRY/WET OSC FREQ LFO DEPTH SEQTRAK User Guide... -
Page 97: Ducker
R3 PLATE R3 PLATE DIFFUSION FREQUENCY HIGH DAMP - HD PLATE HD PLATE ROOM SIZE FREQUENCY LPF CUTOFF - SPX STAGE SPX STAGE DIFFUSION FREQUENCY LPF CUTOFF - REV X HALL REV X HALL ROOM SIZE FREQUENCY SEQTRAK User Guide... -
Page 98: Delay
EQ. Sets the amount of gain for increasing or decreasing the low EQ LOW GAIN frequency range with the EQ. Selects the voicing method. MONO/POLY/CHORD MONO: single tone, POLY: multiple tones, CHORD: chords SEQTRAK User Guide... -
Page 99: Open-Source Software
The time it takes to return to the original pitch from the pitch set by PEG ATTACK LEVEL changes. 17.8 Open-source Software The firmware for SEQTRAK contains open-source software. Copyright information and terms of use for each open-source software can be found on the downloads page of the following website.
Need help?
Do you have a question about the SEQTRAK and is the answer not in the manual?
Questions and answers