Table of Contents
Advertisement
Quick Links
Advertisement
Table of Contents

Related Manuals for Laser LSH-FHD360


Summary of Contents for Laser LSH-FHD360
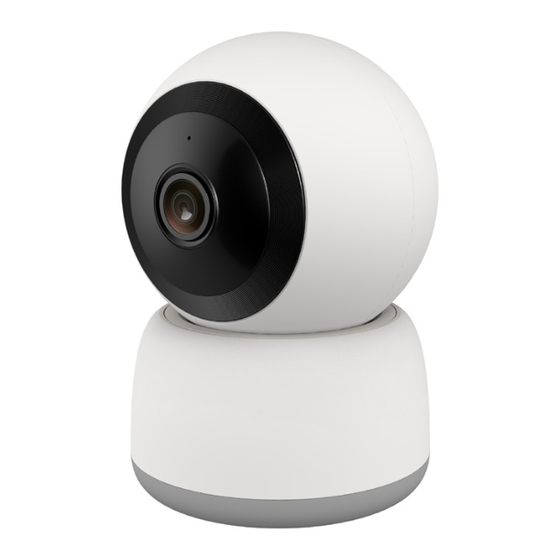
- Page 1 User Manual FHD Pan & Tilt 360° Camera LSH-FHD360/362P...
-
Page 3: Safety Information
SAFETY INFORMATION • For indoor use only. • Only use recommended power adapters as indicated in the specifications. • Keep device away from water, fire, humidity or hot areas. • Don't try to open, fix or modify the device. • Don't use the device where wireless devices are not allowed. -
Page 4: What's In The Box
UHS Speed Class 1 (U1) or higher. • Smartphone or tablet connected to a 2.4GHz Wi-Fi network. • Wi-Fi network password. Installation process: 1. Install the Laser SmartHome app on your smartphone or tablet. 2. Connect the camera using the app. 3. Install the camera. -
Page 5: Install App
INSTALL APP Scan the QR code to get the Laser SmartHome app on your iOS or Android device. Apple App Store Laser SmartHome Google Play (supported on app icon Store (supported iOS 11.0 and up) on Android 6.0 and up) Launch the app. -
Page 6: Configure Settings
CONFIGURE SETTINGS Configure recommended app settings: 1. Tap on Me icon in the bottom right. 2. Tap on (Settings) icon in the top right. NOTE: App features and screenshots may change as we keep improving the app. - Page 7 CONFIGURE SETTINGS continued... 3. Select App Notifications. 4. Turn on all notification settings. 5. Return to the app's home screen.
- Page 8 TURN ON CAMERA 1. Ensure Wi-Fi is enabled on your smartphone or tablet. NOTE: Use a stable 2.4GHz Wi-Fi network only. 2. Manually rotate the camera upwards to find the Reset button and the microSD card slot. 3. Insert a microSD card (up to 256GB) with metal contacts facing up and push it in until you hear a clicking noise.
- Page 9 TURN ON CAMERA continued... 5. Wait for the camera to start up. A voice prompt will confirm it's ready to connect. A fast blinking blue LED also indicates readiness to connect. If the blue LED blinks slowly, tilt the camera up, locate the Reset button, press it with a pin until it beeps, then let go.
- Page 10 CONNECT WITH APP Discover device 7. The app will find the device; tap Add. Skip to page 14. 8. If the app does not find the device, go to Camera & Lock > Smart Camera (Wi-Fi) on the left panel.
- Page 11 CONNECT WITH APP Reset Device 9. Confirm the blue LED is blinking rapidly.
- Page 12 CONNECT WITH APP Confirm Wi-Fi Network 10. Confirm/enter Wi-Fi network name and password. NOTE: Your device must be connected to a 2.4GHz Wi-Fi network.
- Page 13 CONNECT WITH APP Scan QR Code 11. Hold your device with the QR code in front of the camera. Gently move it back and forth until the camera detects it clearly. When the camera reads the code, it will beep and start connecting to your Wi-Fi.
- Page 14 CONNECT WITH APP continued... 12. Wait for the app to confirm the camera is added. 13. If it fails, restart the process from page 8.
-
Page 15: Install Camera
INSTALL CAMERA After adding your camera in the Laser SmartHome app, choose where to put it: on a table, shelf, wall or ceiling using the camera base and screws provided. Ensure a strong Wi-Fi signal for the best video streaming by placing the camera near your router. -
Page 16: Access Camera
ACCESS CAMERA Laser SmartHome App Home Screen Tap to access the app for the camera: view live and recorded video, and configure settings... -
Page 17: App Interface
APP INTERFACE Camera App Home Screen Access device settings (see Tap to select page 18) live video Enable/disable resolution: SD capturing audio or HD Tap to view in different aspect ratios: Timestamp widescreen or narrow Swipe in any direction to change camera's view;... - Page 18 APP INTERFACE Additional Features Go back to previous screen View manually Switch between recorded light/dark app media themes Watch automatically Stop recording recorded manually media Enable siren Turn on/ off/auto infra-red Additional lights features See notification Enable/ messages disable motion detection Enable/disable motion tracking...
- Page 19 SETTINGS Change device name, icon and location See IP & MAC addresses, Wi-Fi signal strength and device ID Turn off video capturing to ensure privacy See page 20 Turn on/off infra- red lights in dark environments Access motion detection-related settings (see page 21) Access Onvif-related settings NOTE: App features and screenshots may change as we keep...
- Page 20 SETTINGS continued... Format microSD card; see storage-related information Configure recording modes Enable offline notification Share access to the device with others Add camera to Home screen of your device Update camera firmware Remove camera from account...
-
Page 21: Basic Function Settings
BASIC FUNCTION SETTINGS Enable - shows blue LED indicator while monitoring Enable to flip camera image (when ceiling mounted) Enable to display date & time on video Select 1-way or 2-way communication mode. -
Page 22: Motion Detection Settings
MOTION DETECTION SETTINGS Turn on/off motion detection Adjust motion detection sensitivity level: Low, Medium or High Turn on/off motion tracking Schedule when to start/end recording Schedule the event: determine its frequency and timing Turn notifications on/off for events Turn motion detection on/off... -
Page 23: Recording Settings
RECORDING SETTINGS Turn on/off recording to microSD card Select continuous recording or when motion event has been detected Schedule when to start/end recording Schedule the event: determine its frequency and timing Turn notifications on/off for events Turn recording on/off to microSD card... -
Page 24: Video Playback Screen
VIDEO PLAYBACK SCREEN Timestamp Audio on/off Record videos from event Change recordings* playback speed Delete event Watch in recording full screen landscape mode Download event recording Capture photos Pick date from event recordings* Zoom in/out Event recordings with spread and pinch gestures to stretch/shrink timeline... - Page 25 GALLERY SCREEN Captured photos and videos from live stream or event recordings can be viewed here. Share recording Delete recording...
-
Page 26: Additional Resources
ADDITIONAL RESOURCES Check out this website for instructional videos on: • Connecting your Laser SmartHome devices with Google Home and Amazon Alexa. • Using Google and Amazon voice assistants to control your devices. • Setting up scenarios and automations. •... - Page 27 Can I register my devices to another Laser SmartHome account? • A device can only be linked to one Laser SmartHome account. • If you want to connect the device to a different account or pass it on to a family member, you must first remove it from your account.
- Page 28 Tap > to send us an unbinding request via the app. Can I stream live video if I'm travelling overseas? Yes, just make sure your smartphone with Laser SmartHome app and Laser SmartHome devices are connected to the internet. Additional charges for international data roaming may apply.
- Page 29 • Make sure notifications are enable within the Laser SmartHome app (see page 5-6). • Make sure the Laser SmartHome app is running in the background. If you restarted your phone, open the app again. • Check the 'Do Not Disturb' toggle in the...
- Page 30 This can cause delays in notifications. To fix this: • Go to Settings > Apps. • Find Laser SmartHome in the apps list and tap on it. • Tap Battery. • Change from 'Optimized' to 'Unrestricted' to allow the app to run in the background without interference.
-
Page 31: Troubleshooting
TROUBLESHOOTING The device does not appear on the app: • If the camera's blue LED is not blinking rapidly, tilt the camera up, locate the Reset button, press it with a pin until it beeps, then let go. Wait for the camera to restart and confirm it's ready to connect. - Page 32 TROUBLESHOOTING continued... • If both 2.4GHz and 5GHz bands are using the same SSID, find the settings that allow you to separate the 2.4GHz and 5GHz bands. Usually, there will be an option to configure each band individually. Change the SSID for one or both bands to make them distinct.
-
Page 33: Specifications
Built-in microphone and speaker Wi-Fi standard 802.11 b/g/n Wi-Fi Freq. 2.4GHz External storage microSD card slot (supports up to 256GB) Laser SmartHome (supported on Android 6.0 and up; iOS 11.0 and up) Voice control Amazon Alexa, Google Assistant Power USB-C... - Page 35 Thank you for your purchase! Laser Corporation is 100% Australian owned & operated. To get the most out of your product please read the user manual carefully and keep for future use. For specific information relating to your product such as Spare Parts, FAQs, Warranty claims, and...
- Page 36 Visit our website www.laserco.com.au Check us out at www.youtube.com/lasercoau...
Need help?
Do you have a question about the LSH-FHD360 and is the answer not in the manual?
Questions and answers