Advertisement
Quick Links
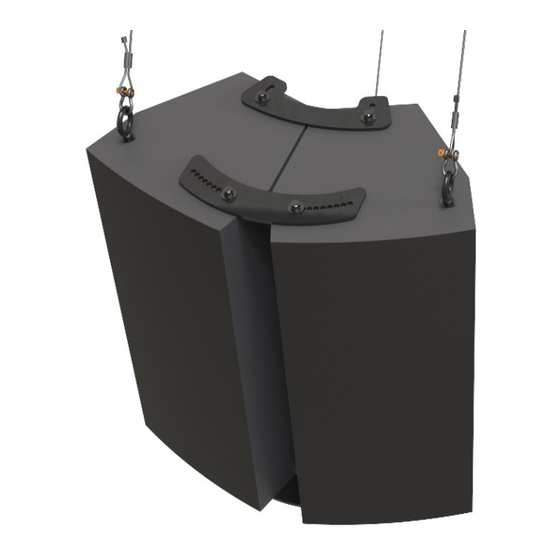
Installation Guide
EYEBOLT
M10X1.5-35mm
(2X)
FLAT WASHER
M10 (2X)
FRONT
JOINER
PLATE (2X)
Figure 1
1 of 2
The FP-CX121-2X1 planar array kit gives designers, contractors and audio
consultants the ability to create a two Renkus-Heinz CX121 series speakers in a
tight pack configurations. The FasPac ™ provides a method of flying a tight pack
array while offering the capability of allowing cabinets to be adjusted relative to
each other to find the optimum sound directivity. A series of holes are provided to
easily adjust the splay angle from 0° to 20° at an increment of 2.5 degree.
Note to installers
Due to the wide variety of wall structures, materials and mounting methods, the
installing contractor must exercise proper judgment in selecting the mounting
area and hardware.
As a guide, the installation, when complete should be capable of supporting 5
times the applied load. Always use a back up safety system such as a safety cable.
To assure a trouble free installation, read through and follow these instructions
carefully before beginning. If you have doubts about
the integrity of the structure you are mounting to or you are not
sure about the proper hardware to use, consult a structural and/or hardware
specialist.
Be sure that all of the following items are included in this kit before proceeding:
2 pcs Front Joiner Plate
2 pcs Rear Joiner plate
1 pc Instruction sheet
Note: Screws and washers to attach speaker to adapter plate are not included
BTNHD SCREW
M10X1.5-45mm (8X)
SPLIT LOCK WASHER ,M10 (8X)
FLAT WASHER ,M10 (8X)
REAR JOINER PLATE (2X)
FP-CX121-2X1
1 pc Hardware kit
Step 1: Flip speakers so that the bottom is facing up. Unscrew
existing speaker screw and discard.
Step 2: Determine the splay angle of the speaker and the holes to
use on the front joiner plate (Figure 2).
Step 3: Bottom of speaker
Install the rear joiner pull back plate on the rear inserts of the
speaker using the slots of the plate (Figure 1). Install the other front
joiner plate on the two front rigging inserts using the corresponding
holes for the appropriate splay angles. Use the provided M10 screws,
lock washer and flat washers. Do not tighten screws; leave it snug
until all plates are in position.
Step 4: Top of speaker
Slowly flip the speaker assembly so that the tops of the speakers
are facing up. Install another rear joiner plate on the rear rigging
inserts. Use the slot on the joiner plate.
Step 5: Install another front joiner plate on the two front rigging
inserts using the same holes as on the bottom plate. Use the
provided M10 screws, lock washer and washer to secure the plate
(Figure 1).
Step 6: When all plates are in position, tighten all screws
permanently.
Step 7: Install M10x 35mm long eyebolts to the top of the speaker
as shown (Figure 1).
REV00-01302024
Advertisement

Related Manuals for Adaptive Technologies Group FP-CX121-2X1


Summary of Contents for Adaptive Technologies Group FP-CX121-2X1
- Page 1 Installation Guide FP-CX121-2X1 The FP-CX121-2X1 planar array kit gives designers, contractors and audio consultants the ability to create a two Renkus-Heinz CX121 series speakers in a tight pack configurations. The FasPac ™ provides a method of flying a tight pack array while offering the capability of allowing cabinets to be adjusted relative to each other to find the optimum sound directivity.
- Page 2 EYEBOLT M10X1.5-35mm (2X) Figure 4 2 of 2 REV00-01302024 Adaptive Technologies Group ALWAYS INSTALL SAFETY CABLES 1635 E. Burnett Street | Signal Hill, CA 90755 USA WARNING: Mounting and/or suspension loudspeakers requires experienced Ph: 562.424.1100 | Fax: 562.424.3520 professionals. Improperly installed loudspeakers can result in property www.adapttechgroup.com...
Need help?
Do you have a question about the FP-CX121-2X1 and is the answer not in the manual?
Questions and answers