Table of Contents
Advertisement
Available languages
Available languages
Quick Links
Advertisement
Table of Contents

Related Manuals for KitchenAid KCO128


Summary of Contents for KitchenAid KCO128
- Page 1 COUNTERTOP OVEN HORNO PARA MOSTRADOR KCO128...
-
Page 2: Parts And Features
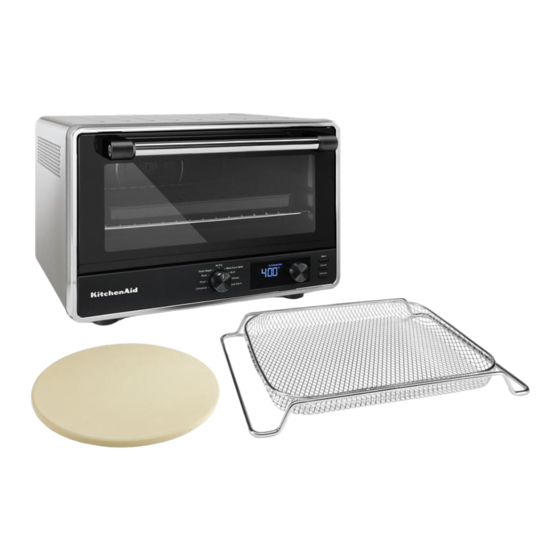
PARTS AND FEATURES Toughened Glass Window Mode Knob: Cooking Mode Selector Removable Crumb Tray Preheating Icon Cool Down Surface for Removable Toast Icon Oven Rack Bagel Icon Chrome-plated Steel Broiling Rack Shade Icon Enamel-coated Pan Fresh Icon Chrome-plated Steel Oven Rack Frozen Icon Door Handle Minutes Icon... -
Page 3: Product Safety
Authorized Service Facility for examination, repair, or electrical or mechanical adjustment. 6. If the supply cord is damaged, it must be replaced by the KitchenAid, its service agent or similarly qualified persons in order to avoid a hazard. - Page 4 15. Extreme caution should be exercised when using containers constructed of materials other than metal or glass. 16. Do not store any materials, other than KitchenAid recommended accessories, in this Countertop Oven when not in use. 17. Do not place any of the following materials in the Countertop Oven: Paper, cardboard, plastic, or anything similar.
-
Page 5: Electrical Requirements
ELECTRICAL REQUIREMENTS Voltage: 220 V~ Frequency: 50 Hz Power: 1650 W If the plug does not fit in the outlet, NOTE: contact a qualified electrician. Do not modify the plug in any way. Do not use an adapter. Do not use an extension cord. If the power supply cord is too short, have a qualified electrician or service technician to install an outlet near the appliance. -
Page 6: Getting Started
GETTING STARTED Before first use, clean all parts and accessories (see Care and Cleaning section). Place “ ” the Countertop Oven on a dry and flat level surface. Remove all packaging materials and labels, if present. Open the door and align the rack with Make sure all sides are positioned with at the grooves for desired positions (see least 4”... -
Page 7: Cooking Functions
GETTING STARTED TIME RECOMMENDATION - AIR FRY FUNCTION FOOD PORTION TEMPERATURE TIME Chicken Nuggets 1 Layer 425°F (218°C) 8-10 minutes Chicken Tenders 1 Layer 425°F (218°C) 13-15 minutes Chicken Wings 1 Layer 425°F (218°C) 18-20 minutes Fish Fillets 1 Layer 450°F (232°C) 12-14 minutes Fish Sticks 1 Layer 450°F (232°C) 10-12 minutes French Fries 1 Layer... - Page 8 COOKING FUNCTIONS RECOMMEND COOKING TEMPERATURE PRESET RACK PRESET TEMP. PREHEAT FUNCTION RANGE TIME POSITION 80–180°F Dehydrate Upper/Lower 150°F (66°C) 6 hours (27–82°C) 75-90°F Proof Lower 90°F (32°C) 30 minutes (24–32°C) 150–450°F Air Fry Lower 400°F (204°C) 17 minutes Auto (66–232°C) 150–450°F Bake Lower 350°F (177°C) 30 minutes Auto...
-
Page 9: Using The Dehydrate Function
COUNTERTOP OVEN RACK POSITION Bottom rack position for Air Fry, Bake, Dehydrate, Keep Warm, Pizza, Proof, Reheat Top rack position for Broil, Dehydrate USING THE DEHYDRATE FUNCTION Dehydrate option is to remove moisture content from veggies or fruits to dry and preserve them. - Page 10 USING THE DEHYDRATE FUNCTION IMPORTANT: Always use oven mitts when removing pans or racks. When the time has elapsed, the end signal will sound and the Countertop Oven will shut off automatically. USING THE PROOF FUNCTION The Proof function maintains a warm environment useful for rising yeast.
- Page 11 USING THE PIZZA (FROZEN/FRESH) FUNCTION The Pizza function distributes power to the top and bottom heating elements to maintain the desired Oven temperature to cook homemade or Frozen pizza. The preset temperatures are 400°F (204°C) for Frozen and Set the Mode Knob to Pizza. 450°F (232°C) for Fresh pizza.
- Page 12 USING THE TOAST OR BAGEL FUNCTION In Toast mode, your oven distributes power to the top and bottom heating elements to maintain the desired oven temperature. In Bagel mode, the oven distributes power between the top and bottom heating elements to nicely brown the top of cut bagels while gently warming the outside.
- Page 13 USING THE AIR FRY FUNCTION When the time has elapsed, the end signal Open the door and place the food on the center of the rack. Close the door. will sound and the Countertop Oven will Press Start to start the cycle. shut off automatically.
-
Page 14: Using The Reheat Function
USING THE BROIL FUNCTION Only the top cooking elements heat when the Broil function is selected. Use the included broil pan directly on the oven rack for even browning and easy cleanup. The broil pan may also be used for the Bake and Warm settings. -
Page 15: Using The Keep Warm Function
USING THE REHEAT FUNCTION Open the door and place the food on the When the time has elapsed, the end signal center of the Rack. Close the door. will sound and the Countertop Oven will Press Start to start the cycle. shut off automatically. -
Page 16: Care And Cleaning
USING THE KEEP WARM FUNCTION Open the door and place the food on the When the time has elapsed, the end signal center of the rack. Close the door. will sound and the Countertop Oven will Press Start to start the cycle. shut off automatically. -
Page 17: Troubleshooting
TROUBLESHOOTING WARNING Electrical Shock Hazard Plug into a grounded 3 prong outlet. Do not remove ground prong. Do not use an adapter. Do not use an extension cord. Failure to follow these instructions can result in death, fire, or electrical shock. PROBLEM SOLUTION Check to see if the oven is plugged into a grounded 3 prong... -
Page 18: Piezas Y Características
PIEZAS Y CARACTERÍSTICAS Ventana de vidrio reforzado Perilla de temperatura/temporizador Bandeja para migas removible Perilla de modos: Selector de modo de cocción Superficie de enfriamiento para la Icono de Preheating (Precalentamiento) parrilla extraíble del horno Parrilla asadora de acero cromado Icono de Toast (Tostar) Recipiente esmaltado Icono de Bagel (Rosca) -
Page 19: Seguridad Del Producto
6. Si se ha dañado el cable de suministro de energía, deberá ser reemplazado por el KitchenAid, el agente de servicio o una persona similarmente calificada con el fin de evitar riesgos. - Page 20 16. No guarde ningún material diferente de los accesorios recomendados por KitchenAid en este horno para mostrador cuando no esté en uso. 17. No ponga ninguno de los siguientes materiales en el Horno para mostrador: papel, cartulina, plástico o similares.
-
Page 21: Requisitos Eléctricos
REQUISITOS ELÉCTRICOS Tensión: 220 V~ ADVERTENCIA Frecuencia: 50 Hz Potencia: 1650 W Si el enchufe no encaja en el NOTA: tomacorriente, póngase en contacto con un electricista calificado. No modifique el enchufe de ninguna manera. No use un adaptador. Peligro de Choque Eléctrico No utilice un cable de extensión. - Page 22 INTRODUCCIÓN Antes del primer uso, limpie todas las piezas y accesorios (consulte la sección Cuidado “ y limpieza ). Coloque el horno para mostrador en una superficie seca, plana y nivelada. ” Quite todos los materiales de empaque y las etiquetas, si los hay. Abra la puerta y alinee la parrilla con las Asegúrese de que todos los lados queden ranuras para las posiciones deseadas...
- Page 23 INTRODUCCIÓN RECOMENDACIONES DE TIEMPO: FUNCIÓN AIR FRY (FREÍDO SIN ACEITE) ALIMENTOS PORCIÓN TEMPERATURA TIEMPO Croquetas de pollo 1 capa 425 °F (218 °C) 8-10 minutos Frituras de pollo 1 capa 425 °F (218 °C) 13-15 minutos Alitas de pollo 1 capa 425 °F (218 °C) 18-20 minutos Filetes de pescado...
- Page 24 FUNCIONES DE COCCIÓN FUNCIÓN POSICIÓN TEMPE- RANGO DE TIEMPO PREHEAT RECOMENDADA RATURA TEMPERA- PREFIJADO (PRECALENTAR) COCCIÓN DE LA PARRILLA PREFIJADA TURA Dehydrate 80–180°F Superior/Inferior 150 °F (66 °C) 6 horas (Deshidratar) (27–82°C) Proof 75-90 °F Inferior 90 °F (32 °C) 30 minutos (Leudar) (24–32 °C)
- Page 25 POSICIÓN DE LA PARRILLA DEL HORNO PARA MOSTRADOR Posición inferior de la parrilla para Air Fry (Freír sin aceite), Bake (Hornear), Dehydrate (Deshidratar), Keep Warm (Mantener caliente), Pizza (Pizza), Proof (Leudar), Reheat (Recalentar) Posición superior de la parrilla para Broil (Asar a la parrilla), Dehydrate (Deshidratar) USO DE LA FUNCIÓN DEHYDRATE (DESHIDRATAR) La opción Dehydrate (Deshidratar) se utiliza para eliminar la humedad del contenido de...
- Page 26 USO DE LA FUNCIÓN DEHYDRATE (DESHIDRATAR) IMPORTANTE: Use siempre guantes de cocina al extraer las bandejas o parrillas. Cuando haya pasado el tiempo, sonará la señal de término y el horno para mostrador se apagará automáticamente. USO DE LA FUNCIÓN PROOF (LEUDAR) La función Proof (Leudar) mantiene un ambiente cálido adecuado para que la levadura levante.
- Page 27 USO DE LA FUNCIÓN PIZZA (PIZZA) (FROZEN/ FRESH [CONGELADA/FRESCA]) La función Pizza (Pizza) distribuye la potencia entre las resistencias superior e inferior para mantener la temperatura deseada del horno para cocinar pizza casera o congelada. Las temperaturas prefijadas son 400 °F (204 °C) para pizza congelada y 450 °F Ponga la perilla de modos en Pizza (Pizza).
- Page 28 USO DE LA FUNCIÓN TOAST (TOSTAR) O BAGEL (ROSCA) En el modo Toast (Tostar), el horno distribuye la potencia entre los calentadores superior e inferior para mantener la temperatura deseada. En el modo Bagel (Rosca), el horno distribuye la potencia entre los calentadores superior e inferior para darle un dorado agradable a la parte superior de las roscas cortadas y, a su vez, calentar la parte externa.
- Page 29 USO DE LA FUNCIÓN AIR FRY (FREÍR SIN ACEITE) Cuando haya pasado el tiempo, sonará Abra la puerta y coloque los alimentos en el centro de la parrilla. Cierre la puerta. la señal de término y el horno para Presione Start (Inicio) para iniciar el ciclo. mostrador se apagará...
- Page 30 USO DE LA FUNCIÓN BROIL (ASAR A LA PARRILLA) Cuando se seleccione la función Broil (Asar a la parrilla), solamente se calentarán los elementos superiores. Use la bandeja de asar a la parrilla incluida directamente sobre la parrilla del horno para conseguir un dorado uniforme y una limpieza fácil.
- Page 31 USO DE LA FUNCIÓN REHEAT (RECALENTAR) Abra la puerta y coloque los alimentos en el Cuando haya pasado el tiempo, sonará centro de la parrilla. Cierre la puerta. la señal de término y el horno para Presione Start (Inicio) para iniciar el ciclo. mostrador se apagará...
-
Page 32: Cuidado Y Limpieza
USO DE LA FUNCIÓN KEEP WARM (MANTENER CALIENTE) Abra la puerta y coloque los alimentos en el Cuando haya pasado el tiempo, sonará centro de la parrilla. Cierre la puerta. la señal de término y el horno para Presione Start (Inicio) para iniciar el ciclo. mostrador se apagará... -
Page 33: Solución De Problemas
SOLUCIÓN DE PROBLEMAS ADVERTENCIA Peligro de Choque Eléctrico Conecte a un contacto de pared de conexión a tierra de 3 terminales. No quite la terminal de conexión a tierra. No use un adaptador. No use un cable eléctrico de extensión. No seguir estas instrucciones puede ocasionar la muerte, incendio o choque eléctrico. -
Page 34: Garantía Y Servicio
GARANTÍA Y SERVICIO CERTIFICADO DE GARANTÍA DE PEQUEÑOS ELECTRODOMÉSTICOS DE LA MARCA KITCHENAID GARANTÍA VÁLIDA SÓLO EN EL PAÍS DE ADQUISICIÓN DEL PRODUCTO GARANTIZADO IMPORTANTE: Este Certificado o Tarjeta de Garantía debería presentarse junto a la factura o boleta de compra o recepción original del producto garantizado. Para Colombia: la factura será... - Page 35 ésta Garantía se podrá efectuar de forma personal y/o telefónica y/o por correo electrónico al Centro de Atención al Cliente del Garante. CERTIFICADO DE GARANTÍA DE PEQUEÑOS ELECTRODOMÉSTICOS DE LA MARCA KITCHENAID Derechos del Beneficiario / Titular: •...
- Page 36 Marca: Tamaño o capacidad (si aplica): Material y color predeterminado CERTIFICADO DE GARANTÍA DE PEQUEÑOS ELECTRODOMÉSTICOS DE LA MARCA KITCHENAID Para hacer efectiva esta garantía: • Este documento deberá ser presentado para cualquier trámite relacionado con la garantía de productos adquiridos dentro de los países que se mencionan a continuación. Si usted compró...
- Page 37 Notes...
- Page 38 Notes...
- Page 39 Notes...
- Page 40 ©2024 All rights reserved. 04/24 W11668987A...
Need help?
Do you have a question about the KCO128 and is the answer not in the manual?
Questions and answers