Table of Contents
Advertisement
Quick Links
Advertisement
Table of Contents

Related Manuals for Power Technologies AC-MINI


Summary of Contents for Power Technologies AC-MINI
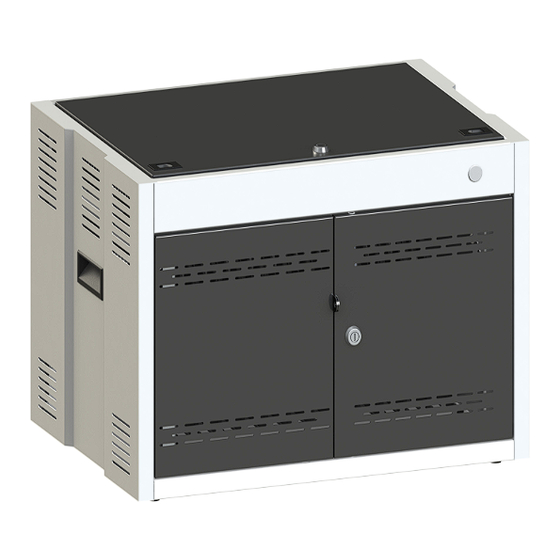
- Page 1 AC-MINI 12 BAY CONFIGURABLE CHARGING CABINET USER MANUAL...
-
Page 2: Product Information
Product Information The AC-MINI is designed to charge and store upto 12 Laptops, Chromebooks or tablets. Specifications: Model AC-MINI Inch 16 (H) x 24.5 (W) x 17.75 (D) Cabinet Dimensions 406 (H) x 622 (W) x 451 (D) Inch 14.375 (D) x 10.875 (H) & Divider Spacing: 1.125 Shelf Dimensions 365 (D) x 276 (H) &... - Page 3 Refer to the part numbers below and cord end diagrams for your specific region. MODEL# AC-MINI DESCRIPTION AC-MINI AC-MINI-12, 12 Bay Full-Featured Charging Cabinet - 110V NA (Legacy Number) CAB-MINI-B12K-D AC-MINI-12, 12 Bay Full-Featured Charging Cabinet - 110V NA CAB-MINI-B12K-E AC-MINI-12, 12 Bay Full-Featured Charging Cabinet - 220V EU...
- Page 4 Product Information The AC-MINI is designed to charge and store up to 12 Chromebooks or tablets. NOTE: Please review this guide before installing devices and to learn how to safely use your cart. Removable Top Panel Push Handle Carry Handle...
- Page 5 Keyed Door Lock Power Adapter Area Device Cord Pass Thru Retracting Front Doors Removable Dividers Front View Of Cabinet (Front & Top Door Open) 42035 Zevo Drive Temecula, CA 92590 | 888-650-4488 | www.powertechnologies.com PT-AC-MINI Manual_Rev2023-10...
- Page 6 • Top area is used to hold the device accessories, power adapter and allow power cables. Power Outlet Strips IEC Power Cord Mounting Holes Rear View of Cabinet 42035 Zevo Drive Temecula, CA 92590 | 888-650-4488 | www.powertechnologies.com PT-AC-MINI Manual_Rev2023-10...
-
Page 7: Mounting To A Wall
Mounting To A Wall • The AC-MINI is designed to be either placed on top of a desk or anchored to a wall and must be installed by a qualified technician. Before mounting, use a level and measure the mounting holes. - Page 8 Step-3: Remove Retaining Strip. Step-4: Pull forward, then up, to remove the Divider. Step-5: Re-install Divider Retaining Strip & all thumbscrews. 42035 Zevo Drive Temecula, CA 92590 | 888-650-4488 | www.powertechnologies.com PT-AC-MINI Manual_Rev2023-10...
- Page 9 Step-5: Open the Front Door & weave device cables into tabs, then fasten each cable to the divider by pressing down firmly on the supplied Cable Clips. 42035 Zevo Drive Temecula, CA 92590 | 888-650-4488 | www.powertechnologies.com PT-AC-MINI Manual_Rev2023-10...
- Page 10 Setting Up 15 - 17” Devices • For devices which are larger than 14” in length, configuring the AC-MINI is as simple as adjusting the device shelf. • The factory default position (Position 1), is perfect for Chromebooks, iPads, tablets and Netbooks.
-
Page 11: Power Requirements
Review your device’s AC Adapter wattage, multiplying it by 12. 65 Watts x 12 Devices Watts 1440 120 Watts x 12 Devices Watts 1800 150 Watts x 12 Devices Watts 42035 Zevo Drive Temecula, CA 92590 | 888-650-4488 | www.powertechnologies.com PT-AC-MINI Manual_Rev2023-10... -
Page 12: Safety Instructions
DO NOT allow children to move cord with this unit. or climb. ------------------------------------------------------------ Date Of Purchase: ------------------------------------------------------------ Reseller Name: ------------------------------------------------------------ PO Number: DO NOT over extend the power cord ------------------------------------------------------------ 42035 Zevo Drive Temecula, CA 92590 | 888-650-4488 | www.powertechnologies.com PT-AC-MINI Manual_Rev2023-10... -
Page 13: Troubleshooting
• Remove power cord replace as firmly. and plug in a PC needed monitor style IEC Power Cord. Plug in both Left side power cords: 42035 Zevo Drive Temecula, CA 92590 | 888-650-4488 | www.powertechnologies.com PT-AC-MINI Manual_Rev2023-10... -
Page 14: Further Information
Further Information For further information on this product and others, contact Power Technologies at. Power Technologies 42035 Zevo Dr Temecula, CA 92590+ 888.650.4488 support@powertechnologies.com www.powertechnologies.com 42035 Zevo Drive Temecula, CA 92590 | 888-650-4488 | www.powertechnologies.com PT-AC-MINI Manual_Rev2023-10...
Need help?
Do you have a question about the AC-MINI and is the answer not in the manual?
Questions and answers