Advertisement
Quick Links
WATKINS WELLNESS
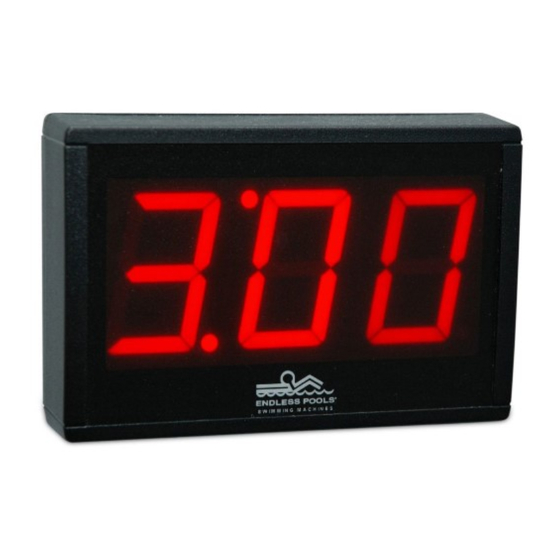
Endless Pool Fitness Systems Digital Pace Display
Parts List:
Swim Pace Display Kit
•
Swim Pace Display Unit (EP3)
•
14" (35.6cm) Velcro tape
•
50' (15.2m) communication cable
•
Water-tight enclosure fitting
Description:
The Digital Pace Display, which can be mounted indoors or outdoors, provides a useful indication of the speed of the swim
current/treadmill in any Endless Pool product. The display will show the pace the swim current/treadmill is creating. A
swim current configuration is the equivalent of swimming 100yards (or 100 meters if set to metric) in the indicated
amount of time. The hydraulic treadmill display will read as miles per hour (or kilometers per hour). Any Pace Display can
be set for a percentage (2-100).
Planning and Considerations:
The Pace Display can be placed wherever it is convenient and visible to the swimmer. It is weather resistant, though relia-
bility is enhanced if it is placed in a somewhat protected location free from frequent or heavy rainfall. The large, bright
LED characters and non-glare face are well suited for use in direct sunlight, but visibility is improved when the unit is
mounted in shade. The display brightness can be reduced for indoor use.
The display unit should be mounted near the pool where it is easily visible while swimming. The Velcro mounting tape
allows you to attach the unit to virtually any surface.
The Pace Display gets its signal and power through a communication cable from the controller. Make sure your mounting
location allows you to route the cable easily from the controller. A 50ft (15.2m) long cable is provided with the Pace Dis-
play.
Display Mounting:
1.
Open the case of the pace display by grasping the front side of the case and care-
fully squeeze the top and bottom together at each end. This will disengage the
latches holding the front and back together.
2.
Locate the 8 dip switches on the circuit board. Verify dip switch #1 is ON (UP Posi-
tion). See Figure 1
3.
Once you have selected an appropriate mounting location use the provided Velcro
tape to secure the pace display to the surface.
4.
Clip the communication cable into the receptacle in the bottom of the display. See
Figure 1
™
•
•
•
(EP3)
Tools Required
Staple gun
Hammer
Drift or punch
1
Make sure dip switch
#1 is ON (Up Position)
Communication cable
receptacle
Figure 1
D60016 0417
Advertisement

Related Manuals for Endless Pools WATKINS WELLNESS EP3


Summary of Contents for Endless Pools WATKINS WELLNESS EP3
- Page 1 WATKINS WELLNESS ™ Endless Pool Fitness Systems Digital Pace Display (EP3) Parts List: Swim Pace Display Kit Tools Required • • Swim Pace Display Unit (EP3) Staple gun • • 14” (35.6cm) Velcro tape Hammer • • 50’ (15.2m) communication cable Drift or punch •...
- Page 2 Endless Pool Fitness Systems Digital Pace Display Installation (EP3) Wiring: DANGER Disconnect power to system before opening the equipment compartment and performing any maintenance involving electrical equipment Route the cable to the controller making sure it is well-secured and poses no hazards.
- Page 3 Endless Pool Fitness Systems Digital Pace Display Installation (EP3) The first parameter that must be set is the type of treadmill. Once is displayed press the Selection (On/Off) button to access this parameter/sub-menu. Use the Up or Down (Faster or Slower) button to navigate to (Chain Drive Treadmill), press the Selection (On/Off) button to confirm.
- Page 4 Endless Pool Fitness Systems Digital Pace Display Installation (EP3) Once the controller has fully restarted the screen will go blank. Use the blue remote and press the combination UP, DOWN, UP, DOWN, UP, DOWN continuously until you see displayed on the pace display screen. The first parameter that must be set is the type of swim current.
- Page 5 Endless Pool Fitness Systems Digital Pace Display Installation (EP3) TREADMILL PACE DISPLAY NAVIGATION TABLE MAIN MENU SUB-MENU (Default) Type of Treadmill Percentage Mode Chain Drive Treadmill Escape Sub Menu Units Units Unit of Measure In English System In Metric System Escape Sub Menu Control Mode Controlled by the blue...
Need help?
Do you have a question about the WATKINS WELLNESS EP3 and is the answer not in the manual?
Questions and answers