Table of Contents
Advertisement
Quick Links
Advertisement
Table of Contents
Troubleshooting

Related Manuals for Mowrator S1

Summary of Contents for Mowrator S1
- Page 1 User Manual Mowrator S1 21” - ZMLMS212WG1 V1.0 2024.04 Warning: To reduce the risk of injury, users must read and understand this User Manual before using this product. Please keep this manual properly for future reference. You can get the instructional video by scanning the QR code below.
- Page 2 Sincerely thank you for purchasing the high-quality Mowrator S1 21" smart lawn mower produced by Shenzhen Zongguan Innovation Co., Ltd.! Hope you enjoy using it. If you encounter any problems during use, or if you need to order replacement parts or apply for repairs, please contact us through the following methods, and we will arrange professionals to provide you with solutions as soon as possible.
-
Page 3: Table Of Contents
Security protection project ...................19 Optional Attachments ....................21 Firmware upgrade ....................21 Maintenance ......................22 Troubleshooting .....................23 Mowrator S1 Professional Remote Controller ..........27 Product description ....................27 Operating Instructions ..................28 Troubleshooting .....................34 Storage Guidelines ....................35 SteadyForce 56V 12&18Ah Battery ..............35 Safety Signs ...................... -
Page 4: Mowrator S1 21
Mowrator S1 21'' Safety Signs Safety signs and their instructions deserve your careful attention and understanding. The purpose of safety signs is to alert you to possible hazards. Safety signs by themselves do not eliminate any hazard and cannot be used for accident prevention. - Page 5 Keep away from Keep away from flammable materials to flammable materials prevent fires. Prevent burns. The arrow indicates the area with high temperature. Be careful to avoid touching it to prevent burns. Recyclable Recycling, can be reused for recycling after disposal. Read and understand Please read and understand the user the user manual.
- Page 6 Limit distance from The remote controller is recommended for remote controller. use within 65 feet of the machine. Clean the filter. The filter at the position indicated by the two arrows needs to be cleaned regularly. After placing the battery , Lock the clasp. Lock the battery clasp ⎓...
- Page 7 1. Keep children away from the mowing area and under responsible supervision, as a accident may occur if the operator is not alert to the presence of children. Children are often attracted to lawn mowers and lawn mowing activities. They do not understand the dangers involved.
- Page 8 6. When operating the machine, please always look at the range of movement of the machine and be ready to stop at any time. When the machine is traveling on non-working roads, please release the blade-start button to stop the blade rotation. 7.
- Page 9 1. Please check whether the blade is installed correctly, whether the blade screws are tight, and whether the blade is bent, cracked, worn or otherwise abnormal. If so, please replace the MOWRATOR special blade according to the manual instructions before operating the machine.
- Page 10 6. Before starting the blade, please adjust the blade to a suitable height level and confirm that the machine is in a safe position. 7. After powering on the blade, when you release the blade-start button on the remote controller, the blade should stop rotating immediately. If not, please stop using it immediately and contact an authorized service provider.
-
Page 11: Product Description
Please read this manual carefully to learn how to operate and maintain your product to avoid personal injury and product damage. You can visit the https://www.mowrator.com website to get the latest information on MOWRATOR. If you need repairs, replacement parts or other services, please contact the authorized service provider and provide the product model and serial number, which is on the nameplate in the battery compartment of the machine. - Page 12 Chassis Steering system Zero-Turn steering system (ZTR) Maximum walking speed 1.5 m/s 3.4 mph Maximum Climbing Cutting system Blade size 21 in Blade cover DC06 High strength metal material Maximum cutting torque 6 ft lb Blade height 1.8-4.6 in, 5 adjustable gears, (1.8, 2.2, 2.9, 3.6, 4.6 in) Blade speed Max 3200 rpm (can be manually adjusted)
- Page 13 Battery life 12Ah Battery 18Ah Battery Light load 1.5~2h 2.25~3h Medium load 1~1.5h 1.5~2.25h Heavy load 0.5~1h 0.75~1.5h Note:Actual run time will vary depending on grass quality (variety, density, moisture, etc.). How to improve battery life: The cut-off height should not exceed one-third of the height of the grass at one time. Use a self-sharpening, low-lift blade.
-
Page 14: Unboxing
2.When the ultrasonic radars detect an obstacle, it will reduce the walking speed or stop the machine. This can be relieved by controlling the machine to move in the direction without obstacles. For different obstacle distances, the corresponding indicator lights and machine status are as follows: Obstacle distance Indicator color... - Page 15 Install drive wheels Steps: ①.Install the drive wheel into the travel motor with the tire pattern pointing in the forward direction of the machine. ②.Align the three triangular arrows on the hub cover with the triangular arrows on the motor and install the hub cover. ③.Insert and tighten 6 screws(M4x25mm)into the 6 holes on the hub cover to complete the installation.
- Page 16 Install the grass outlet cover Steps: ①.Align the 4 holes on the grass outlet cover with the 4 holes on the grass outlet. ②.Install and tighten 4 screws(M4x6mm)to complete the installation. ③.Pay attention to avoid pressing the sensor wire for cover opening. Install the grass bag Note: Before installing the grass bag, please check whether the grass bag is damaged.
-
Page 17: Usage Guide
Note:Before use, please check the two magnet sensors on the metal frame of grass bag to see if it is damaged or missing. If it is, it will cause the machine to abnormally report an error. Please replace it or contact after-sales service. Install the mulching insert If you want to shred the grass instead of discharging it out or collecting it into the grass bag, open the grass outlet cover, and insert the mulching insert in the direction of the... - Page 18 ①. Insert the cable plug into the holder on the battery. Note that the plug needs to be inserted to the bottom. ②. Press and hold the power button on the battery until the 4 indicator lights light up in sequence, and then the startup is completed.
- Page 19 Blade selection The standard configuration of MOWRATOR is a low-lift blade. You can choose a high-lift blade or a high-lift shredding blade according to your needs. name Function Illustration Extended runtime blade A conventional blade can meet the needs of most lawn mowing scenarios.
- Page 20 ②.Place the machine upright ③.Turn counterclockwise to remove the screws (fig1) ④.Replace blade and turn the screw clockwise to tighten (fig2) fig1 fig2 Cleaning the blade cover The blade cover is equipped with a quick-release water inlet for connecting the faucet. You can clean the inner wall of the blade cover by filling the inlet with water.
- Page 21 Note:In order to ensure that the machine can achieve the best results every time you use it, please clean the machine in time after each operation is completed. Indicator light status Light status Meaning Action Steady green Everything is fine with ——...
-
Page 22: Security Protection Project
Light status Meaning Action Steady Yellow There is a warning. For details, please refer to the warning content and operating tips on the remote controller screen. Steady Red There is an error. For details, please refer to the error content and operation tips on the remote controller screen. - Page 23 Protection item Triggering conditions Machine action Release condition Tilt protection The body tilt angle is Stop the blade The body tilt angle greater than 40°. rotation and is less than 35°. walking. Crash protection The bumper sensor is Stop the blade Manually release triggered when it hits an rotation and...
-
Page 24: Optional Attachments
3. Turn on the robot and connect the remote controller to the robot. 4. Use the included OTG cable to connect the remote controller and mobile phone. 5. Open the MOWRATOR APP and operate according to the prompts in the APP interface. -
Page 25: Maintenance
Maintenance 1. When maintaining the machine, please turn off the power and remove the battery. 2. Please clean the grass clippings, dust, mud and other attachments on the inner wall of the blade cover regularly. 3. Please check and tighten all the nuts, bolts, screws and other fasteners regularly. 4. -
Page 26: Troubleshooting
7. The machine can be stored upright, but it needs to be placed on a hard and stable ground, because if the machine tips over from the upright position, it may cause damage to the machine or personal injury. When the machine is in the upright position, always keep it stable and out of the reach of children. - Page 27 The robot detects safety For details, see the error content on hazards such as obstacles the remote controller screen. being too close, collision, Resolve the error condition and excessive tilt, opening of grass press the button on the remote outlet cover, over range of controller to clear the error state.
- Page 28 automatically on the chassis, and the stop button located on the remote controller. The robot detects safety See the error content on the remote hazards such as collisions, controller screen for details, handle opening of the grass outlet the error condition and clear the cover, and over range of error state on the remote controller.
- Page 29 No grass collection The blade is severely worn. Replace the blade or use a high-lift or poor grass blade. collection effect The blade height is too low or Increase the blade height, or wait the grass is wet. until the grass is dry before mowing, or reduce the spacing between lawn mowing routes.
-
Page 30: Mowrator S1 Professional Remote Controller
Mowrator S1 Professional Remote Controller Product description Mowrator S1 Professional Remote Controller is a remote control device specially designed for smart lawn mowers. It contains travel control joystick, blade motor control, mowing mode switch, etc. It contains cruise control button, auto left/right U-turn button, and other auxiliary driving function buttons. -
Page 31: Operating Instructions
Battery Built in 18650 lithium-ion battery Battery nominal voltage 3.6V Battery capacity 2550mAh Battery energy 9.18Wh Battery and charging Battery life Charging interface USB Type-C Charging voltage 5V⎓ Charging current Max 1A Charging time Resolution 320x480, 241 PPI Screen size 2.35 in Screen Color bits... - Page 32 Warning: Please remote control the machine within the visual range. When the ultrasonic radar or bumper sensor is turned off, the allowed remote control distance is Blade motor control 1. Press the left and right blade-start buttons with the index fingers of your left and right hands respectively.
- Page 33 Note: The higher the cutter head speed, the better the cutting effect and the shorter the battery life. Maximum movement speed adjustment Toggle the max movement speed switch to adjust the maximum speed of the machine. There are three gears from left to right, and the speed is from slow to fast. The corresponding maximum forward speeds are 0.8m/s, 1.2m/s, and 1.5m/s respectively.
- Page 34 b) Auto U-turn Short press the auto U-turn button, and the lawn mower will automatically complete the turn in the left or right direction. Triggering any other button or operating the joystick during the process will exit the auto U-turn. Display and operation of the touch screen After connecting the machine correctly, the homepage of the remote control screen will display as follows:...
- Page 35 Robot information display area This icon displays yellow to indicate that the ultrasonic radar in the corresponding direction has detected an obstacle, and displays red to indicate that the obstacle is too close (less than 30cm). Assisted driving status area When the corresponding icon lights up, it indicates that the assisted driving task is being performed.
- Page 36 Mode switch button:Touch to switch the robot function mode, including manual lawn mowing and manual leaf suction modes. Manual leaf suction mode is only applicable to MOWRATOR centrifugal fan blades (need to be purchased separately). Manual mowing mode is available with other MOWRATOR mowing blades.
-
Page 37: Troubleshooting
Note: Some dedicated chargers may not be able to charge the Mowrator remote control. Please use a more universal charger. Troubleshooting Fault name possible reason Solution Unable to turn on 1.Battery is exhausted. 1.Charge. Can't charge 1.Some dedicated chargers are not 1.Replace with a suitable... -
Page 38: Storage Guidelines
Storage Guidelines 1. Please place items in a cool, dry place away from direct sunlight. 2. If it will not be used for a long time, please make sure to charge the battery to more than 70% before storing it. 3. -
Page 39: Product Overview
Avoid placing the battery pack near anything that may cause a short circuit, such as paper clips, coins, keys, screws, nails, and other metal objects. 14.Prohibited for use on products other than Mowrator to avoid unknown risks and issues. - Page 40 70min 90min With Mowrator 600W Supercharger, Model 600CG4810L 1.5h 2.25h Battery life With Mowrator S1 series 3000 ㎡ (0.75 ac) 4500 ㎡ (1.125 ac) Single battery mowing area With Mowrator S1 series Battery type Lithium iron phosphate Number of charge cycles...
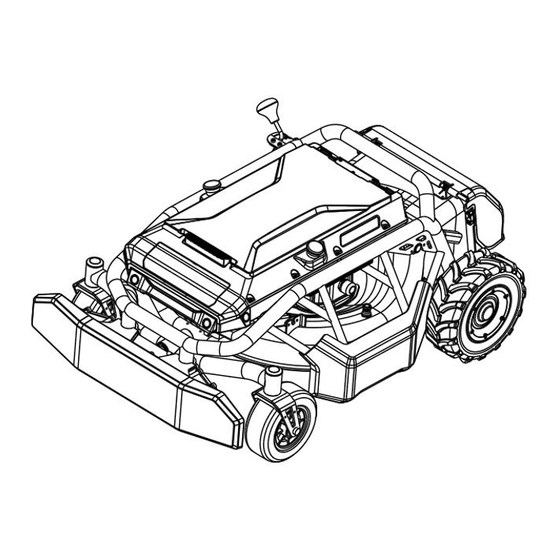
- Page 41 Charging over temperature, discharging over temperature, excessive total voltage, insufficient total BMS protection voltage, excessive individual voltage, insufficient individual voltage, individual imbalance, overcurrent, short circuit, communication anomaly protection support Product Introduction The names and functions of each component are illustrated in the diagram: Checking Battery Level Short press the power button to check the battery level.
- Page 42 62.5%~75% Solid Solid Solid 75%~87.5% Solid Solid Solid Blinking 87.5%~100% Solid Solid Solid Solid Battery Power On/Off Power On: Long press the power button to turn on the battery. During the long-press, indicator lights 1, 2, 3 and 4 will sequentially illuminate. Continue holding until all four indicator lights are fully lit, then release the button.
-
Page 43: Troubleshooting
Troubleshooting Issue Possible Causes Troubleshooting Battery Cannot Battery is completely Recharge the battery before use. Power On drained. Unable to charge 1.Charger malfunction. 1.Check if the charger is damaged. 2.Plug not properly 2.Ensure the plug is securely inserted. inserted. 3.Dirt between plugs. 3.Clean the plugs. -
Page 44: Warranty Guide
Visit https://www.mowrator.com for the latest User Manual. Shenzhen Zongguan Innovation Co., Ltd. (MOWRATOR) reserves the right to update this User Manual. Please be sure to read the entire User Manual carefully before using this product, and operate it only after you are familiar with the functions of the product. - Page 45 MOWRATOR may formulate. MOWRATOR is not responsible for any losses caused by the user's failure to use the product in accordance with this document and the "User Manual".
-
Page 46: Fcc Statement
Be sure to understand the relevant local laws and regulations. Mowrator is not responsible for any of your usage. Before using the Mowrator App, you must agree to the Mowrator App Terms of Use and the ZGI Privacy Policy. These Terms of Use and Privacy Policy limit some of Mowrator's legal liabilities, please read them carefully within the app. -
Page 47: Fcc Rf Exposure Information (Sar)
reasonable protection against harmful interference in a residential installation. This equipment generates, uses and can radiate radio frequency energy and, if not installed and used in accordance with the instructions, may cause harmful interference to radio communications. However, there is no guarantee that interference will not occur in a particular installation. If this equipment does cause harmful interference to radio or television reception, which can be determined by turning the equipment off and on, the user is encouraged to try to correct the interference by one or more of the...
Need help?
Do you have a question about the S1 and is the answer not in the manual?
Questions and answers