Table of Contents
Advertisement
Quick Links
Advertisement
Table of Contents

Related Manuals for Blomberg LTDIP08310


Summary of Contents for Blomberg LTDIP08310
- Page 1 Dryer User Manual LTDIP08310 2960314012_EN/ 22-02-24.(16:03)
- Page 2 Please read these instructions first before using your appliance Thank you for choosing a Blomberg appliance. Please take some time to read this user manual before using your appliance, to ensure you know how to safely operate the controls and functions.
-
Page 3: Table Of Contents
Table Of Contents 1 Safety Instructions ................5 1.1 Intended use .....................5 1.2 Safety of children, vulnerable persons and pets ..........5 1.3 Electrical Safety ....................6 1.4 Transporting safety ....................7 1.5 Installing safety ....................7 1.6 Usage safety .....................9 1.7 Maintenance and cleaning safety ..............11 1.8 Lighting safety ....................11 2 Environmental instructions.............. - Page 4 6 Running the product ................19 6.1 Control Panel ....................19 6.2 Symbols ......................19 6.3 Preparation of drying machine .................20 6.4 Program selection and consumption chart ............21 6.5 Auxiliary functions ....................23 6.6 Warning indicators ...................23 6.7 Starting the program ..................24 6.8 Child Lock .......................24 6.9 Changing the program after it is started ............24 6.10 Cancelling the program ..................25 6.11 End of program .....................25...
-
Page 5: Safety Instructions
1 Safety Instructions This section includes the safety instructions necessary to prevent the risk of personal injury or material damage. • Our company shall not be held responsible for damages that may occur if these instructions are not observed. • Installation and repair operations shall always be performed by Authorized Service. -
Page 6: Electrical Safety
• Electrical products are dangerous for children and pets. Children and pets shall not play with the product, climb on or get inside the product. • Keep the product door closed even when not operated. Children or pets could be locked inside the product and suffocate. •... -
Page 7: Transporting Safety
1.4 Transporting safety • Unplug the product prior to transport, empty the water tank and if any, remove the water drain connections. • This product is heavy, do not handle it by yourself. • Take required precautions for the product against falling and tipping. Do not crash or drop the product when transporting. - Page 8 • The product shall not be installed against a door, sliding door where the product loading door cannot be completely opened, or behind a hinged door where the product hinge is faced against the door’s hinges. • Install the product where periodic maintenance and cleaning can be done with ease.
-
Page 9: Usage Safety
• When the product is placed on the washing machine, their combined weight when full could be around 180 kg. Place the products on a sturdy floor that can carry adequate amount of load. • Washing machine cannot be placed on top of the drying machine. 1.6 Usage safety •... - Page 10 • To prevent back draft of gas in the room from the devices that consume other fuels, including open fire, appropriate ventilation shall be provided (for models with flue). • Do not operate the product together with heaters such as gas heater and a chimney.
-
Page 11: Maintenance And Cleaning Safety
1.7 Maintenance and cleaning safety • Do not wash the product by spraying or pouring water on it. Do not use a pressure cleaner, steam cleaner, hose or pressurised gun to clean the product. • Do not use sharp or abrasive tools to clean the product. •... -
Page 12: Environmental Instructions
2 Environmental instructions 2.1 Compliance with the WEEE Regulations and Waste Disposal This product does not contain the dangerous and prohibited materials indicated in the “Regulation on The Control of Waste Electrical and Electronic Equipment” published by Ministry of Environment and Urbanisation of Republic of Turkey. Complies WEEE Regulations. -
Page 13: Your Drying Machine
3 Your drying machine 3.1 Technical specifications Height (Min. / Max.) 84,6 cm / 86,6 cm* Width 59,8 cm Depth 54,6 cm Capacity (max.) 8 kg** Net weight (± %10) 42 kg Voltage Rated power input See type label*** Model code * Min. -
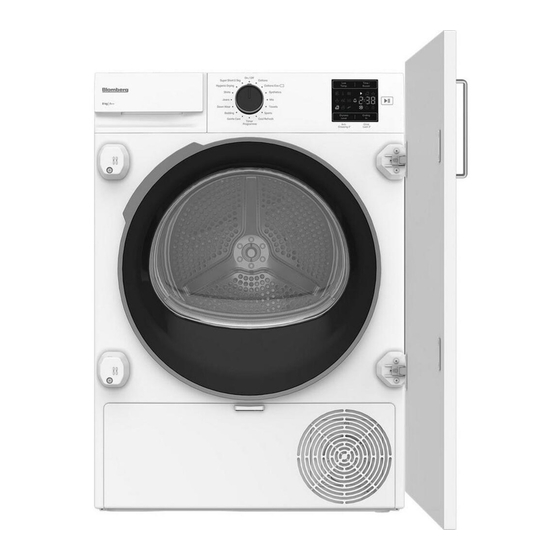
Page 14: General Appearance
3.2 General appearance 3.3 Scope of delivery 1. Water 6. Water discharge filling cap* hose* 2. Filter drawer 7. Pure spare Water* sponge* 8. Odour 3. User Capsule Manual Group* 4. Drying 9. Brush* basket* 5. Drying 10. Filter 1. Top panel basket user cloth* manual*... -
Page 15: Installation
4 Installation • Once the drying machine is installed, the connections must stay stable. After Read the “Safety Instructions” first! placing the drying machine, ensure that the back wall does not come in contact Before consulting the nearest Authorized with any extrusion (a water tap, electrical Service for installing the drying machine, see outlet etc.). -
Page 16: Adjusting The Stands
4.3 Adjusting the stands Until the drying machine stands level and sturdy, adjust the stands by turning them left and right. 4.4 Moving the drying machine • Drain the water in the drying machine completely. • If the product is connected via direct discharge, remove the hose connections. -
Page 17: Preparation
5.3 Preparing the laundry to be dried 5 Preparation Items such as coins, metal parts, needles, nails, screws, stones etc. may damage the drum group of the product or may cause functional Read the “Safety Instructions” first! operation issues. Therefore check all laundry that will be loaded to the product. -
Page 18: Correct Load Capacity
• If you are using environment friendly filter, you are not required to clean the filter after every cycle. When the environment friendly icon is lit on the screen, change the filter cloth. 5.5 Correct load capacity NOTICE If the laundry in the product exceed maximum load capacity, it may not... -
Page 19: Running The Product
6 Running the product 6.1 Control Panel 1. On/Off/Programme selection button. 4. End time and Child lock selection button. 2. Low temperature selection button. 5. Timer program and the audible warning selection button. 3. Dryness level and Wrinkle prevention selection button. 6. -
Page 20: Preparation Of Drying Machine
6.3 Preparation of drying machine • Plug the drying machine. • Open the loading door. • Place the laundry to the drying machine without jamming them. • Push and close the loading door. NOTICE Ensure that no laundry is jammed to the loading door. -
Page 21: Program Selection And Consumption Chart
6.4 Program selection and consumption chart Programmes Programme Description You can dry your heat-resistant cotton textiles with this programme. A drying setting suitable for Cottons 1000 the thickness of the products to be dried and the desired level of dryness should be selected. It dries single layer, casual cotton textiles in the Cottons Eco 1000... - Page 22 It is the programme that you can dry your washed products you want to provide with extra Hygienic Drying hygiene (baby clothes, underwear, towels, etc.). It provides high hygiene for your textiles via heat effect. Use this program to have 2 shirts ready for Super Short 0.5kg 1200 ironing.
-
Page 23: Auxiliary Functions
3. Press the End Time selection button and Allergy UK is the trademark of set the delay time you wish. End time LED the British Allergy Foundation. turns on. (When pressed and hold the The Seal of Approval has been button, End Time proceeds non-stop). -
Page 24: Starting The Program
Cleaning of filter drawer/ 6.9 Changing the program after it is started heat exchanger You can change the program you selected to Warning symbol flashes periodically to remind dry your laundry with a different program after that filter drawer must be cleaned. the drying machine starts running. -
Page 25: Cancelling The Program
Do not touch the inner surface of the drum while adding or removing clothes during a continuing program. The drum surface is hot. 6.10 Cancelling the program If you want to cancel the program and ter- minate the drying operation for any reason after the drying machine starts running, turn the On/ Off/Program Selection button after pressing the Start / Standby selection button;... -
Page 26: Maintenance And Cleaning
7 Maintenance and cleaning Ensure that hair, fibre and cotton balls do not fall into the slot where the filters are installed. Read the “Safety Instructions” first! • Open both of the lint filters (outer and inner) and remove the fibres with your hands or 7.1 Lint filters (internal and external with the brush on the air deflector. -
Page 27: Cleaning The Sensor
7.2 Cleaning the sensor The drying machine has humidity sensors that detect whether the laundry is dry. To clean the sensors: Open the drying machine loading door. If the machine is hot due to drying operation, wait until it cools. Clean the metal surfaces of the sensor with a soft cloth dampened with vinegar and then dry. -
Page 28: Cleaning The Condenser
Condensed water is not potable Move the latches to water! open the air deflector Do not remove the water tank as a lid. program is running! If you do not empty the water tank, during the Pull the brush to the next drying sessions the machine will stop left to remove it. - Page 29 After the cleaning process is completed, Do not have weight place the air deflector on the toe board cover to its place, when it is open. move the latches to close it and close the toe board. Do not use abrasive materials or NOTICE steel wool to clean the drum.
-
Page 30: Troubleshooting
8 Troubleshooting The drying operation takes too long. Fibre filter (interior and exterior filters) pores may be clogged. >>> Wash the fibre filters with warm water and dry them The front side of the condenser may be clogged. >>> Clean the front side of the condenser. The ventilation grills in front of the machine may be closed. - Page 31 The fibre filter cleaning icon is lit. Fibre filters (interior and exterior filters) may be unclean. >>> Wash the filters with warm water and dry them. A layer may be formed in the fibre filter pores, leading to clogging. >>> Wash the filters with warm water and dry them.
-
Page 32: Electrical Connection
9. Electrical Connection manufacturer, its service agent or similarly qualified people. Make sure that you have an earthed power Do not operate without the top outlet socket rated at 13 amps (minimum). cover fitted. Risk of injury. !Attention 9.1 When installed, the socket must be Important reachable after installation, or a separate switch (which can disconnect the two poles) - Page 33 PRODUCT FICHE Complying Commission Delegated Regulation (EU) No 392/2012 BLOMBERG Supplier name or trademark LTDIP08310 Model name 7188303540 Rated capacity (kg) Air Vented Type of Tumble Dryer Condenser Energy efficiency class Annual Energy Consumption (kWh) Automatic Type of Control Non-automatic...
- Page 34 Dryer / User manual...
- Page 35 H: 863 mm H: 883 mm Dryer / User manual...
- Page 36 Dryer / User manual...
- Page 37 Dryer / User manual...
- Page 38 Dryer / User manual...
- Page 39 Dryer / User manual...
- Page 40 Dryer / User manual...
- Page 41 Dryer / User manual...
- Page 42 Dryer / User manual...
- Page 43 Dryer / User manual...
- Page 44 Dryer / User manual...
- Page 45 Accidental damage, misuse or abuse of a product. An attempted repair of a product by anyone other than a Blomberg Approved Engineer (the “Engineer”). Installation or use of a product where such installation or use fails to meet the requirements contained in this guarantee or the User Instructions Booklet.
- Page 46 11. Optional extras, where available (i.e. extendable feet) are supplied on a chargeable basis only. Does Blomberg offer replacements? This is a repair-only guarantee. On occasion, the Manufacturer may at its sole discretion, replace your product with a new product instead of carrying out a repair. Where a replacement is offered, this would normally be an identical model but when this is not possible, a model of similar specification will be provided.
- Page 47 You can register by first visiting blomberguk.com/register and by following the online instructions. All Blomberg appliances come with a 3 year parts and labour guarantee as standard. When you register your appliance for the Optima Inverter Motor 10 year guarantee, you are also registering your appliance for the standard 3 year parts and labour guarantee.
- Page 48 HOW TO OBTAIN SERVICE FOR YOUR APPLIANCE Please keep your purchase receipt or other proof of purchase details in a safe place; you will need to have this documentation available should the product require attention under guarantee. Please take a few moments to complete the details below, as you will need this information when you call us, or to use our online services.
Need help?
Do you have a question about the LTDIP08310 and is the answer not in the manual?
Questions and answers