
Subscribe to Our Youtube Channel
Related Manuals for Laser SPK-DABFM-429


Summary of Contents for Laser SPK-DABFM-429
- Page 1 User Manual Scan QR code to check your local DAB+ digital radio coverage or visit: https://www.digitalradioplus.com.au/can-i-get- digital-radio DAB+ Radio with FM SPK-DABFM-429...
-
Page 2: Safety Precautions
SAFETY PRECAUTIONS • Before operating the radio, read and understand all safety instructions. • Avoid using the radio near water or moisture. • Do not install the radio near heat sources such as radiators, stoves, or other devices that produce heat. -
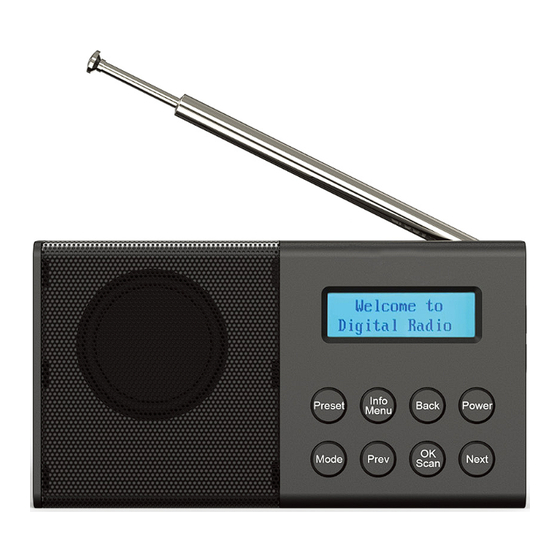
Page 3: What's In The Box
WHAT'S IN THE BOX • DAB+ Radio • USB-A to USB-C cable • User manual You may also need: • 5V USB-A power source (like a wall adaptor, powerbank, laptop/PC) to power/recharge the battery. - Page 4 CONTROLS...
- Page 5 CONTROLS continued... 1. Speaker 2. Telescopic antenna Extend to improve DAB+ and FM reception. 3. Volume up 4. Volume down 5. USB-C charging port 6. Power indicator light 7. 3.5mm stereo headphones jack 8. Preset Press: Recall preset. Press and hold: Store presets. 9.
- Page 6 CONTROLS continued... through saved stations. In FM mode, press to go back frequency by 0.05MHz. In FM mode, press and hold to reverse scan for the next station. In menu settings, move through options. 14. OK/Scan Press: Confirm menu selection. In DAB+ and FM modes, press and hold to auto- scan the frequency band.
-
Page 7: Operation
OPERATION • Fully charge the battery before using your radio for the first time. • Plug one end of the included cable into the radio and the other end into a USB-A power source like a wall adaptor, power bank or PC/laptop. The power light will turn red. - Page 8 OPERATION - DAB+ • Fully extend the telescopic antenna vertically. • Press Mode, and switch to DAB mode. • Press and hold OK/Scan for auto scanning DAB+ frequencies. All found stations will save. NOTE: If no signals are found, move the radio for better reception, or refer to a DAB+ coverage map.
- Page 9 OPERATION - DAB+ continued... • To store presets: • Tune to desired station. • Press and hold Preset. • Use Prev or Next to select preset number. • Press OK to save; up to 40 presets allowed. • To access presets: •...
- Page 10 OPERATION - DAB+ Menu options • Press and hold Info/Menu to see menu options. • Use Prev or Next to navigate through menus. • Press Back to return to the previous menu. • Confirm selection by pressing OK. • The currently selected option is marked with an asterisk (*).
- Page 11 OPERATION - FM • Extend the telescopic antenna fully, preferably in a vertical position. • Press Mode to switch to FM mode. • Press and hold OK/Scan button to scan for FM stations. All found stations will be saved in presets; up to 40 presets allowed.
- Page 12 OPERATION - FM continued... • For manual frequency scanning: • Press and hold Next to scan up the frequency band. Your radio will stop at the next available station. • Press and hold Prev to scan down the frequency band. Your radio will stop at the previous station.
- Page 13 OPERATION - FM Menu options • Press and hold Info/Menu to see menu options. • Use Prev or Next to navigate through menus. • Press Back to return to the previous menu. • Confirm selection by pressing OK. • The currently selected option is marked with an asterisk (*).
-
Page 14: Operation - Bluetooth
OPERATION - BLUETOOTH 1. Press Mode to switch to Bluetooth mode. 2. Open the Settings app on your smartphone or tablet. 3. In Settings, scroll down and tap "Connections" or "Bluetooth," depending on your device. 4. Toggle the Bluetooth switch to turn it on if it's off. 5. - Page 15 OPERATION - SET ALARM NOTE: Ensure the radio displays the correct date and time before you set an alarm. • Press and hold Info/Menu to see menu options. • Use Prev or Next to navigate through menus. • Press Back to return to the previous menu. •...
- Page 16 OPERATION - SET ALARM continued... 9. Set alarm status to On/Off to activate/deactivate it. Press OK to save. If alarm is On, Alarm 1 and/or Alarm 2 symbols will show on the LCD display. • When the alarm sounds, press the Power button to turn it off.
- Page 17 MENU OPTIONS - SYSTEM • Press and hold Info/Menu to see menu options. • Use Prev or Next to navigate through menus. • Press Back to return to the previous menu. • Confirm selection by pressing OK. • The currently selected option is marked with an asterisk (*).
-
Page 18: Menu Options
MENU OPTIONS - SYSTEM continued... • Timeout - Set duration (10, 20, 30, 45, 60, 90, 120, 180 seconds, Off - backlight always on) • Language Select display language: English, German, Italian, French, Norwegian, Swedish, Danish, Polish, Finnish. • Factory Reset Select Yes and press OK to reset settings to factory defaults. -
Page 19: Troubleshooting
TROUBLESHOOTING No/poor reception • Extend and position the telescopic antenna vertically. Adjust its direction or the radio's location for better reception. • Ensure there are no large metal objects or electronics nearby causing interference. • Perform a factory reset by navigating to System >... - Page 20 TROUBLESHOOTING continued... No Power: • Charge the rechargeable battery fully by connecting the radio to a 5V USB power source using the included USB cable. The power light will turn red when charging. • Ensure the power cable is correctly inserted into both the radio and the USB power source.
-
Page 21: Specifications
SPECIFICATIONS Frequency DAB+: 170-240 MHz range FM: 87.5-108 MHz Bluetooth version Bluetooth SPK-DABFM pairing name Speaker Power input DC 5V 1A Rechargeable 1200mAh battery capacity Dimensions - 120×24×64 mm (L×W×H) - Page 22 Thank you for your purchase! Laser Corporation is 100% Australian owned & operated. To get the most out of your product please read the user manual carefully and keep for future use. For specific information relating to your product such as Spare Parts, FAQs, Warranty claims, and...
- Page 23 Visit our website www.laserco.com.au Check us out at www.youtube.com/lasercoau...
Need help?
Do you have a question about the SPK-DABFM-429 and is the answer not in the manual?
Questions and answers