Table of Contents
Advertisement
Quick Links
MW18Ti60Hz
Commercial Microwave Oven
Operation Manual
PLEASE KEEP THIS DOCUMENT FOR FUTURE REFERENCE
www.maestrowave.com
customerservice@maestrowave.com
Sole Worldwide Distributor:
R H Hall, Hallco House, Beacon Court, Pitstone Green Business Park, Pitstone, Bedfordshire, LU7 9GY
Tel: 01296 663400
Email: customerservice@rhhall.com
Web: www.rhhall.com
Advertisement
Table of Contents

Related Manuals for maestrowave MW18Ti60Hz


Summary of Contents for maestrowave MW18Ti60Hz
- Page 1 MW18Ti60Hz Commercial Microwave Oven Operation Manual PLEASE KEEP THIS DOCUMENT FOR FUTURE REFERENCE www.maestrowave.com customerservice@maestrowave.com Sole Worldwide Distributor: R H Hall, Hallco House, Beacon Court, Pitstone Green Business Park, Pitstone, Bedfordshire, LU7 9GY Tel: 01296 663400 Email: customerservice@rhhall.com Web: www.rhhall.com...
-
Page 2: Table Of Contents
PRECAUTIONS TO AVOID POSSIBLE EXPOSURE TO EXCESSIVE MICROWAVE ENERGY 1. Do not attempt to operate this oven with the door open since open-door operation can result in harmful exposure to microwave energy. It is important not to disable or tamper with the safety interlocks. 2. -
Page 3: Important Safety Instructions
IMPORTANT SAFETY INSTRUCTIONS When using electrical appliances, basic safety precautions should be followed, including the following: WARNING! To reduce the risk of burns, electric shock, fire, injury to persons or exposure to excessive microwave energy: 1. Use this appliance only for its intended use as described in the manual. Do not use corrosive chemicals or vapours in this appliance. -
Page 4: Grounding Instructions
24. WARNING! If the door or door seals are damaged, the oven must not be operated until it has been repaired by a competent person. 25. The appliances are not intended to be operated by means of an external timer or separate remote-control system. 26. -
Page 5: Installation Guide
INSTALLATION GUIDE 1. Make sure that all the packing materials are removed from the inside of the door. 2. WARNING! Check the oven for any damage, such as misaligned or bent door, damaged door seals or sealing surface, broken or loose door hinges and latches and dents inside the cavity or on the door. If there is any damage, do not operate the oven and contact qualified service personnel. -
Page 6: Before Calling For Service
BEFORE CALLING FOR SERVICE Before asking for service, please check each item below: Check to ensure the oven is plugged in securely. If not, remove the plug from the outlet, wait 10 seconds, and plug it in again securely. ... -
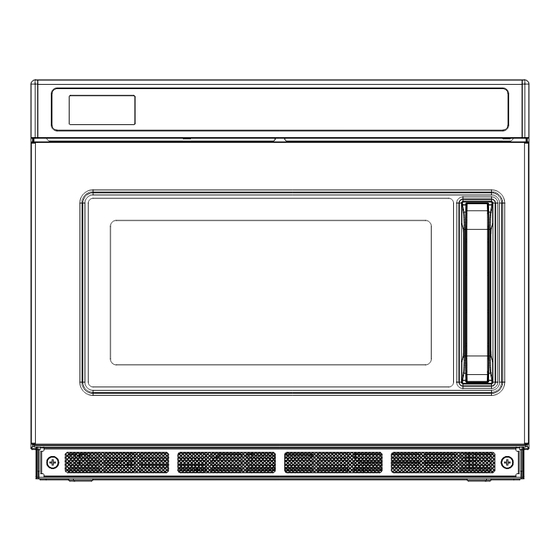
Page 7: Product Diagram
PRODUCT DIAGRAM 1. Door Safety Lock System 2. Oven Window 3. Cavity Base 4. Control Panel CONTROL PANEL DISPLAY Cooking time, power and indicators are displayed. POWER PROG Press to set power level. etc. Use to store program, memory lock, lamp, ... -
Page 8: Operation Instructions
OPERATION INSTRUCTIONS When the oven is first plugged in, the display shows for 2 seconds and a beep will sound, then returns to standby mode and the display shows "0". During setting, if no action is taken within 1 minute, the oven will return to standby mode. ... -
Page 9: Auto Cook
The system has 297 auto cook menus to be selected. You can adjust the power and time by operating the control panel or using a USB with Menu Creator™ software to download/upload menu settings. See pages 11-13 for further details. To start menu cooking program: For example: To start A-04 menu. -
Page 10: Change Rate
HANGE RATE You can change the rate through the memory settings, change range: 0.1 times - 3.0 times. For example: To set b4 menu with 1.8 times. In standby mode, open the oven door and place the food, close it. Press PROG button once. -
Page 11: Set Memory Functions
ET MEMORY FUNCTIONS The memory function includes: memory setting locking function, oven lamp setting function, buzzer setting function, power saving mode setting function and restore factory settings. Memory setting locking function: In standby mode, open the oven door. The oven door must remain open throughout this process. Press and hold PROG button for 3 seconds. -
Page 12: Using Menu Creator™ Software
Warranty Registration Form (link in page footer). We will send you a link to download the Menu Creator™ Software, as well as a free USB stick for use with your Maestrowave Microwave Oven. Or you can contact customerservice@rhhall.com... -
Page 13: Uploading And Downloading Menu Creator™ Programs Via Usb
To upload to your Maestrowave Microwave Oven, the file must be saved with the name ‘menufile.hex’ Add the required menu file to your USB stick, ready for upload to the machine. This should be the only file on the USB stick. -
Page 14: Child Lock
HILD LOCK The lock prevents unsupervised operation by children. To set: In standby mode, press and hold STOP button for 3 seconds, the oven will automatically enter child lock mode and the lock indicator light will turn on. In the lock state, all buttons are disabled. To cancel the child proof lock: In child lock mode, press and hold STOP button for 3 seconds, the system will return to standby mode the display will show "0". -
Page 15: Cleaning And Care
11. Your Maestrowave product is designed and manufactured with high quality materials and components which can be recycled and reused. At the end of its life, it should be disposed of separately from household waste. Please dispose of this equipment at your local community waste collection/recycling centre. - Page 16 Sole Worldwide Distributor: R H Hall Hallco House, Beacon Court Pitstone Green Business Park Pitstone, Bedfordshire LU7 9GY Tel: 01296 663400 Email: customerservice@rhhall.com...
Need help?
Do you have a question about the MW18Ti60Hz and is the answer not in the manual?
Questions and answers