Advertisement
- 1 Introduction
- 2 Product Contents
- 3 Diagram
- 4 Specifications
- 5 Operating Guide: Charging
- 6 Operating Guide: Vaping Dry Herbs
- 7 Operating Guide: Vaping Dry Herbs
- 8 Operating Guide: Timer
- 9 Operating Guide: Toggles & Indicators
- 10 Cleaning
- 11 Sterilising in 3 steps
- 12 Nectar Club Subscription
- 13 Warnings
- 14 YouTube Support Videos
- 15 Nectar Customer Support
- 16 Documents / Resources
Introduction
At Nectar, we develop products which allow customers to utilise the benefits of cannabinoids whilst eliminating the intake of toxins and carcinogens.
We strive for 100% customer satisfaction. If you have any queries about our products or services then please get in touch (scan/click the relevant QR Code below, or see the last page for full contact details):
We look forward to hearing from you.


Product Contents

1x Nectar v2
1x Charging Cable
1x Accessory Kit
1x QR Code Card
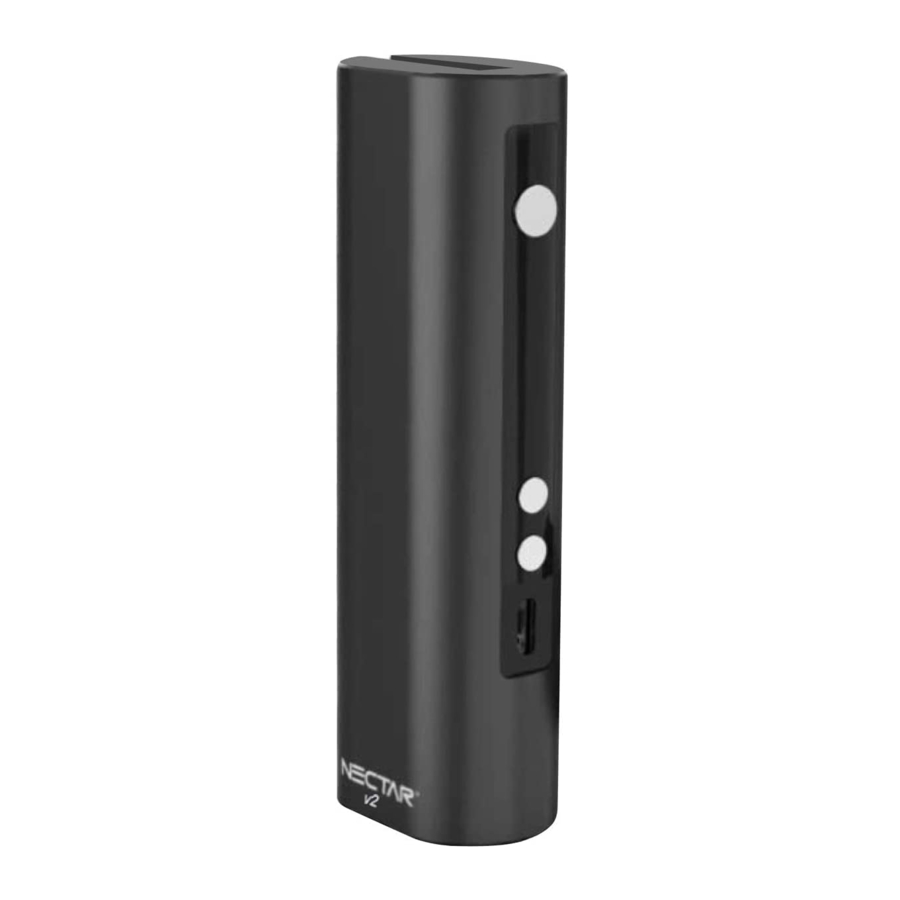
Diagram

Specifications
 | Dimensions 9.4cm x 3.1cm x 2.1cm |  | Device Weight 124g |
 | Colour Matte Black |  | Battery Capacity 2600mAh (20A) |
 | Compatible Ingredients Dry Herbs |  | Materials Ceramic Chamber/ Aluminium Body/ Zirconia Mouthpiece |
 | Temperature Range 100°C - 225°C / 212°F - 437°F |  | Temperature Precision 5°C Increments |
Operating Guide: Charging
It is recommended to charge your Nectar v2 for 1 hour before its first use. When charging, the OLED screen will turn on and show the battery charging gauge which will blink whist charging. The OLED screen will indicate a full gauge and will stop blinking when the battery is fully charged.
Note: Avoid overcharging to protect and extend the battery life.

After using the device allow it to cool down before storage. Store it in a dry and cool place to protect it against the effects of weather and avoid damage to the battery. Store out of reach of children.
Operating Guide: Vaping Dry Herbs
- Sterilising
Detach the chamber cover by turning the vaporizer upside down and pressing on one edge of the cap. Before using your Nectar v2 and after charging it you should sterilise it.
![]()
- Packing your chamber/bowl
Position your device upside on a flat surface. Grind your herbs and pour them into the chamber (at least half full for best results). Press the herbs softly to compact them slightly but avoid overcompacting as this will restrict airflow.
![]()
- Turning your device on
Press the power button 5 times to turn on the device. You should now see two temperatures:
![]()


- The 'set' temperature (the one you select - blinking).
- The 'run' temperature (the one detected in real-time).
Your device should vibrate once when it turns on.
Top Tip: If the chamber cap gets stuck insert the clearing rod through the mouthpiece hole and push it all the way through until you push out the mouthpiece.
Operating Guide: Vaping Dry Herbs
- Setting the temperature
Press the 'up' and 'down' buttons to increase and decrease your set/desired temperature. Press the power button to start heating your device. Once the set/desired temperature has been reach the device will vibrate.
![]()
- Vaping your herbs
Once the desired temperature has been reached, wait another 20s in order to give your herbs time to heat evenly. When ready, take long, slow and smooth tokes - lasting around 5-10s per toke (without pressing any buttons).
![]()
- Choosing a temperature
There is no such thing as an optimum temperature - it is down to your personal preference and the quality of the herbs being vaped. We suggest to start on 180C and go up in increments of 10C until you find your favourite temperature.
![]()


Operating Guide: Timer
The Timer
The device is automatically set to a timer which automatically turns the device off after 5 minutes to ensure the battery is conserved and the device does not overheat. Once the timer is reached and the device turns off, another vibration will alert you that the device has turned off.

Operating Guide: Toggles & Indicators
Temperature Units
To toggle the temperature setting between Celsius and Fahrenheit, press and hold the 'down' button for 2 seconds.

Haptic Feedback
To toggle the vibrate function on and off, press and hold the 'up' button for 3 seconds. Your device vibrates when turned on/off and also when the safety function is activated: If your device is left untouched for more than 60s whilst turned on, the temperature will automatically begin to drop to 120°C (it will vibrate to notify you). The device will begin to increase its temperature once picked up again.

Overview

Cleaning
- Prepare for cleaning
Before cleaning your device, it is important to allow your device to completely cool down in order to avoid injuries. Once cooled, detach your chamber cap and prepare your device for cleaning by brushing away any loose leaf.
![]()
- Detaching the mouthpiece
To detach or replace your mouthpiece, grip it tightly between your thumb and forefinger and pull it out. The bearings secure it in place so don't be shy of using force when pulling it out.
![]()
- Cleaning the mouthpiece
Soak a pipe cleaner with isopropyl alcohol (ISO) and scrub the inside of the mouthpiece. Wipe away the ISO using a clean/dry pipe cleaner. You can clean the outside of the mouthpiece with a cloth dipped in ISO.
![]()
Note: Regularly cleaning your device will improve its lifespan and flavour. - Cleaning the heating chamber
Soak a cotton swab or cleaning brush with ISO. Insert into the chamber and scrub the sides and bottom with a circular motion and repeating the process until you are satisfied. Then dry using a clean and dry cloth or cotton swab.
![]()
- Cleaning the airflow path
Soak a pipe cleaner with ISO and floss through the airflow path via both ends. Drive the clearing rod through the airflow path by inserting it through either end and pushing out leftover residue material. Then dry with a new pipe cleaner, sterilise and use.
![]()
- Cleaning the chamber filters
Use an cloth dipped is ISO or use alcohol pads to rub away any residue and clean each chamber filter individually. Put your device back together, sterilise and use.
![]()


Sterilising in 3 steps
- Prepare for Sterilising
Before sterilising your device, ensure it has been sufficiently charged. If sterilising after a clean, ensure your parts have been wiped dry with a clean cloth before proceeding to the next step. - Setting your temperature
Set your vaporizer to the maximum temperature (240°C) by holding the temperature 'up' button until your desired temperature is reached. See Page 5 for more information. - Sterilising
Allow the device to heat for 5 minutes with an empty chamber in order to sterilise it. The device has a built in 5-minute timer and hence it will turn itself off once the sterilisation process in complete.
Repeat this step twice. Once without the cooling unit detached and once with the cooling unit attached.
Note: Isopropyl Alcohol (ISO) evaporates faster than water therefore any ISO on your vaporizer should evaporate within a minute or so after cleaning, however it is still good practise to sterilise your vaporizer after each clean.
Nectar Club Subscription
Designed to pay for itself.
"Receive a FREE upgrade/vaporizer once every 2 years"

Scan the QR Code to see our monthly plans. Sign up now to receive:
- Receive a refurbished version of your device every year.
- Lifetime Insurance (Covers Accidental Breakage).
- Receive products worth up to £613.19 every 2 years.
- Receive a FREE upgrade/vaporizer once every 2 years. Receive a lifetime discount (up to 15% off sitewide).
+ MORE!

Warnings
Liquids & Cleaning
Do not submerge the whole device or its chamber into water, isopropyl alcohol (ISO), or any other substance. Do not use the device with viscous liquids/oils as this may block the airflow holes.
Condensation Treatment
Condensation can be caused by the surrounding environment or by breathing into the device. The condensation can be wiped away and is no cause for alarm. Simply turn the pod upside down and shake the pod lightly to get rid of this issue.
Charging
Do NOT charge your device with a charger consisting of more input than 5V/1A. Do not leave your device with no charge for periods over 2 months as this will cause a reduction in future capacity and possibly battery failure.
Law & Age
This device can be used for various herbs and extracts, some of which may be considered restricted or illegal in some countries. Please check your local jurisdictions for legality and minimum age restrictions.
YouTube Support Videos
Scan the QR Codes below to subscribe to our channel.
Subscribe to our channel


Nectar Customer Support
Scan a QR Code or click the icons below to get in touch:
WhatsApp

+44 773 2415 188
Avg. Response: 0.5 hours
Email

info@nectarmedicalvapes.com
Avg. Response: 2 hours
Telephone

+44 207 050 0737
Avg. Response: 30 seconds
Documents / Resources
References
Download manual
Here you can download full pdf version of manual, it may contain additional safety instructions, warranty information, FCC rules, etc.
Advertisement


Need help?
Do you have a question about the V2 and is the answer not in the manual?
Questions and answers